Tag Archives: blog

Pearls and Black Eyed Peas

IMG_1656_1

A few weeks ago my hubby and I visited Washington, DC to get away and enjoy each others company. Because we really just wanted to relax and not do a lot of sightseeing we stayed close to the hotel. We also took most of our meals at the hotel. Fortunately, the main restaurant served some delicious food and gave me a few ideas for new recipes.

IMG_1661_1

One night I chose to have grilled salmon (my favorite fish) with a side of black eyed peas and Israeli couscous. I was interested in tasting the Israeli couscous because I had just purchased a box of it from Trader Joe’s and I wasn’t sure of how to prepare it. Plus, I liked the look of the box. I sometimes chose new foods to try based on how they look. I think it is a true statement that we eat with our eyes and presentation is important when serving a meal.

IMG_1675_1

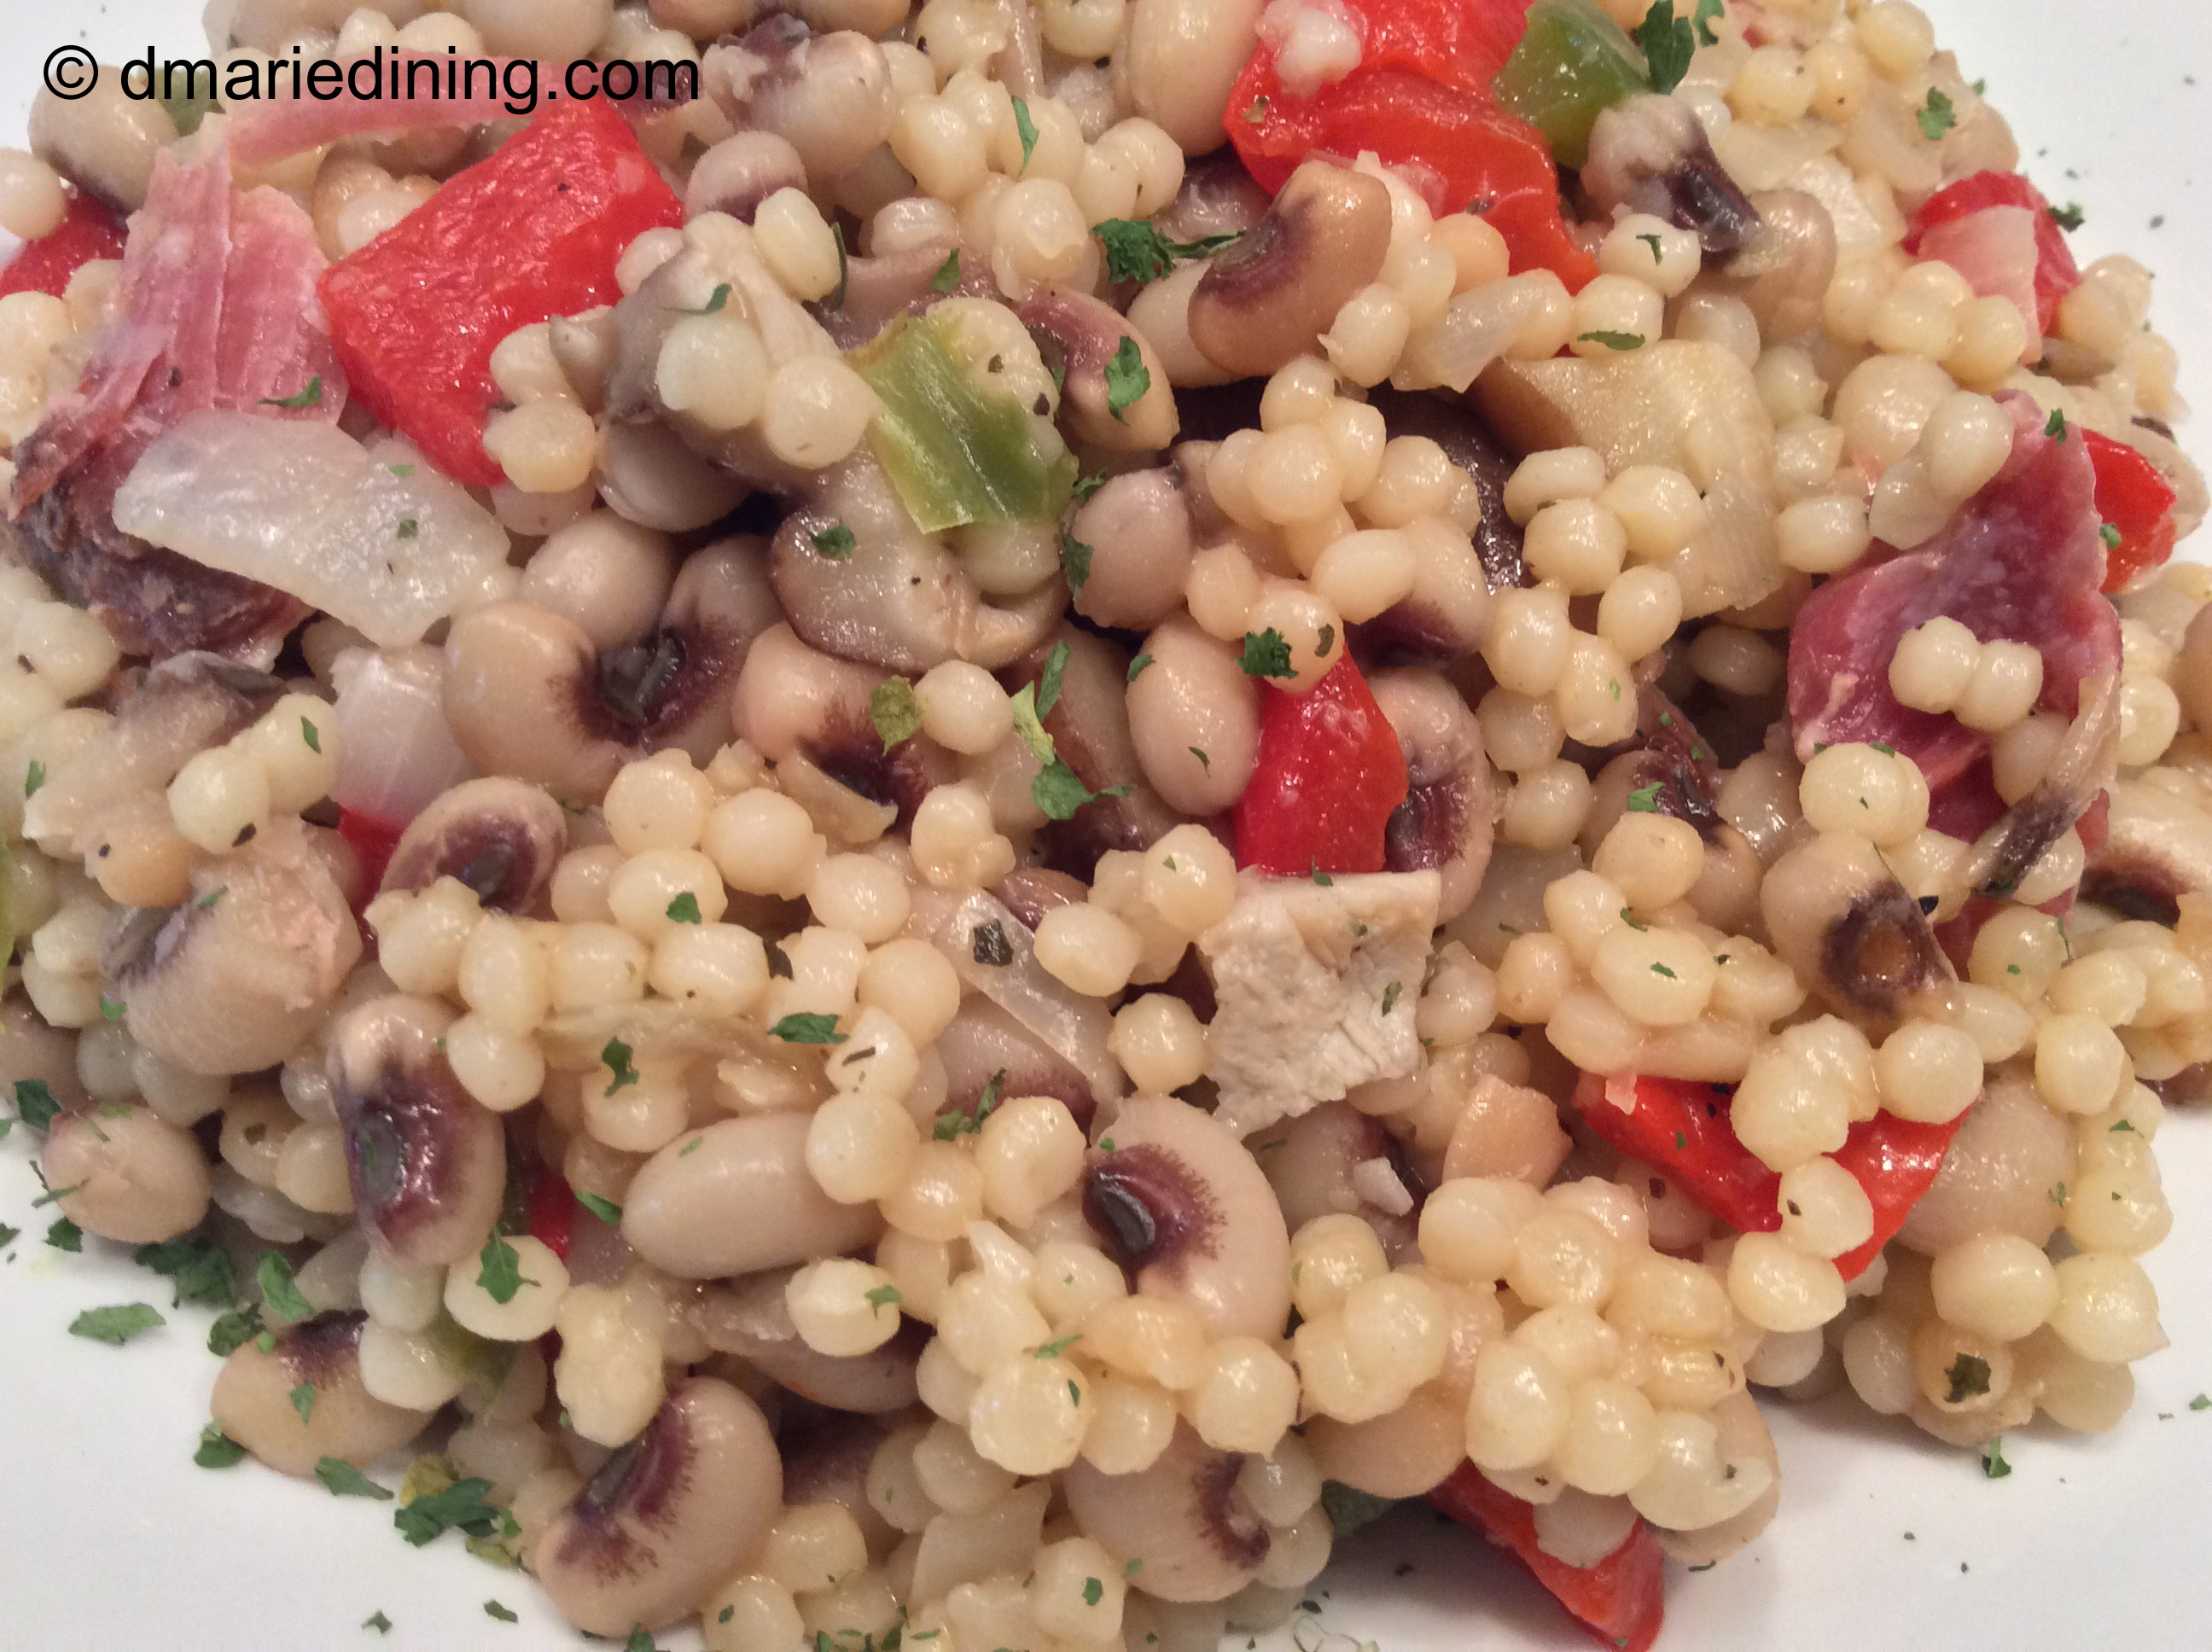
The black eyed peas and Israeli couscous was absolutely wonderful. It was full of flavor and I liked the texture of the pearl sized couscous. Israeli couscous is larger in size than regular couscous and resembles tapioca pearls. The side dish also included lots of other vegetables like zucchini, corn, onions and mushrooms. As soon as I tasted the black eyed peas and couscous I knew I had found a new recipe to try using my box of Israeli couscous.

IMG_1699_1

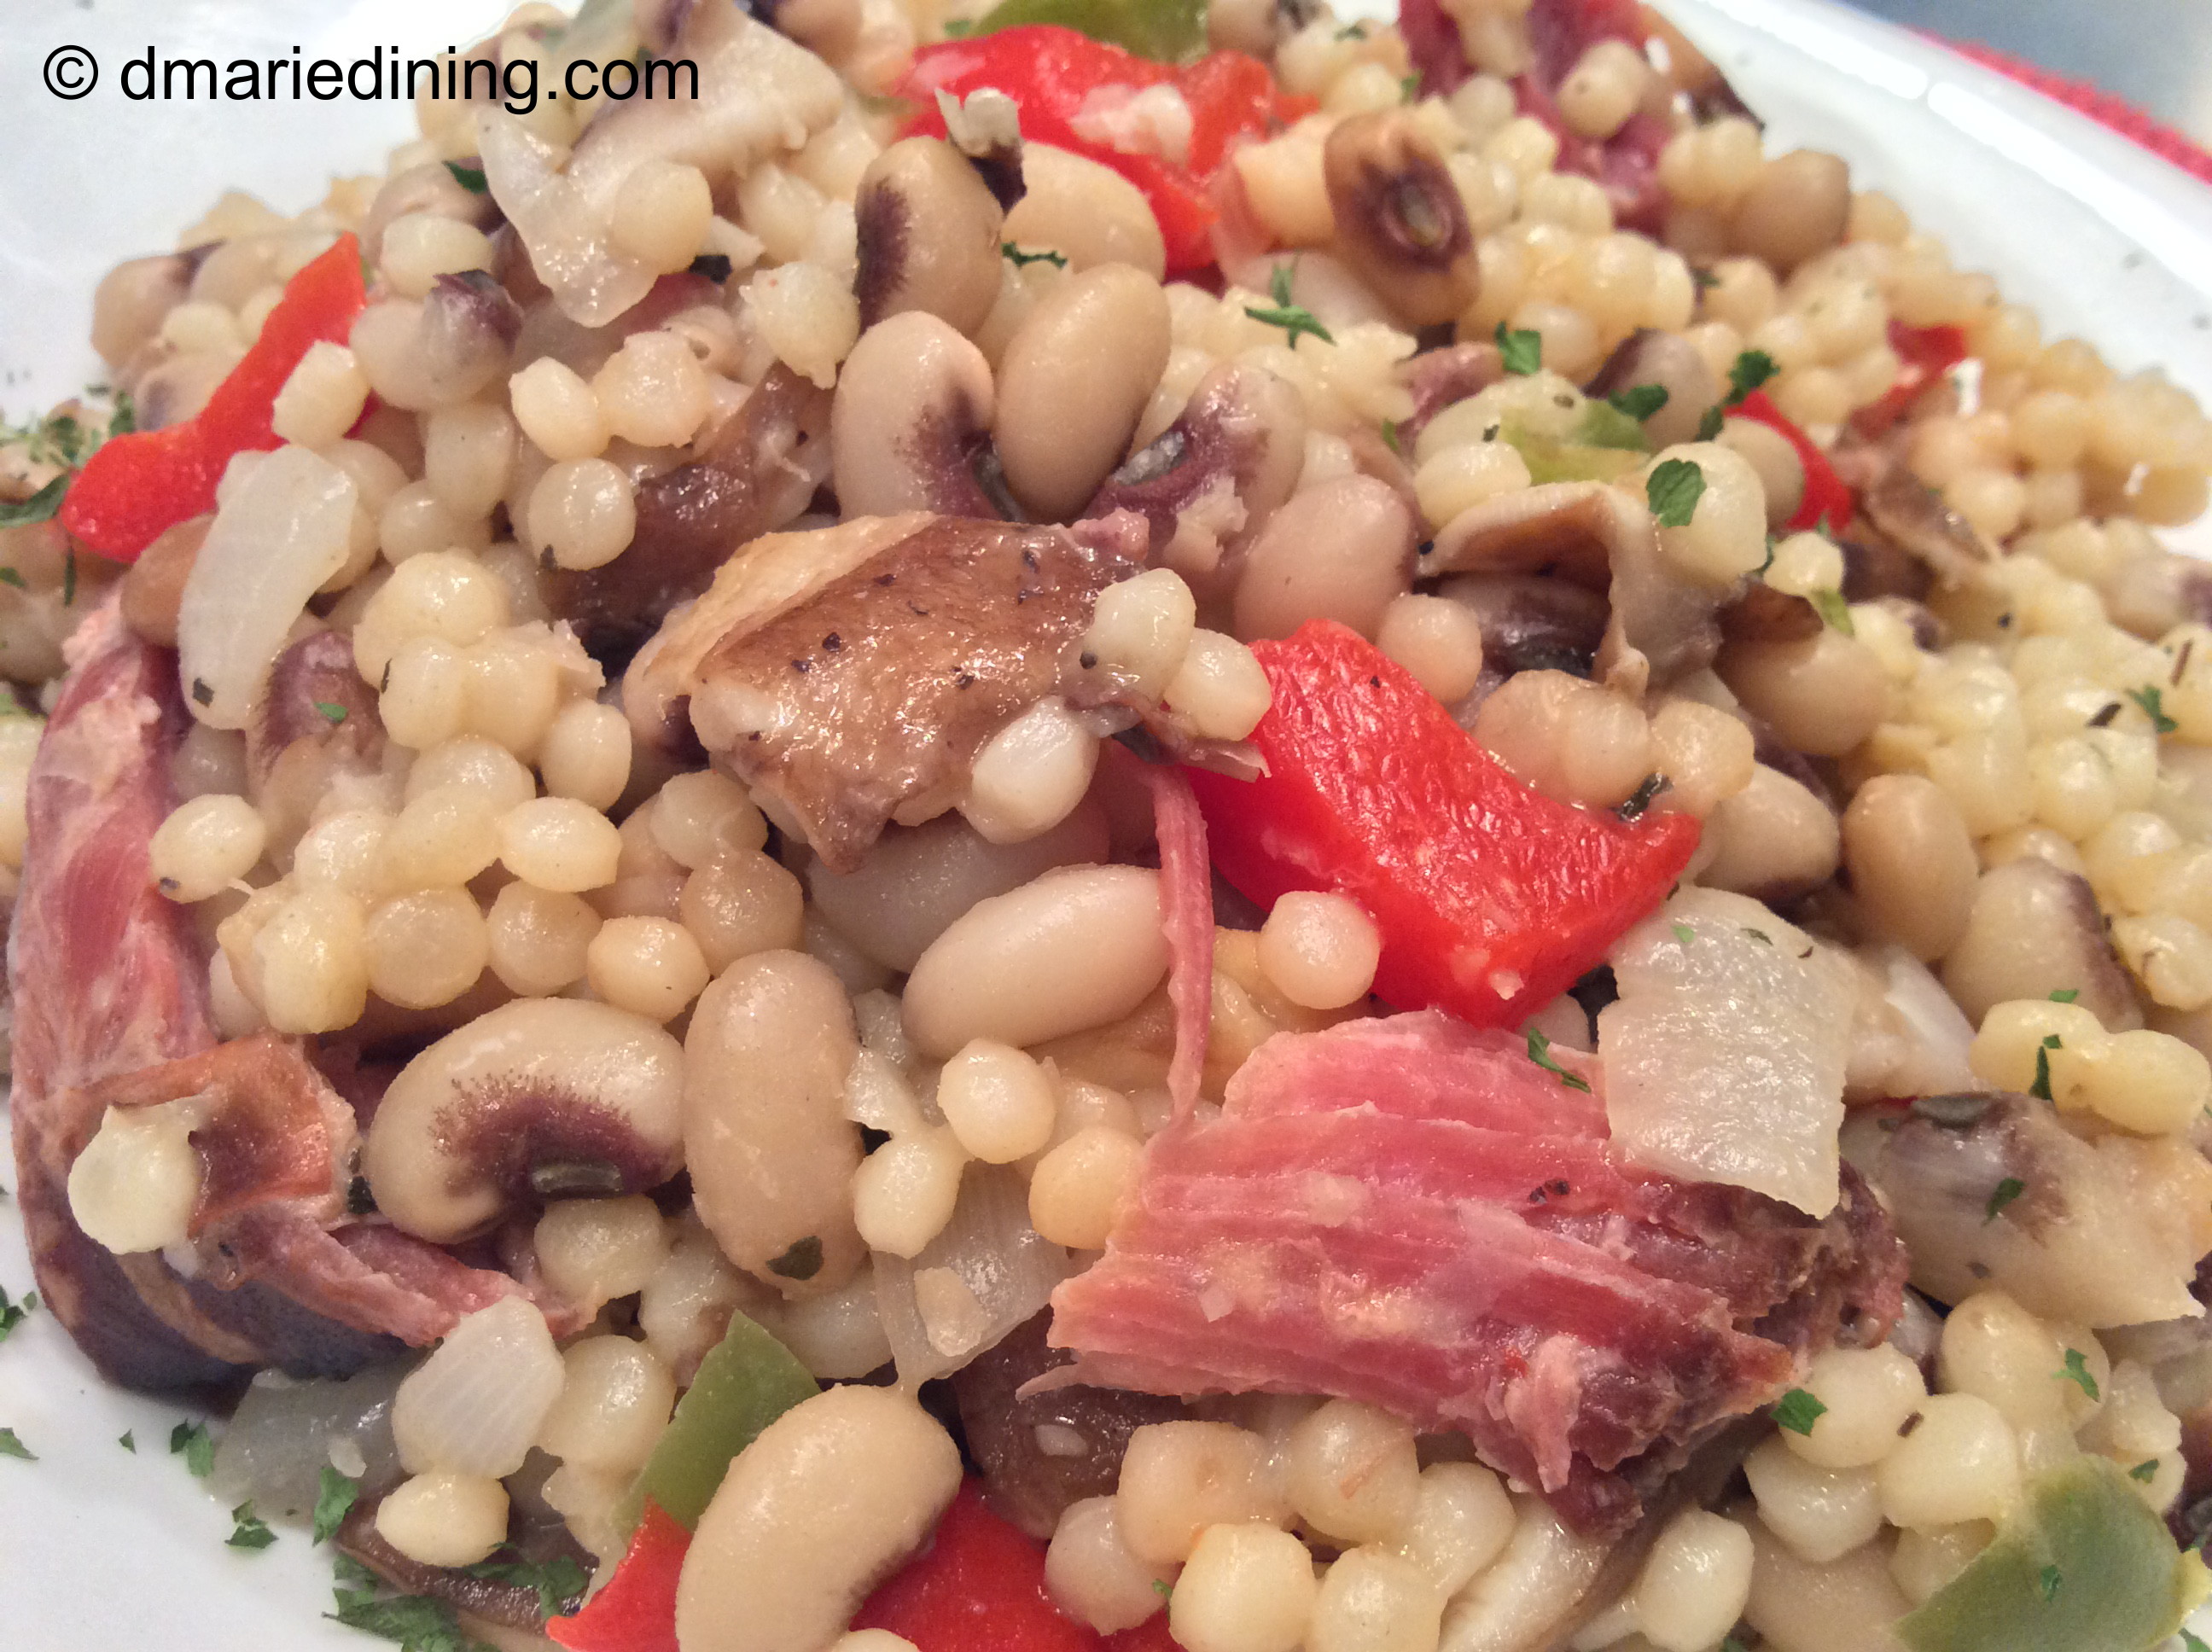
Although I truly enjoyed the hotel’s version, I decided to put my own twist to the dish and used a few different ingredients that complimented the black eyed peas and couscous. Black eyed peas, Israeli couscous, roasted red peppers and mushrooms. Yummy! Once you have a bite you will be making this side dish over and over again.

IMG_1687_1

Pearls and Black Eyed Peas

Ingredients:
1 bag frozen black eyed peas
1 large or 2 small smoked turkey legs (optional)
2 cups cooked pearl (Israeli) couscous (prepare according to package)
2 cups chicken broth
1 cup sliced shitake or baby bella mushrooms
½ cup onions diced
½ cup green peppers diced
½ cup roasted red peppers diced
2 tbsp olive oil
1 tsp garlic powder
1 tsp salt
1 tsp black pepper
½ tsp cayenne

If using smoked turkey in the dish, cook turkey in 6 cups of water until until meat is tender. If you are comfortable using a pressure cooker, it will speed up the process. Strain and reserve broth to use with black eyed peas in lieu of chicken broth. Slightly shred turkey.

Heat olive oil in a medium sized frying pan over medium high heat then add mushrooms, green peppers and roasted red peppers. Sprinkle with a little salt and cayenne pepper. Saute until mushrooms are browned and green peppers are soft.

Place black eyed peas in a large pot with 2 cups chicken broth or reserved smoked turkey broth. Add onions and remaining seasonings. Cook black eyed peas for 20 – 25 minutes until soft. Drain black eyed peas.

In a large bowl gently mix couscous, veggies and black eyed peas. Add a little broth to moisten if necessary.

Enjoy!

Follow my blog with Bloglovin

Shredded Chicken and Pasta Soup

IMG_1792_1

Comfort food is good anytime of the year but fall calls for comfort soup. With slight breezes and the crisp sound of falling leaves, soup is a great way to warm up and snuggle. Chicken noodle soup is a very traditional comfort food which my family loves. But, I wanted to make a traditional chicken soup with a slight twist. That is why I decided to make a Shredded Chicken and Pasta Soup.

IMG_1784_1

When it came to choosing a pasta for the soup I didn’t want a noodle so I had to search for a type of pasta that would compliment the soup. Ditalini pasta turned out to be the perfect pasta for the Shredded Chicken and Pasta Soup. Ditalini looks like little tubes and they soaked up the chicken broth. Every bite offered an extra burst of broth and flavor.

IMG_1776_1

One thing I really liked about the Shredded Chicken and Pasta Soup was the fact that including the pasta made the soup very filling. A big bowl of soup makes a full meal with a nice chunk of crusty bread. If you want to have the soup with a meal I would suggest you only have a small cup so that you don’t get full too fast. Either way you will definitely have a smile on your face while eating the soup.

IMG_1800_1

Think about cooking up a big pot of Shredded Chicken and Pasta Soup the next time you feel a chill in the air. It will warm you up and put a smile on your face. Remember comfort food is good anytime of the year but fall and winter call for comfort soup.

IMG_1814_1

Shredded Chicken and Pasta Soup

Ingredients:
4 chicken thighs
5 quarts water
3 cups Ditalini pasta (prepare according to package)
1 cup chicken broth
1 cup diced celery
1 cup diced onion
1 cup shredded carrots (rough chop)
3 scallions diced (green part included)
2 tbsp salt
1 tsp black pepper
½ tsp onion powder
½ tsp Adobo seasoning
½ tsp dried dill
¼ tsp thyme
dash of cayenne pepper (optional)

Place water, chicken, ½ cup onions and all seasonings except for dill into a large pot. Cook chicken on medium high for 45 minutes or until chicken is cooked all the way through and is tender. Remove chicken from the pot and set aside to cool for shredding. Once cooled, shred chicken with your fingers and set aside.

Strain chicken broth and place back into the pot. Skim some of the chicken grease from the surface of the broth. Reduce heat to medium. Add the additional cup of chicken broth, carrots, celery, green onions, dill and remaining onions to the pot. Simmer for 5 minutes. Add chicken to the broth and simmer for another 10 – 15 minutes. You can either place pasta in individual bowls then ladle soup over the pasta so that the pasta stays al dente. Or, you can add pasta to the soup and remove from heat so that the pasta does not over cook.

Follow my blog with Bloglovin

Caramel Popcorn Balls

IMG_1896_1

One of the best things about going to the movies is the buttered popcorn. I have not been able to recreate the flavor of movie popcorn at home although I have tried. The smell of theater popcorn is intoxicating. But, the smell of microwave popcorn is another story for me. I do not like the smell of microwave popcorn. My hubby is a fan of all types of popcorn especially microwave popcorn so I keep it as a staple in the pantry.

IMG_1910_1

The other day when I was searching through the pantry for some pasta I ran across a few boxes of microwave popcorn. I started wondering what I could do to the microwave popcorn to make it more appealing. The first thing that came to mind was the big bin of caramels I saw at the grocery store the last time I was there. Usually, I would just use caramels to make caramel apples or apple crisp. However, the thought of mixing the caramels with popcorn and sliced almonds seemed like a pretty good idea. Instead of making caramel corn (which is a little too sweet for me), I decided to make Caramel Popcorn Balls which had only a hint of caramel and nuts.

IMG_1918_1

The result was a nice little treat. I can even say I did not even mind the smell of the microwave popcorn while it was popping because I was so excited to try out the recipe. Light, slightly crunchy, savory and sweet. The caramel was just sweet enough to satisfy my sweet tooth and savory enough to make me want more.

IMG_1925_1

Caramel Popcorn Balls

Ingredients:
2 bags microwave popcorn popped
1 11 oz caramels unwrapped
¼ cup light corn syrup
2 tbsp water
½ cup sliced or whole almonds
cooking spray

Place popped popcorn in a 200 degree oven while melting caramels. Be sure to remove all unpopped kernels.

Melt caramels, corn syrup and water in a medium sized pot over medium heat. Spray a large bowl with cooking spray. Place popcorn and nuts in bowl and drizzle warm caramel over popcorn and nuts. Quickly mix until popcorn is well coated. Form popcorn balls by hand. Spray hands with a little cooking spray prior to forming balls so that they do not stick to your hands. Wrap balls in plastic wrap and place in an air tight container. Popcorn will keep fresh for a few days.

Follow my blog with Bloglovin

Sticky Granola Clusters

IMG_1367_1

Once in a while I have a sweet tooth for something other than chocolate. Cookies, cakes, pies and ice cream don’t always hit the mark for me. Instead, I just want a small treat that will satisfy my desire for sweets but will not make me feel too guilty or bloated.

IMG_1378_1

Looking around my kitchen on one of those days of having a sweet tooth I found a container of granola. I know. Granola as a treat does not sound very exciting when you have a sweet tooth and I wanted more than plain ol’ granola. To jazz up the granola and make it into a really delicious treat I added a few extra ingredients to a basic granola bar recipe and created Sticky Granola Clusters.

IMG_1381_1

Naturally sweetened from the whipped honey I used along with the dried fruit, this easy treat satisfied my sweet tooth and kept me from feeling too guilty or bloated. I liked the nice crunch of the granola, toasted almonds and walnuts plus the chewiness of the dried plums, mango and cranberries. The whipped honey made it all sticky and fun to eat.

IMG_1422_2

Usually, I use my family as taste testers but this time I took my recipe directly to the public and asked my co-workers what they thought of the Sticky Granola Clusters. Sometimes you have to go outside of your own bubble to make sure you are on the right track when cooking. Judging by their comments and the fact that a few folks came back for seconds I know this recipe is a hit. The next time you have a sweet tooth make a batch of Sticky Granola Clusters. Not a lot of fuss and a lot less guilt than most treats.

IMG_1394_2

Sticky Granola Clusters

Ingredients:
14 oz granola (I used Aurora Natural Vanilla Crunch)
½ cup sliced almonds
½ cup chopped walnuts
½ cup dried chopped plums
½ cup dried chopped mango (optional)
½ cup shredded coconut
½ cup whipped honey or regular honey
¼ cup dried cranberries
¼ cup light brown sugar (lightly packed)
3 tbsp butter
2 tbsp vanilla extract

Preheat oven to 350 degrees.

Spread coconut and almonds on a rimmed baking sheet and toast for 10 minutes. Check coconut to make sure it does not burn. Remove from oven and set aside to cool. Lower oven temperature to 300 degrees.

Place granola, cooled coconut, almonds and walnuts in a large bowl.

In a small pot heat brown sugar, butter, honey and vanilla in a small pot over medium heat. Bring to a boil. Remove from heat and pour over granola mixture and stir. Add dried fruit and stir until well mixed.

Line a rimmed baking sheet with parchment paper and spray with cooking spray. Pour granola mixture onto baking sheet and gently press to spread out the granola evenly. If necessary, wet your fingers before handling to prevent mixture from sticking to you.

Bake for 25 – 30 minutes. Remove from oven and let cool for 3 hours to set. You can cool in the refrigerator the last 30 minutes. Break into clusters or cut into squares. Store in an air tight container. Refrigerate if necessary.

Follow my blog with Bloglovin

Spicy Meatball Stew

IMG_0929_1

I enjoy hearty stews in the winter but I also enjoy them in the warmer months just because I like stews. Since my family doesn’t eat beef too often I decided to create a stew that replaces a typical beef stew using spicy meatballs but still remained hearty.

IMG_0945_1

When you think meatballs you usually think of beef but meatballs can be made out of ground turkey, chicken or pork. In most recipes that call for a ground meat I use turkey. The one thing about ground turkey is that you must season it really well otherwise it will taste bland. Lately, I prefer baking my meatballs instead of frying them. This eliminates having the meatballs absorb a lot of excess fat. Plus, it is easier to control the heat so the meatballs don’t dry out too much while cooking.

IMG_0953_1

Spicy Meatball Stew was somewhat of a surprise for my family. I received a few strange glances when I placed a bowl full of stew on the table for dinner. They were use to seeing meatballs floating around in a nice tomato sauce not swimming with veggies and gravy. However, it did not take long for them to trust I had worked my cooking magic so they lunged into their bowls and came up saying “Hmmm… not bad”. The second and third bites had them totally convinced that Spicy Meatball Stew was fantastic and produced smiling faces. It is always nice when the family requests a second helping.

IMG_0974_1

Spicy Meatball Stew

Ingredients:

Meatballs
1 lb ground turkey
1 lb ground spicy sausage
2 eggs beaten
½ cup panko bread crumbs
¼ cup half and half
¼ cup grated parmesan cheese
1 tbsp worcestershire sauce
1 tsp salt
1 tsp black pepper
1 tsp oregano
1 tsp onion powder
½ tsp parsley chopped
½ tsp Adobo
cooking spray

Stew
1 jar beef au jus
1 small bag baby carrots cut in half
1 small bag frozen peas
1 small onion diced
2 stalks celery dice
2 cloves garlic chopped
2 red potatoes cubed
1 cup beef broth
½ cup water
1 tsp ground black pepper
1 tsp salt
2 tbsp olive oil
1 tsp thyme

Preheat oven to 375 degrees.

In a large bowl mix ground turkey, ground sausage, seasonings and worcestershire. Form meatballs and place on a rimmed baking sheeting sprayed with cooking spray. Bake for 30 – 35 minutes. If not quite done, meatballs will finish cooking in the stew.

While the meatballs are cooking heat olive oil in a large pot or dutch oven over medium high heat. Add onions, celery, salt and pepper. Saute for 2 – 3 minutes to let veggies sweat. Add garlic and stir for 1 – 2 minutes. Be careful not to let garlic burn. If necessary, reduce heat. Add remaining ingredients except for peas. Reduce heat to medium and let simmer for 15 minutes. Add meatballs and peas. Cook for an additional 20 – 25 minutes. May be eaten alone or served over egg noodles, mashed potatoes or rice.

Follow my blog with Bloglovin

Naan Style Pizza

IMG_1011_1

Tonight I made Naan Style Pizzas. I found small individual sized Naan at Trader Joes’s. I was looking for small regular flatbread but spotted the Naan flatbread instead. I wanted to make something quick for dinner and thought homestyle pizzas would be a good choice for a quick meal. Hubby and my youngest son are pizza lovers so they usually like any kind of pizza you throw in front of them. I on the other hand prefer non traditional style pizzas.

IMG_1028_1

Passing by the deli meats and cheeses I had a light bulb moment and decided to make a variety of pizza toppings like pre-cooked chicken, prosciutto, salami and capicola instead of pepperoni or sausage. Since the pizzas were individual sized we were each able to try a different type of topping. To make the pizzas even more non-traditional I slathered the Naan with pesto instead of a basic pizza sauce. This gave the pizzas more of a savory taste rather than the acidic flavor you get with tomato sauce.

IMG_1032_1

The best thing about pulling together the Naan Style Pizzas is that it took all of 15 minutes. That is my kind of recipe. Baking took about another 15 minutes to melt the cheese and make it golden brown. Total time for me to get dinner on the table was about 45 minutes which included me explaining to my hubby what I was making.

IMG_1050_1

After a few bites and a couple of umm hmmm’s I knew the Naan Style Pizzas were blog worthy. So there you have it. Another quick and easy meal with a healthy twist. Try it and I am sure you and others will like it.

IMG_1040_1

Naan Style Pizza

Ingredients:
1 small jar pesto
1 pkg Tandoori Naan flatbread (Trader Joe’s)
1 pkg pre-cooked slices of chicken
8 slices salami
8 slices prosciutto
8 slices capicola
1 bag baby leaf spinach
4 small tomatoes sliced
6 slices of jalapeno pepper cheese
¼ cup buffalo wing sauce
1 tbsp oregano

Preheat oven to 350 degrees.

Pull cheese apart and set aside. Place pre-cooked chicken in a bowl and drizzle buffalo chicken wing sauce over chicken. Toss until chicken is well coated with sauce. Set aside.

Spread about 1 tbsp of pesto on each slice of Naan flatbread then layer with baby spinach leaves. Next on 1 -2 pieces of flatbread layer the chicken then a few slices of tomato and sprinkle with oregano. Top with cheese.

Follow the same steps creating the salami flatbread pizza. Alternate the prosciutto and capicola together on one flatbread when layering.

Place Naan Style Pizzas on a rimmed baking sheet. Bake for 15 minutes until cheese melts and is golden brown.

Follow my blog with Bloglovin

Shrimp Summer Rolls

IMG_0148_1

My family and I love Asian cuisine and the spicier the better for my hubby and youngest son. I have limited experience making Asian style foods but thought I would try my hand at making Shrimp Summer Rolls. We often eat Vietnamese spring rolls whenever we go to the Cheesecake Factory and recently found handmade spring rolls at one of our local grocers that sells fresh sushi daily.

IMG_0153_1

I wasn’t sure what kind of wrap to use for the spring rolls but discovered Blue Dragon Rice Pancakes which are used for summer rolls. Turns out spring rolls are not too hard to make. Although the rice pancakes are delicate, they roll easily. Once I rolled a couple of spring rolls I really got the hang of it. The test of whether or not I had done a good job of making Shrimp Summer Rolls was in the taste. In my opinion and fortunately the opinion of my family they tasted as good as the fresh summer rolls we get at the local grocer.

IMG_0169_1

Since this was my first attempt at making Shrimp Summer Rolls I took that as a very nice compliment. My next goal is to make fresh Shrimp Summer Rolls as good as the Cheesecake Factory. Now that is saying something! In the meantime, I can at least say my Shrimp Summer Rolls are pretty tasty. Next time I think I will try frying the summer rolls. Stay tuned.

IMG_0189_1

IMG_0195_1

Shrimp Summer Rolls

Ingredients:
1 lb large shrimp peeled and deveined
1 pkg Chinese noodles
1 pkg rice pancakes
1 pint snap peas
1 cup shredded carrots
2 heads butter lettuce
3 cups cold water
1 tbsp sriracha sauce
2 tbsp olive oil
4 tbsp oyster sauce
½ tsp black pepper
½ tsp salt
¼ tsp cayenne pepper (optional)
juice from ½ lemon

Prepare Chinese noodles according to package. Drain and set aside.

Heat olive oil in a medium size non-stick frying pan over medium high heat. Add shrimp, sriracha sauce and lemon juice. Season with a little salt and pepper. Stir shrimp until they turn pink. Remove shrimp from pan and set aside in a small bowl. Add carrots, snap peas and a little more salt and pepper (add cayenne pepper if you really like heat) to the frying pan. Stir and let cook for 1 minute. Add oyster sauce and mix with veggies until they are well coated. Reduce to low heat and cook for another 2 minutes. Remove from heat and let cool for a few minutes.

Dampen a clean dish cloth. Add water to a large bowl. Place 1 rice pancake in the cold water until it softens and becomes pliable (about 10 – 15 seconds). Lay rice pancake on the dish cloth and add two pieces of butter lettuce to the pancake. Place a small amount of Chinese noodles in the center of the lettuce. Top with a little bit of the snap peas and carrots mixture then layer three shrimp on the veggies. Fold one end of the rice pancake towards the center over the shrimp then fold the sides towards the center as well. Gently roll up the pancake like a cigar. The pancake will seem delicate but should roll easily. Tuck in the sides as you roll the pancake if necessary. Chill for 30 minutes or serve immediately.

Follow my blog with Bloglovin

Tex Mex Chicken Salad

IMG_1204_1

Summer is slowly fading which means all the delicious backyard veggies, fresh corn and fresh herbs I grew will also fade away. Before fall settles in I thought I would come up with a dish that we could have year round but would remind me of our hot and lazy summer days. Tex Mex Chicken Salad became my summer reminder.

IMG_1206_1

Chicken salad was one of my favorite meals growing up. My mom made some of the best chicken salad around and always made little blueberry muffins to go with the salad. It took me a while but I mastered make my own wonderful version of chicken salad. Because chicken is so versatile it can be combined with a lot of different ingredients to make a fantastic salad.

IMG_1215_1

Tex Mex Chicken Salad combines black beans, corn (the reason I call it Tex Mex) and avocado along with fresh herbs. Lemon and lime juice help brighten the flavors. As always, my family likes heat so I add a little cayenne or chopped jalapeno peppers to spice up the salad.

IMG_1211_1

Even though summer will fade into fall it doesn’t mean we cannot continue to enjoy the great tastes of summer. Remember, all it takes is a little chicken, a few fresh veggies and memories of those hot, lazy days we enjoyed so much.

Tex Mex Chicken Salad

Ingredients:
4 cooked chicken thighs diced
3 ears fresh corn shucked
2 15oz cans black beans rinsed and drained
5 fresh basil leaves chopped
½ cup small cherry tomatoes
½ cup olive oil
1 ripe avocado diced
1 tbsp red onion diced small
1 tsp parsley
1 tsp cilantro
1 tsp chili powder
1 tsp cracked black pepper
1 tsp salt
1 tsp cayenne (optional)
juice from ½ lemon
juice from ½ lime

Dressing:
Place olive oil, lemon juice, lime juice, cayenne, parsley and cilantro in a small bowl. Whisk together.

Salad:
In a large bowl add chicken, corn, avocado, tomatoes, red onion, salt, pepper, chili powder and basil. Pour dressing over salad and gently toss.

Follow my blog with Bloglovin

Country Style Ribs with Sauerkraut

IMG_0722_1

Sauerkraut is one of those foods you really have to taste to determine if you like it or not. My son’s first reaction when he saw me cooking Country Style Ribs and Sauerkraut was to say “I don’t like sauerkraut”. Of course, I had never fixed sauerkraut for my family so my reply to him was “Just try a little then decide if you like it or not”. A few minutes after I let him try a spoonful to taste he exclaimed “I  like this!”.

IMG_0726_1

I think I can safely say almost everyone knows about country style ribs (nice thick pork ribs). But, what the heck is sauerkraut? Sauerkraut is pickled (fermented) cabbage. The word sauerkraut means “sour cabbage”. For many, it is an acquired taste and you may love it or hate it after you try sauerkraut.  I fall into the love it category. My mom made spare ribs and sauerkraut on many occasions and taught me her secret for taking the bitterness out of the sour cabbage. Brown sugar!

IMG_0736_1

Sauerkraut actually has quite a few health benefits. There are a number of diets that feature sauerkraut as the star to help reduce weight, lower cholesterol and fight against certain forms of cancer. The biggest benefit of sauerkraut is that it is inexpensive so it is light on the pocket book.

IMG_0754_1

If you have the time and the energy, you can easily make your own sauerkraut and store it in the frig or freeze it. Personally, I find it easier to buy it, freeze it and then pull it out whenever I want to make Country Style Ribs and Sauerkraut. Maybe in my next phase of life I will add making sauerkraut from scratch to my list of things to do. Until then…….

IMG_0766_1

Country Style Ribs and Sauerkraut

Ingredients:
1 pkg country style spare ribs
1 pkg sauerkraut
1 small onion sliced
1 cup water
¼ cup dark brown sugar
4 – 5 small red potatoes sliced thick
2 tbsp butter
1 tbsp salt
1 tbsp black pepper
½ tsp onion powder
paprika

Preheat oven to 350 degrees.

Place sauerkraut in the bottom of a baking dish. Add water then season with a little salt and black pepper. Crumble brown sugar over the sauerkraut and dot with butter. Layer potatoes on one side of the baking dish.

Season country style ribs with salt, pepper and onion powder. Sprinkle with paprika. Lay ribs over sauerkraut. Cover with foil and bake for 1 hour (baste ribs and potatoes after 30 minutes) then remove foil and continue baking for an additional 45 minutes to 1 hour.

Bon Appetit!

Follow my blog with Bloglovin

Meringue Clouds

Check out my dessert at rantingchef.com Diced! Day of Eating Contest.  Vote for my Meringue Clouds recipe.  Voting ends on 10/9/15.IMG_9458_1

I was sitting on our porch the other day surrounded by the beauty of nature watching clouds go by. The clouds were big, white, fluffy and moving ever so slowly against the bluest sky I had seen in a while. Watching the clouds I started thinking about cotton candy, food in general then dessert.

IMG_9469_1

Dessert. What kind of dessert could I make that reminded me of clouds? Meringue came to mind but the problem was that I wasn’t a lover of meringue. Whenever my mom made her delicious lemon meringue pie I would scrap off the meringue then eat the lemon filling and crust. The two textures of meringue, both crusty and squishy, just did not feel right in my mouth. After searching for a meringue alternative to crusty and squishy I ran across a recipe that called for baking the meringue and it looked light like a macaroon.

IMG_9562_1

To make meringue the centerpiece of my dessert, I created mounds of sweetness that melted in your mouth. Then I added fresh raspberries, blackberries and blueberries that were slowly simmered until a simple syrup was rendered and the fruit was fragrant. Talk about heaven! Eating my Meringue Clouds reminded me of sitting on the porch watching the clouds go by surrounded by the sweetness of nature.

IMG_9584_1

Meringue Clouds

Ingredients:
3 egg whites
1 cup sugar
1 tbsp water
½ tsp vanilla
½ tsp lemon juice
¼ tsp lemon zest
¼ tsp cream of tartar
1 pint raspberries
1 pint blackberries
1 pint blueberries
parchment paper

Preheat oven to 275 degrees.

Place eggs whites in a bowl and let sit for 30 minutes at room temperature. Beat egg whites with vanilla and cream of tartar on medium speed until soft peaks form. Gradually add ¾ cup sugar 1 tbsp at a time on high speed until stiff peaks are formed.

Drop a large spoonful of meringue on to parchment paper or place in a piping bag and pipe onto parchment paper to create mounds. Meringue will spread so do not make the mounds too big. Bake for 45 minutes then turn off the oven and DO NOT open the oven door for 1-2 hours.

While the meringue is baking, place berries, water, lemon juice, zest and ¼ cup of sugar into a medium sauce pan over medium heat. Cook until berries begin to breakdown and a simple sugar is rendered.

Place a Meringue Cloud in the center of a bowl then drizzle the berries and juice around the Meringue Cloud.

Follow my blog with Bloglovin