Tag Archives: recipes

Double Dip Fried Chicken

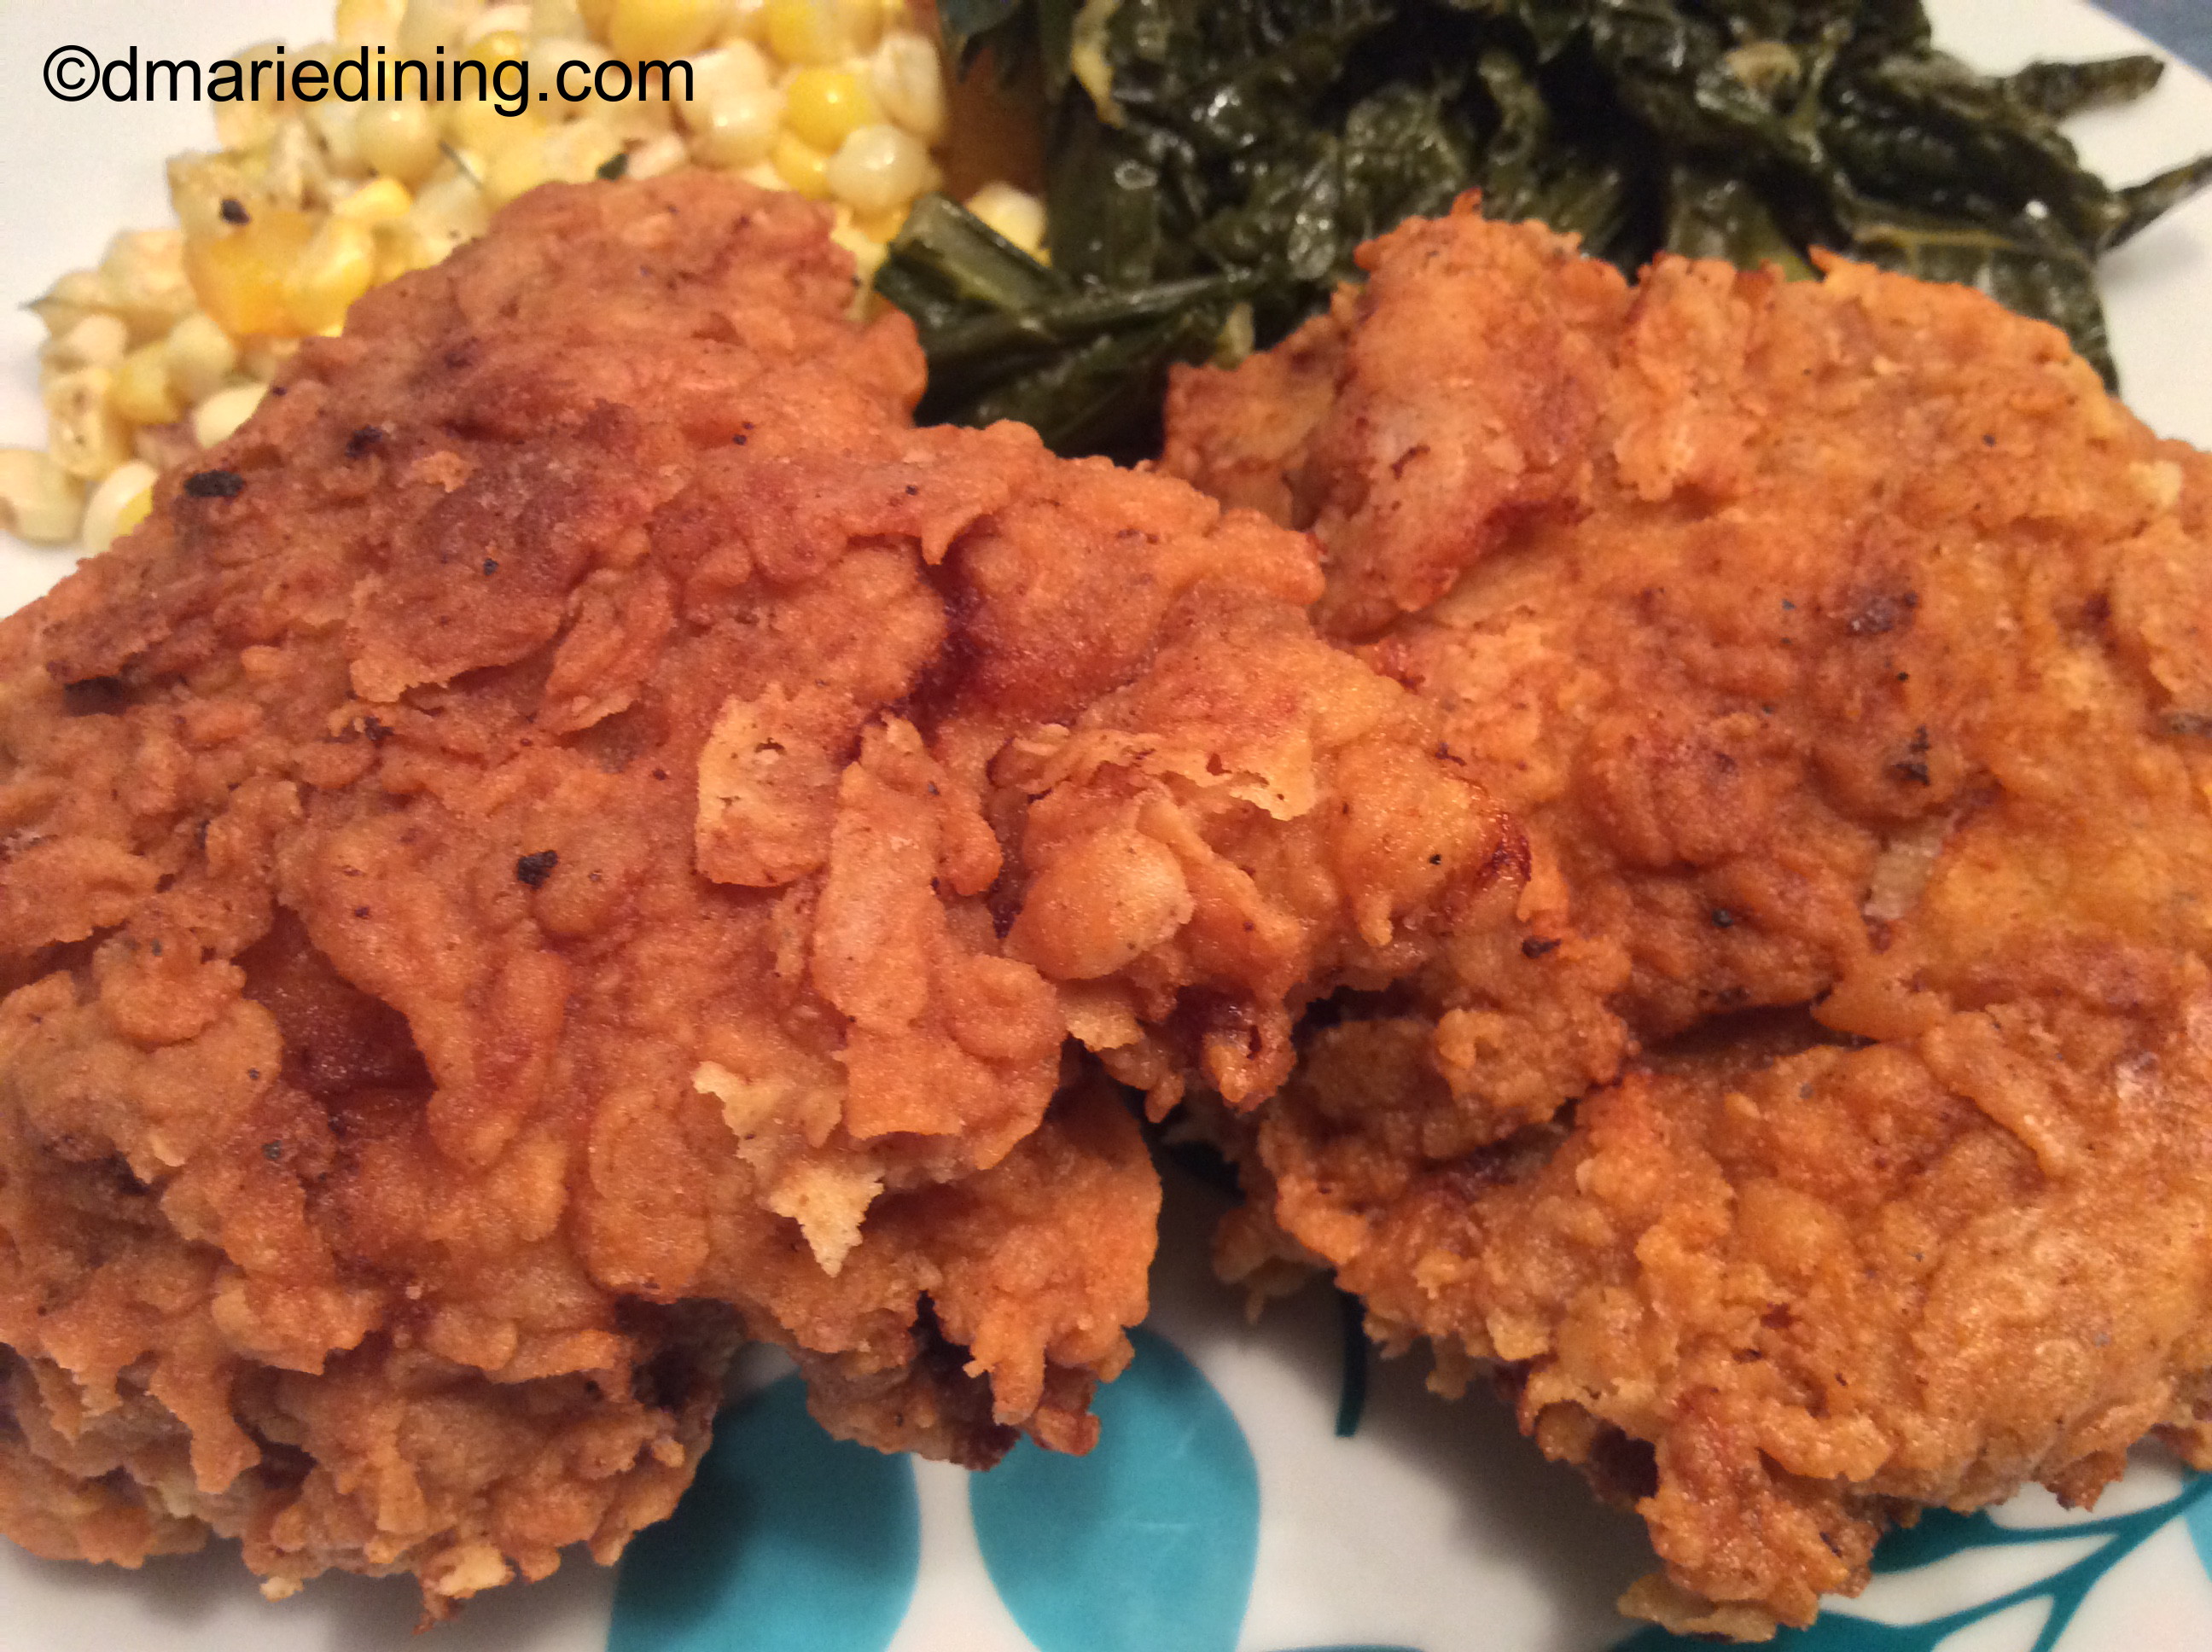
Okay, who besides my vegan friends does not like good ol’ home cooked fried chicken? I don’t see any hands so I am guessing just about everyone likes fried chicken. Of course, fried chicken is not something you should have often and if you want to make it seem a little healthy it is better to oven fry the chicken. Less grease. Less hassle. But, when you have a taste for some good extra crispy fried chicken you should try my Double Dip Fried Chicken. Yes, I said double dip. You will be surprised just how crispy, flavorful and tender the chicken will be.

This recipe is a twist on a recipe I saw on a restaurant cooking show. I would never have thought to double dip my chicken before frying to make it real crispy. I always wondered how some chefs were able to make their chicken crispy enough to make a crunching sound without the chicken being dry. Now, I know.

The key to tenderness is marinating the chicken in seasoned buttermilk for a few hours. Usually, after the chicken had marinated I would toss the buttermilk. Oh no, not any more. That buttermilk is golden. Once the chicken is coated with a flour mixture I dip it back into the buttermilk then coat it again with more of the flour mixture. The buttermilk helps to keep the chicken tender and the extra coating creates a wonderful crispiness to the chicken.

Next time you get a taste for some good ol’ extra crispy fried chicken grab some buttermilk, seasoned flour and try out my Double Dip Fried Chicken. I think you will like it.

Double Dip Fried Chicken

Ingredients:

4 – 8 cleaned chicken thighs

4 cups vegetable oil

2 cups flour

1 1/2 cups buttermilk

1 tbsp salt

1 tbsp ground black pepper

1 tbsp smoked paprika

½ tbsp Chile lime seasoning (Trader Joe’s optional)

½ tbsp onion powder

½ tbsp Adobo (optional)

½ tbsp seasoned salt

¼ tsp cayenne pepper

Season the chicken on both sides with salt, ½ tbsp ground black pepper, Chile lime seasoning and smoked paprika. Place chicken in an air tight container then pour buttermilk over the chicken to cover it. Place container in the refrigerator for 2 – 4 hours or overnight.

When it is frying time, heat vegetable oil in a large dutch oven over medium high heat. Temperature should register at 360 degrees. To test the oil the old fashion way, put a small drop of water in the oil and stand back. If it starts popping the oil is ready.

While oil is heating up take the chicken out of the refrigerator and let it come to room temperature. Add flour, ½ tsp ground black pepper, seasoned salt, onion powder and Adobo to a large bowl and combine until well mixed.

Shake off excess buttermilk from a chicken thigh then place it in the flour mixture and coat both sides. Shake off excess flour and dip the floured chicken back into the buttermilk marinate. Again, shake off the excess buttermilk then place it back into the flour mixture. Shake off excess flour and place on a wire rack. Repeat steps with each piece of chicken.

Add 4 – 5 pieces of chicken to the hot oil and fry until golden brown and cooked through. Drain on a layer of paper towels. Repeat steps until all of the pieces are cooked. Serve with your favorite side dishes.

Advertisement

Rice and Spinach Casserole

Some days are harder than others to come up with side dish ideas. Potatoes, pasta and rice in various forms usually come to mind but can become boring or routine.

The other day I was trying to figure out what to do with the leftover rice in the fridge because I had made too much. Chicken and rice soup was one idea but we were still eating the Lentil and Carrot Ginger Soup I had made two days before. So, soup was out. Then I thought about making a casserole and maybe making it similar to my Macaroni and Cheese recipe. The idea morphed into a Rice and Spinach Casserole.

This recipe was so simple and quick to make because the rice was already cooked which meant it did not take long to pull the recipe together. I must say the Rice and Spinach Casserole did not come out exactly like my macaroni and cheese but it was doggone tasty. I think because rice and pasta have two different consistencies the rice did not come out as creamy as macaroni and cheese. Still the rice dish had a certain level of creaminess. It’s kind of hard to explain so I will just say you will have to try the recipe to see what I mean.

As always, I use my family as a guide to whether or not a recipe is blog worthy. Both my youngest son and hubby enjoyed my “new” side dish and happily had seconds of the Rice and Spinach Casserole. I will say a side dish tastes even better when the entire meal is good so that folks want to get just a little bit more of everything.

Rice and Spinach Casserole

Ingredients:

2 cups cooked rice (leftover rice works well)

1 ½ cups fresh baby spinach

1 cup shredded extra sharp cheddar cheese

½ cup shredded pepper jack cheese

½ cup half and half milk

1 can 2% evaporated milk

2 tbsp butter

cooking spray

Preheat oven to 400 degrees.

Spray a medium sized casserole dish with cooking spray. Set aside ¼ cup cheddar cheese.

Place cooked rice into the casserole dish. Pour evaporated milk and half and half over the rice. Add spinach, cheese and butter. Sprinkle with salt and pepper. Mix well then top with remaining ¼ cup of shredded cheddar cheese.

Bake for 45 minutes to 1 hour until the liquid is evaporated and a knife comes out clean when placed in the middle of the casserole.

Remove from oven and serve with your favorite dish.

No Bun Needed Bacon Cheese Burger

Part of my new journey and change in eating habits is to minimize the amount of carbs we eat on a daily basis. Instead of eating bread for breakfast and having a sandwich for lunch then pasta for dinner, we have fruit smoothies or oats for breakfast. Lunch may be a variety of homemade soups that are quick and easy to make. Dinner is the usual chicken or fish with beef or pork thrown in a couple of times a month to break up the monotony of eating chicken. We also changed from eating white rice to mainly eating brown rice. Brown rice can be bland but I kick up the taste with teriyaki sauce and scallions.

Okay, back to my No Bun Needed Bacon Cheese Burger. Since we are doing our best to eliminate carbs as much as possible I tossed the bun on our turkey cheese burgers ad put the burgers on a bed of mixed greens then topped them off with a fried egg. If you are like my hubby, you will enjoy a soft fried egg so that when you dig into it the yolk runs over the burger and makes the meal even more delicious.

Who needs bread when you can create a delicious No Bun Needed Burger!

No Bun Needed Bacon Cheese Burger

Ingredients:

1 lb ground turkey meat

6 slices of bacon cooked, cut in half

4 eggs (fried to your liking)

4 slices pepper jack cheese

2 plum tomatoes sliced

1 pkg mixed greens

½ small onion diced

2 tbsp olive oil

1 tbsp Worcestershire sauce

1 tsp salt

1 tsp black ground pepper

½ tsp onion powder

Saute onions in 1 tbsp olive oil over medium high heat until softened. Set aside.

Place ground turkey in a large bowl. Add onions, Worcestershire sauce and seasonings. Mix together well then form 4 turkey patties.

Add remaining olive oil to the same pan used to saute the onions and turn heat to medium high. Cook turkey patties for 2-3 minutes on each side until burgers are nicely browned and cooked all the way through. Remove from the heat and top each with a slice of pepper jack cheese. Cover the burgers then fry the eggs to your liking.

Place mixed greens into four bowls. Place a turkey burger in the middle of each bed of greens then top it with a fried egg. Add bacon and tomatoes around the bowl and dress the greens with your favorite salad dressing. I recommend Gazebo Room Greek Salad Dressing and Marinade. You cannot go wrong with this fantastic dressing.

Enjoy!

Follow my blog with Bloglovin

Teriyaki Baby Back Ribs

Ribs, ribs and more ribs. Okay, so you may be wondering how many rib recipes can there possibly be in the world. Well, the short answer is a lot! Granted, my family does not eat ribs often but when we do I like to try different sauces instead of using bbq sauce all of the time.

Teriyaki Back Back Ribs are a new favorite flavor whenever we get tired of traditional bbq and don’t feel like firing up the grill. Ribs can taste great whether you char them on the grill or bake them in the oven. One is just less time consuming to prepare. Baking ribs means you can do minimal work up front then stick them in the oven to bake low and slow. After that you can move on to doing something else productive like blogging.

If you like Asian flavors, you will enjoy Teriyaki Baby Back Ribs. P. F. Chang has become my  favorite teriyaki sauce because of the subtle hint of garlic, the slight tang of ginger and the sweetness of brown sugar. I use it as a marinade, glaze for pork, chicken or salmon and for a teriyaki brown rice side dish I recently made.

Whatever brand of teriyaki sauce you decide to use you cannot go wrong making a rack of ribs with a teriyaki twist.

Teriyaki Baby Back Ribs

Ingredients:

1 rack pork baby back ribs sliced
1 bottle P.F. Chang Teriyaki sauce
1 small onion sliced
1 cup water
2 tbsp vegetable oil
1 tbsp worcestershire sauce
1 tbsp salt
1 tsp ground black pepper
1 tsp smoked paprika
1 tsp garlic powder
1 tsp onion powder

Preheat oven to 325 degrees.

Season ribs with seasonings. Heat vegetable oil over medium high heat in a non stick frying pan. Brown ribs on all sides. Place ribs and onions in dutch oven. Add water then pour teriyaki sauce over the ribs. Cover and back for 1 ½ – 2 hours until ribs are tender and cooked through.

Follow my blog with Bloglovin

Roasted Tomatoes and Artichokes Pizza

Roasted Tomatoes and Artichokes Pizza

Homemade pizzas don’t have to be boring. By boring, I mean using only the basics like pizza sauce, cheese and pepperoni. I have nothing against a basic pizza. But, when I make pizzas at home I like to pair different veggies or add chicken or prosciutto instead of pepperoni. I also substitute pesto for the pizza sauce.

One of my favorite homemade pizzas is Roasted Tomatoes and Artichokes Pizza. Roasting the tomatoes brings out the natural sweetness of the fruit. Yes, tomatoes are classified as a fruit not a vegetable. Of course, there is an ongoing debate about that but it really doesn’t matter. All I know is that freshly roasted tomatoes are delicious. Combining the artichokes with the roasted tomatoes just increases the deliciousness of the pizza. I have tried different types of tomatoes in this recipe and depending on the tomato the flavor is slightly different.

Ultimately, I prefer using Caperelli tomatoes but I also enjoy Roma tomatoes on this pizza. Hot house or beefsteak tomatoes don’t fair well with this recipe but in a pinch use whatever you have available.

Like all pizzas this one is versatile. Add roasted chicken for protein or even pepperoni if you feel a pizza isn’t really a pizza without it. For my vegetarian friends, I think you will want to add my Roasted Tomatoes and Artichoke pizza to your list of homemade pizza ideas.

Roasted Tomatoes and Artichokes Pizza

Ingredients:

2 containers Caperelli tomatoes quartered

1 jar marinaded artichokes

1 small red onion sliced thin

1pkg ready made pizza crust (Trader Joe’s)

1 ½ cups mozzarella cheese shredded

2 tbsp extra virgin olive oil

2 tbsp basil or tomato pesto (optional)

1 tsp salt

1 tsp black pepper

1 tsp dried oregano

½ tsp red pepper flakes (optional)

¼ tsp onion powder

cooking spray

Preheat oven to 400 degrees.

Spray rimmed baking sheet with cooking spray. Place tomatoes, artichokes and red onions on the baking sheet. Sprinkle with olive oil, salt, black pepper and onion powder. Gently toss to coat veggies with olive oil and seasonings. Bake for 20 – 25 minutes until veggies are roasted. Remove from the oven and let cool for 3 – 5 minutes.

Pre Pizza Crust:

Place pizza crust ona baking sheet and spread crust with pesto. Sprinkle a little cheese over the pesto. Spread roasted tomatoes, artichokes and red onions over the cheese then sprinkle with remaining cheese, dried oregano and red pepper flakes. Place in the oven and bake until cheese melts and turns slightly golden brown (approximately 5 minutes).

Remove from the oven and let cool for 1 minute then slice.


Follow my blog with Bloglovin

Turkish Lamb Neckbones

Neck bones are a Southern delicacy. There are beef neck bones, pork neck bones and as I recently discovered, lamb neck bones. Beef and pork neck bone recipes are pretty basic. I smother them in onions with a lot of good seasonings and chicken broth. Then I use the strained neck bone broth to flavor some white rice. Add some collard greens or steamed cabbage and you have heaven on a plate.

Lamb Neck Bones are not really Southern or at least not in my mind. When I picked up a couple of packs of lamb neck bones my mind landed on creating a Greek or Turkish recipe. Hence, my Turkish Lamb Neck Bones.

I wish I could say I have experience in making Turkish cuisines but I don’t. So, to make my job easy I bought a package of Turkish marinade to help my recipe along. The marinade was fragrant with the scent of cumin, garlic and tomatoes. These seasonings were deeply infused into the lamb which made it extra flavorful and the meat was very tender from the marinade.

My Turkish Lamb Neck Bones may not have been southern but they were still heaven on a plate. If you ever run across lamb neck bones or feel bold enough to ask you butcher if he has any, you should try this recipe. You will be pleasantly surprised at how delicious it is and how easy it is to make.

Turkish Lamb Neck Bones

Ingredients:

2 pkgs lamb neck bones

4 carrots peeled and cut into large slices

½ large onion peeled and sliced

½ lemon cut into quarters

½ jalapeno pepper sliced

1 pkg Turkish marinade

1 cup chicken broth

1 cup water

1 tbsp salt

½ tbsp ground black pepper

½ tsp onion powder

¼ tsp cayenne

Wash lamb neck bones. Place neck bones in a large bowl and season with salt, black pepper, onion powder and cayenne pepper. Toss to coat with seasoning. Pour marinade over the lamb then place meat in a large plastic zip lock bag and lock. Massage the marinade into the meat. Place in the refrigerator overnight or at least 4 hours. Remove from the plastic bag and place in a large pot with water, chicken broth, marinade, onion slices, lemon and jalapeno peppers. Cook lamb over medium heat for 1 ½ hours. Stir occasionally and add more liquid if necessary.

Preheat oven to 325 degrees.

Remove lamb neck bones from pot and place in a large casserole dish. Top with carrot slices and cover. Cook for 20 – 25 minutes until the carrots are tender. Serve with steamed cabbage or sauteed sweet potatoes.

Follow my blog with Bloglovin

Mustard Baby Back Ribs

Growing up with southern influences while living in the northeast region has been quite interesting to me. I embrace my southern roots but not all of the delicacies enjoyed by my southern brethren. For instance, my mom is a true southern chef and would prepare things like pig feet, chitterlings, pork ribs, muskrat, fried chicken livers or chicken gizzards smothered in onions and gravy with rice. Don’t ask about the muskrat which is really called musk rabbit. It smelled good but is one food I refused to eat. I preferred cereal or lunch meat sandwiches on muskrat dinner night.

Although I ate the other dishes growing up, I can say the thought of eating pig feet, chitterlings or chicken livers makes my stomach churn a little and my head ache. Back then you ate whatever was served (except muskrat) just because your mama made it. Now, I have total control over what I eat and it does not include anything that makes me frown when I look at it. The one thing I do like that my mom prepared in my younger days is ribs!

Mustard Baby Back Ribs is a slight twist on the ribs my mom made for every family BBQ. Everyone loved my mom’s ribs because they were smoky and tender plus she made her own BBQ sauce which had a tangy mustard and vinegar flavor. Once you tasted her sauce you were hooked. Even my neighbors started asking if Mrs. T could make them a batch of sauce after they tasted it at one of our backyard BBQs.

Okay, back to the Mustard Baby Back Ribs. A few weeks ago, I had a taste for baby back ribs but I did not have any of my mom’s sauce on hand so I had to think outside of the box to get the flavors I wanted. I decided to place the ribs in a mustard marinade to mimic the nice tangy flavor of my mom’s BBQ sauce. I think my idea worked beautifully and by the number of clean bones left on the family’s plates they thought it was a good idea too.

Mustard Baby Back Ribs

Ingredients:

2 packages baby back ribs

½ onion sliced thin

4 tbsp spicy brown mustard

1 ½ tbsp salt

1 tbsp Worcestershire sauce

½ tbsp black ground pepper

½ tbsp lemon pepper

½ tbsp chili powder

1 tsp onion powder

1 tsp garlic powder

Place baby back ribs in a large bowl. Add seasonings, Worcestershire sauce and mustard. Mix thoroughly to coat ribs with seasonings and mustard. Place in a plastic zip lock bag and refrigerate for 2 hours.

Preheat oven to 325 degrees.

Spray cooking spray on the bottom of a baking dish then line it with foil. Spray foil with cooking spray then spread sliced onions on the bottom of the baking dish. Season with a little salt. Remove ribs from plastic bag and place in a single layer over the onions. Bake uncovered for 30 minutes then cover with foil and bake another 30 minutes. Remove the ribs from the oven and top with your favorite BBQ sauce. Place ribs back into the oven uncovered and bake an additional 30 minutes.

Follow my blog with Bloglovin

Honey Dijon Baked Chicken

If you have used Gazebo Room Greek Salad Dressing and Marinade as a marinade for chicken you won’t be surprised at how tasty their Honey Dijon Vinaigrette works as a marinade too. This new Gazebo Room product lives up to their signature Greek salad dressing. I was inspired to use this dressing as a marinade because I enjoy the taste of honey and mustard. I don’t usually tell on myself but I must say the flavors were so good on the chicken that I wanted to take my time and pick every morsel of meat off the bone. Of course, I added other seasonings to the chicken but the flavors from the dressing were prominent.

I tried this recipe while my youngest son was home from college. He declared he was trying to eat healthier and didn’t want to eat red meat. Since he was game I was game for giving up pork chops and ribs for a while. This meant I had to add even more chicken and fish to our diets. No one would miss the steaks we ate a few times a year. Now my biggest problem was coming up with even more ways to prepare chicken so it would not be boring. T is not a fan of baked chicken but I had run out of ideas for my usual chicken recipe rotation. So, I took the chance of marinating chicken legs in the Gazebo Room dressing then baking them. Hence, my Honey Dijon Baked Chicken recipe. I figured the Honey Dijon Vinaigrette would kick the flavors up a notch and he would not notice the chicken was baked. I was right! T never mentioned or grumbled that we were having baked chicken. All I heard was the smacking of lips and saw naked chicken bones on his plate.

Chalk one up for Gazebo Room and chalk one up for me!

Honey Dijon Baked Chicken

Ingredients:

6 – 8 chicken legs and thighs

½ cup Gazebo Room Honey Dijon Vinaigrette

½ stick butter

½ medium onion sliced thin

1 tbsp salt

1 tsp olive oil

½ tsp ground black pepper

½ poultry seasoning

½ tsp turmeric

½ tsp cayenne pepper

Preheat oven to 350 degrees when ready to bake.

Place chicken in a large bowl and sprinkle seasonings over chicken. Pour dressing over chicken and toss to coat. Place chicken into a plastic bag then place in the refrigerator for a couple of hours. Remove from bag and add single layer to a baking dish. Melt butter and pour over chicken. Place in the oven and bake for 1 hour until chicken is browned and cooked all the way through.

Follow my blog with Bloglovin

Spicy Taco Chicken Bowl

The “new” craze right now is creating recipes and putting the dish in bowls. At first, I wasn’t really into the bowl idea but it didn’t take long for me to realize I kinda liked the idea. Placing breakfast, lunch or dinner in a bowl helped to cut down on the amount of food we actually ate. I put less in a bowl compared to  how much I put on a plate.

One of my first bowl adventures was my Asian Bowl with Lollipop Lamb Chops. Not to brag too much but that recipe was a big hit with hubby. Now, he has another favorite. My Spicy Taco Chicken Bowl. This recipe was a little spicy with various textures and flavors that complimented each other. Although there are several components to the recipe, I think it is a very simple dish. Shredded spicy taco flavored chicken, crispy yellow rice, seasoned black beans and a mix of avocado and tomatoes. The hardest thing about this recipe is the wait time. Yeah, this one isn’t quick to make only because the chicken has to bake. While the chicken bakes about an hour all of the other pieces can easily be pulled together.

Even I couldn’t complain about having chicken again. Plus, I didn’t take the easy way out and make wingettes. Instead, I opted for chicken legs because they are meaty and you don’t have to take a long time to clean them like chicken thighs. Granted, I think chicken thigh meat is sweeter than chicken leg meat but it takes work to get thighs ready for cooking. Maybe the next time I make a Spicy Taco Chicken Bowl I’ll build in extra time and try it with chicken thighs. Whichever chicken part you choose (legs vs. thighs), I am confident you will enjoy my Spicy Taco Chicken Bowl. Healthy, Easy and Delicious!

Spicy Taco Chicken Bowl

Ingredients:

6 – 8 chicken legs washed

2 plum tomatoes diced

2 scallions diced

2 slices bacon diced

1 can black beans rinsed

1 avocado diced

1 pkg hot and spicy taco seasoning

½ stick butter melted

1 ½ cup water

1 ½ cup chicken broth

1 ½ cups white rice

1 ½ tbsp salt

1 tbsp fresh lemon juice

½ tbsp ground black pepper

1 tsp turmeric

1 tsp cilantro

½ tsp dried parsley

½ tsp onion powder

½ tsp Chile powder

Preheat oven to 350 degrees.

Place chicken in a large bowl. Season with 1 tbsp salt, black pepper, Chile powder and all but 1 tsp hot and spicy taco seasoning. Add melted butter and mix until chicken is well coated. Spray a baking dish with cooking spray then place chicken in one layer in the baking dish. Bake for 1 hour until the chicken is tender and cooked through. Remove from the oven and let cool for about 10 minutes then pull meat off the bone into chunks. Place chicken in a medium size skillet with ¼ chicken stock and remaining taco seasoning. Stir and let simmer for 5 minutes.

While chicken is cooking prepare the following:

Rice:

Rinse rice with cold water to remove some of the starch. Place in a microwaveable casserole dish with a pinch salt, turmeric, water and chicken broth. Place in microwave uncovered for 21 minutes until cooked. Remove from microwave and fluff up rice with a fork. Let cool for about 10 – 15 minutes. While rice is cooling cook bacon in a large skillet until crisp over medium high heat. Remove from skillet and drain on paper towels. Reduce heat to medium high and add rice and scallions to the bacon grease breaking up any clumps of rice. Let rice crisp up for about 3 minutes then stir and flip to crisp up the other side. Cook for an additional 3 minutes then toss in bacon and mix in thoroughly. Cook another 2 minutes then remove from heat.

Prepare Tomato and Avocado:

Place diced tomatoes and avocado in a medium sized bowl. Season with a little salt, ground black pepper, parsley and lemon juice. Gently toss with a spoon. Cover and set aside in the refrigerator.

Black Beans:

Place black beans in a small pot and add a little chicken broth. Season with salt, pepper, cilantro and onion powder. Cook over medium heat for 3 – 5 minutes stirring occasionally. Remove from heat.

Bowl Setup:

Place crispy yellow rice in the bottom of an individual bowl. Add chicken to one side of the bowl then add the black beans along with tomato and avocado mix. Enjoy!

Follow my blog with Bloglovin

Zucchini, Tomato and Sweet Potato Gratin

Eating with your eyes is just as important as tasting with your tongue. I know I have mentioned this in the past but it is worth mentioning again. If you are going to prepare a dish for family, friends or yourself, you want it to look appealing. Combining different colors is an easy way to create visual beauty with food. This recipe is a nice blend of green, red and orange. Layering the vegetables in a circular pattern also made this a very attractive dish.

Gratins originated in French cuisine and has been adopted in many other culinary cuisines. I wasn’t sure exactly what gratin was until I saw one made on a cooking show. On this particular show the chef made potato au gratin which was gorgeous because of the crispy brown topping. Turns out a gratin is considered the technique of topping a dish with breadcrumbs or grated cheese then browning it.

While most of the gratin recipes I have seen are made with sliced white potatoes I wanted to think outside the box and combine potatoes with other vegetables. Plus, I wanted to make the dish pop with color. Hence, my Zucchini, Tomato and Sweet Potato Gratin. A ring of beauty and a delightful dish.

Zucchini, Tomato and Sweet Potato Gratin

Ingredients:

2 plum or vine ripe tomatoes sliced

1 large zucchini sliced

1 large sweet potato peeled and sliced

½ red onion sliced

½ cup shredded Parmesan or mozzarella cheese

2 tbsp olive oil

2 tbsp minced garlic

1 tbsp salt

½ tbsp ground black pepper

½ tsp dried thyme

Preheat oven to 375 degrees.

Coat bottom of a large iron skillet with 1 tbsp olive oil.  Add minced garlic and spread around the skillet. Alternate slices of zucchini, tomatoes, and sweet potatoes in a circular pattern around the iron skillet. Place red onion slices over the other veggies then season with salt, ground black pepper and thyme. Drizzle with remaining olive oil and sprinkle with shredded cheese. Place on the lower shelf of the oven and bake for 35 minutes. Move to top rack and back for 20 – 25 minutes more. Test potatoes with a knife to make sure they are cooked and soft.


Follow my blog with Bloglovin