Tag Archives: photography

Hot Italian Sandwich

IMG_3515_1

A good sandwich always starts with delicious bread. Some of the best bread comes from the bakery at your local grocer. I often find myself searching for different types of rolls for sandwiches when I want to make a tasty but quick family meal.

IMG_3520_1

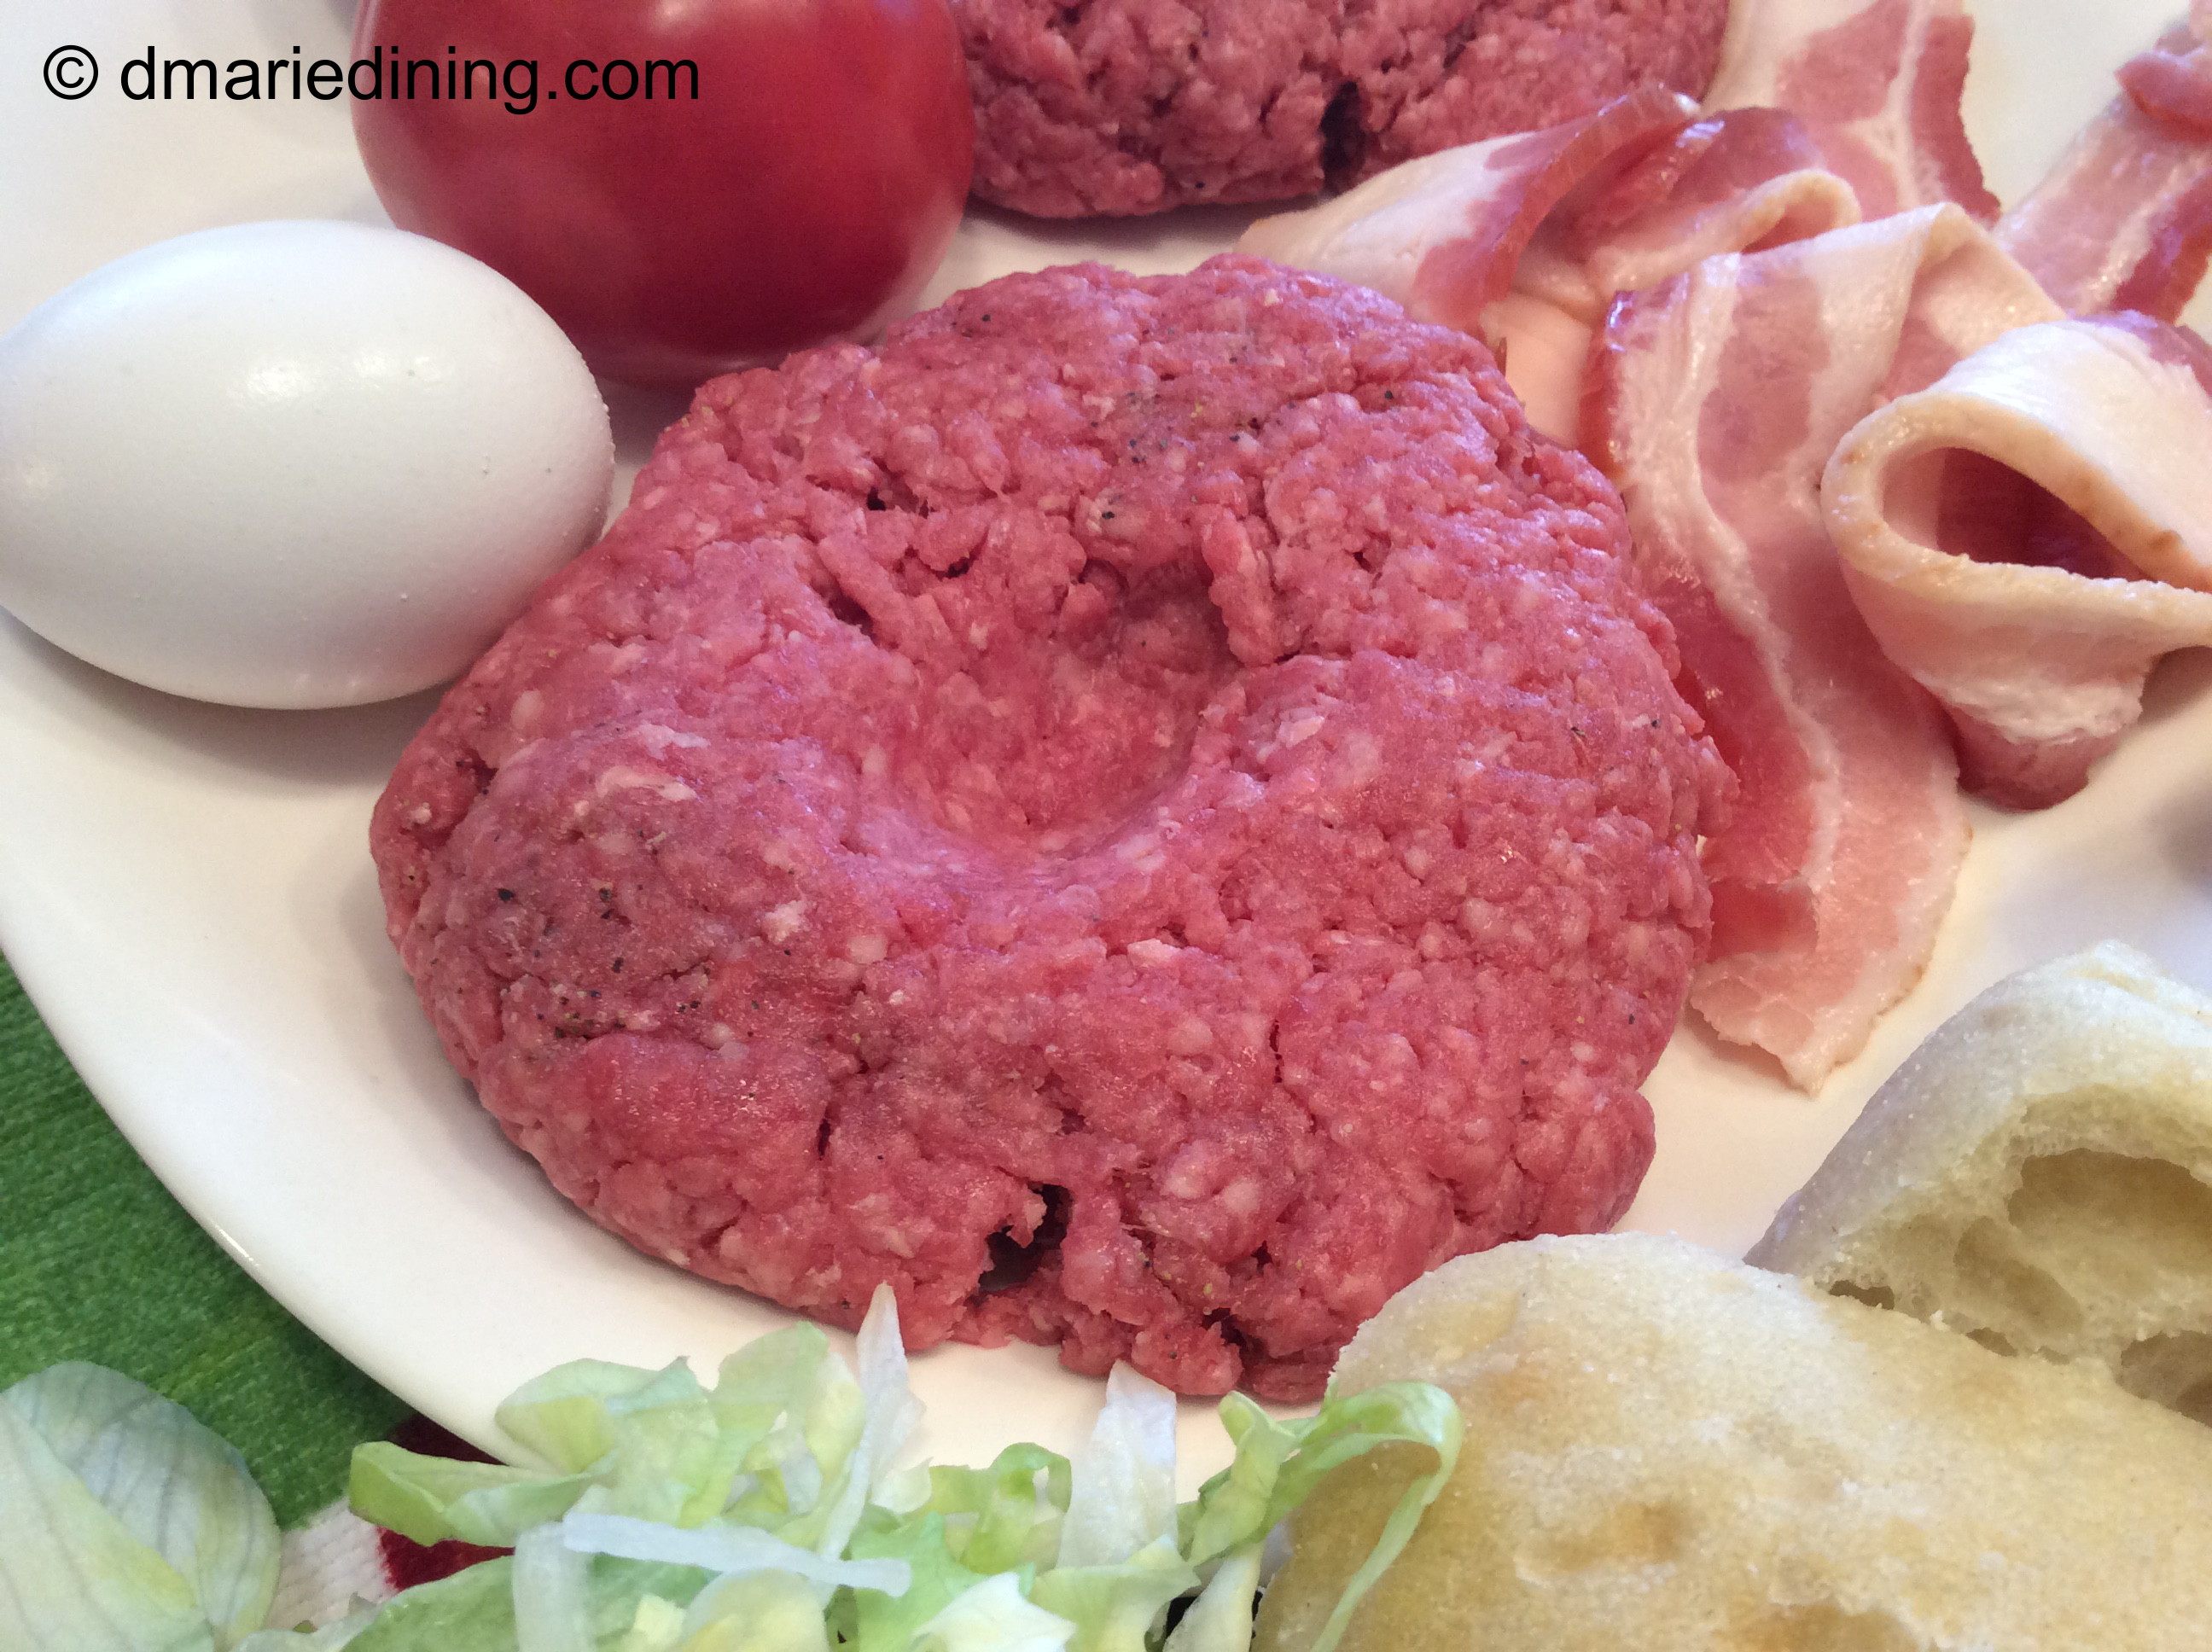
The other day I found two different flat rolls that inspired me to try a new sandwich. An Italian roll and a jalapeno roll. The Italian roll was sprinkled with Parmesan cheese and oregano while the jalapeno roll was sprinkled with a little grated Parmesan cheese with slices of jalapeno peppers baked into the top of the bread. Both rolls smelled heavenly at the bakery and were so inviting that I had no choice but to put a couple of each in my basket. The Italian roll inspired me to create a Hot Italian Sandwich which turned out to me a winner in the family. I have made this sandwich a few times since my first try and it continues to be something the family enjoys. The sandwich is packed with soppressata, capicola ham and pepperoni sliced from the deli.

IMG_3529_1

Sandwiches are my go to meal whenever we are having a later than usual dinner because my son has a sporting event, school event or I have a bunch of errands after work. By the time we get home I don’t feel like preparing a complicated meal but I still want a balanced dinner. I really just want to get dinner on the table in less than 30 minutes so that we all still have time to relax before going to bed to prepare for another busy day.

IMG_3546_1

IMG_3542_1

Hot Italian Sandwich

Ingredients:
2 – 3 flat bread rolls (jalapeno, Parmesan or regular) sliced in half
6 – 9 slices deli pepperoni
6 – 9 slices deli soppressata
6 – 9 slices deli capicola
1 large tomato sliced thin
4 – 6 slices provolone cheese
4 – 6 slices pepper jack cheese
2 tbsp pesto
¼ tsp red pepper flakes
¼ tsp oregano
1 tbsp Italian dressing
1 cup of shredded lettuce

Preheat oven to 400 degrees.

Mix Italian dressing with lettuce and set aside.

Spread pesto on bottom half of each roll. Place two slices of pepper jack cheese on the bottom half of each roll. Place on a cookie sheet.

On a separate cookie sheet pile 2 slices of capicola, 2 slices soppressata, 3 slices tomatoes sprinkled with oregano and red pepper flakes. Top tomatoes with pepperoni then 2 slices provolone cheese.

Place meats and bread in the oven until cheese melts approximately 2 – 3 minutes. Remove from oven and top bottom half of each roll with meat and lettuce. Place other half of roll on top of the lettuce and cut in half. Serve with chips or a cup of soup.

Follow my blog with Bloglovin

Oxtail Stew

IMG_2957_1

My southern roots are showing. Oxtail Stew is one of those southern dishes that most folks up north don’t really know about. Surprisingly, more and more people are coming into the fold and are enjoying oxtails in various recipes. Historically, oxtails were considered a poor man’s dish since it was a cheaper cut of meat. Still, all across the world this cheaper cut of meat was also considered a delicacy. Oxtails were and are used in stews, soups and special sauces. Today, oxtails are no longer a cheap cut of meat. To the contrary. Oxtails are a little more expensive and can be found among the best choice cuts of meat at any grocery store that carries a variety of meats.

IMG_2982_1

Because my mom is both southern and an amateur chef by profession it meant growing up we often had meals that included every part of an animal’s body. I can honestly say my mom can take any animal on the planet and prepare it so that it smells heavenly. I would also say that same animal probably tastes absolutely delicious but I draw the line at eating certain things regardless of how good it smells. Needless to say, the squirrel, rabbit, turtle and sweet bread dishes my mom made did not touch my lips but boy they sure smelled good cooking.

IMG_3016_1

Back to Oxtail Stew. I was talking to my mom about recipes recently and she told me she had made some oxtails. I started thinking of how good her oxtails in onions and gravy were and how much I missed having them. I decided I should try making my own Oxtail Stew for the blog and create a new memory for my family. I was shocked when I got to the grocers and saw the price on the few packages of oxtail I found next to the Delmonico steaks. Since I had committed myself to making an Oxtail Stew I did a Mary Tyler Moore move and rolled my eyes, shook my head and tossed the oxtails into my shopping cart.

IMG_3003_1

Oxtail Stew is one of those meals you eat with two types of utensils. A fork and fingers. You can use the fork to pull pieces of meat off of the bone then pick up the bone and suck all of those delicious juices and those tiny remaining pieces from the bone. For those of you who eat fried chicken with a knife and fork you would not understand what I mean. Just like most of us use our God given fingers to pick up chicken and eat it off the bone you need to do the same with oxtails. If you don’t, you will miss out on some serious flavors and good eating!

IMG_3020_1

Oxtail Stew

Ingredients:
2 pkgs of oxtails
2 carrots chopped
2 scallions chopped (including green part)
1 large onion chopped
1 garlic clove chopped
1 bay leaf
1 small can tomato paste
2 cups water
1cup beef stock
4 tbsp frying olive oil or vegetable oil
1 tbsp salt
½ tbsp black pepper
1 tsp ground cumin
1 tsp ground coriander
1 tsp curry powder
1 tsp ginger (ground or fresh minced)
1 tsp smoked paprika
1 tsp red pepper flakes (optional)
¼ tsp nutmeg

Season oxtails with all seasonings. Place in a plastic zip lock bag and refrigerate for 2 hours or overnight.

Heat oil in a dutch oven over medium high heat. Brown oxtails on all sides then place oxtails in a pressure cooker with ½ of the diced onions and 2 cups of water. Cook oxtails for approximately 45 minutes. Let pressure cooker cool (run cold water over the top of the pressure cooker to cool faster. Check out handling instructions.). Strain beef stock from pressure cooker and reserve 2 cups.

Saute remaining onions, scallions and carrots in the dutch oven over medium heat until slightly softened and onions are translucent. Reduce heat to medium then add garlic and stir for 1 minute. Do not let the garlic burn. Add tomato paste, reserved beef stock and 1 cup of beef stock. Whisk together. Add oxtails and bay leaf. Cover and let simmer for 2 ½ hours stirring occasionally. Add additional salt to taste. Serve with rice.


Follow my blog with Bloglovin

Breakfast Burrito

IMG_3366_1

Weekends are usually the only time I have to make a family breakfast. But, even on the weekends I may be crunched for time to get breakfast on the table. Between basketball games, errands or family outings I sometimes have to pull together a quick meal before we head out the door.

IMG_3374_1

Breakfast Burritos are a quick way to get a relatively balanced breakfast on the table without a lot of fuss. Plus, the burritos are light but filling so you feel satisfied and not hungry a few minutes after eating. I like to add veggies to my Breakfast Burritos to make them seem healthier than if I loaded them with potatoes or other heavy foods like you see in fast food commercials. That being said, it doesn’t mean I don’t like a little bacon on my burrito. Healthy is good but bacon is too!

IMG_3380_1

Getting back to the veggies in the Breakfast Burrito, I count salsa as a veggie. Salsa is basically nothing but veggies. Tomatoes, onions, peppers. Three vegetables in one scoop of salsa. How great is that? Even my youngest son likes salsa. Although he would also tell you he does not like fresh tomatoes. Cooked? Yes. Fresh? No. Crazy I know but it is all a mind game. There are plenty of things in life folks say they don’t like in one form but love them in another form. For instance, I have a friend that refuses to each raw broccoli with dip. However, she is wild about broccoli salad. Go figure. Hmmm… it must be the bacon. Again, bacon is always good. Yea bacon!

IMG_3399_1

Okay, I got off track for a second. Back to the Breakfast Burritos. You can add whatever you like to your burrito. Leftovers are a wonderful filling to Breakfast Burritos as long as they go with eggs. Try my standard version of a Breakfast Burrito then try creating your own version. Whatever you do I know it will be good.

IMG_3405_1

Breakfast Burrito

Ingredients:
8 large eggs
6 slices bacon
3 large tortillas
¼ cup milk
½ cup shredded Colby Jack cheese
¼ cup shredded sharp cheddar cheese
¼ cup salsa
1 tbsp sour cream
1 tbsp butter
cooking spray

Preheat oven to 250 degrees.

Place bacon on a microwave safe plate with a stack of 3 paper towels and cover with a paper towel. Microwave bacon for 4 ½ minutes until crispy. May need to adjust time based on your microwave. Set aside.

Melt butter in a medium size non-stick frying pan. Add eggs and milk. Break up yolks in the pan and stir until eggs are blended with the milk. Stir in cheddar cheese and black pepper. Cook until eggs are scramble, light and fluffy.

Lay a large tortilla on a flat surface. Spread a little cream cheese over the tortilla. This will act as a binding agent to keep the tortilla together when you roll it up. Place a spoonful of scrambled eggs at one end of the tortilla. Layer a little salsa over the egg then sprinkle shredded Colby Jack cheese over the salsa. Add two slices of bacon over the cheese. Fold the closest end of the tortilla over the filling then fold in the two sides. Roll the tortilla tucking in the sides as you go until you reach the other end of the tortilla. Place tortilla on a cookie sheet sprayed with cooking spray. Repeat with remaining tortillas. Bake the tortillas for 5 – 10 minutes to allow cheese to melt and the tortilla is warm.


Follow my blog with Bloglovin

Roasted Pork Tenderloin

IMG_2368_1

I have to say on the day I prepared this recipe I was really stopped up and couldn’t enjoy the normal aromas surrounding me when I cook. But, the Roasted Pork Loin smell came through loud and clear. The pork smelled heavenly with the onions and jalapeno peppers I added to the dish. All of a sudden I felt my mouth watering and I realized it was because of the delicious smell coming from the oven. It is nice when good food evokes that kind of reaction. The smell is great, your mouth waters and you just cannot wait to eat!

IMG_2380_1

Not everyone enjoys pork but if you are willing to serve it to family and friends this will be a crowd pleaser. Pork loin is a tender piece of meat but like with any meat it can dry out if you are not careful. I think surrounding the pork loin with lots of onions and peppers along with a little water then wrapping it up tight helps to lock in the juices and the flavors.

IMG_2389_1

Roasted Pork Loin is excellent as a sandwich or paired with fried apples and mashed potatoes. No matter what you decide to make as a side dish the Roasted Pork Loin with be the star on your table. “Mr. DeMille, I’m ready for my close-up”.

IMG_2403_1

Roasted Pork Loin

Ingredients:
1 – 2 pork loins
1 large onion sliced
1 jalapeno pepper sliced
1 cup of water
1 tbsp salt
1 tbsp black pepper
1 tsp onion powder
½ tsp ground ginger
paprika

Preheat oven to 350 degrees.

Season pork loins with all seasonings and place in a roasting pan. Cover with onions and jalapeno peppers. Pour water into the pan and wrap tightly with foil. Bake for 1 ½ hours until cooked and tender. Slice for a meal or sandwiches.

Follow my blog with Bloglovin

Shrimp with Crab Grits

IMG_2766_1

I recently went to a fantastic restaurant in Maryland with my daughter and youngest son. We were doing an overnight visit with baby girl so I treated us all to dinner. The restaurant was eclectic with modern tables, a small library of books to purchase, great artwork, a stage for poetry readings and wonderful service. The crowd was diverse and so was the food.

IMG_2744_1

I was amazed at the variety of dishes on the small menu which had a basic organic theme but offered foods anyone could enjoy. I decided to try a shrimp dish that was layered over crab grits and smothered in a light sauce with crisp veggies. After the first bite I knew I would have to try and re-create this dish when I got home.

IMG_2774_1

What I created does not taste exactly like the wonderful dish in Maryland but it comes pretty close. The key was to make sure each layer of flavor complimented the next. The grits were nice and creamy with the subtle hint of crab. The veggies were crisp and naturally sweet. The shrimp added their own layer of flavor along with an underlying level of spicy heat just enough to make your taste buds tingle. Although I used jumbo shrimp for the recipe, I think scallops or a nice grilled fillet of salmon or cod would be enjoyable too.

IMG_2798_1

Shrimp with Crab Grits

Ingredients:
1 lb lump crab meat shelled
2 shallots diced
2 cloves garlic sliced
1 tomato seeded diced
1 cup coarsely ground grits
1 cup thin asparagus chopped
2 cups water
¼ cup heavy cream
½ cup half and half
2 tbsp butter
2 tbsp olive oil
1 tsp fresh parsley
1 tsp salt
1 tsp black pepper
juice from ½ lemon
Bring water and 1 teaspoon of salt to a boil. Stir in half and half then add grits and reduce to medium heat. Cook until thick and tender approximately 15 to 20 minutes. Add cheese and stir until melted and well blended. Gently stir in crab and try not to break up the lumps of meat. Set aside and keep warm. Add a little milk if needed to thin out grits.

In a medium pan melt 1 tbsp butter with 1 tbsp olive oil. When heated add shrimp and sprinkle with salt, pepper and lemon juice. Cook until shrimp are pink and remove from heat. Set aside.

In a large pan saute shallots in olive oil and 1 tbsp butter until slightly browned. Stir in garlic then add asparagus, tomatoes, parsley and seasonings. Let simmer for 3 minutes then remove from heat.

Place grits into a bowl then spoon veggie mixture over the grits. Top with shrimp and sprinkle a little fresh parsley over the top. Yummy!

Follow my blog with Bloglovin

Dee’s Veggie Soup

IMG_2865_1

My mom loves to make vegetable soup in the winter or if there is a slight chill in the air. I really like her vegetable soup but when I cannot get to her house I have to make my own soup. Usually, I make chicken corn chowder or some version of chicken noodle soup. Today, I thought I would try my hand at creating my own vegetable soup. Besides, it was a cold snowy day and I couldn’t get to my mom’s house.

IMG_2867_1

My version of vegetable soup (Dee’s Veggie Soup) did not include any meat. My mom uses ham or smoked meats to help season her soup. I wanted mine to be purely vegetarian. The natural sweetness of the vegetables along with a few choice seasonings gave the soup the punch of flavor I desired. As for the vegetables I used in the soup, they were both traditional and non-traditional. Like my mom I used tomatoes, onions and cut green beans. But, instead of adding celery and peas I used sliced fennel and kale. I also used a can of creamed corn to make the soup a little more savory.

IMG_2910_1

Dee’s Veggie Soup had several depths of flavor from the mix of vegetables and seasonings. I thought it was delicious and the soup definitely took the chill out of my bones. Hubby liked the soup too. Once he started dipping into his bowl of soup I don’t think he stopped until it was all gone. To me, that is one of the nicest compliments you can get when you cook.

IMG_2934_1

IMG_2925_1

Dee’s Veggie Soup

Ingredients:
1 small fennel bulb sliced (white part only)
1 small bunch of curly kale chopped
1 small onion diced
1 ½ cups cut french green beans
1 14 oz can fire roasted tomatoes
1 14 oz can creamed corn
2 14 oz cans small white beans drained and rinsed
1 tbsp salt
1 tsp black pepper
1 tsp onion powder
1 tsp garlic powder
1 tsp basil
1 tsp thyme
1 tsp parsley (fresh or dried)
32 oz chicken stock
32 oz water

Place all ingredients except for kale into a large pot over medium heat. Cover and simmer for 30 minutes. Add kale. Stir and simmer for an additional 30 to 45 minutes until kale is tender.

Mixed Baked Beans

IMG_2697_1

Summertime is usually the time when folks make baked beans for every picnic, bar-b-que (yes, there is a difference between the two) or outdoor kids birthday party. But, we like to have baked beans year round because they taste so darn good. Plus, baked beans pair well with a lot of different meats like hot dogs, kielbasa, hot sausages and burgers. The list goes on and on.

IMG_2709_1

Now that I have said how wonderful baked beans can be I think I should add that they sometimes need to be “doctored up”. I came up with Mixed Baked Beans because I wanted to make a slightly different side dish to go with some oven baked spare ribs I was fixing for dinner. I had a shelf full of a variety of beans so I decided to mix them all together to see how it would taste. If I do say so myself, they tasted absolutely delicious. The flavors of the cannellini, black beans and the homestyle baked beans blended together very well and were fantastic with the ribs.

IMG_2733_1

The next time I tried making Mixed Baked Beans  I added some kielbasa and andouille sausage to the beans to kick up the flavors even more. Imagine all those wonderful flavors mixing together all in one simple dish. Hmmm…. I think I know what we are having for dinner tonight. Mixed Baked Beans with a few added surprises. Excellent!

IMG_2722_1

Mixed Baked Beans

Ingredients:
1 15 oz can cannellini beans drained and rinsed
1 15 oz can black beans drained and rinsed
1 15 oz can homestyle baked beans
1 14 oz can fire roasted tomatoes
½ cup diced onion
½ cup diced green pepper
2 tbsp brown sugar
2 tbsp butter
½ tbsp dijon mustard
1 tsp salt
½ tsp onion powder
½ tsp black pepper
½ diced jalapeno pepper

Optional:
2 slices of bacon diced
kielbalsa sausage
andouille sausage

Preheat oven to 350 degrees

Spray casserole dish with cooking spray. Combine all ingredients into the casserole dish. Stir to mix well. Bake for 30 – 35 minutes until hot and bubbly.

Follow my blog with Bloglovin

Comfort Stew

IMG_2114_1

Comfort food comes in many shapes, flavors and categories. Some are hot and some are cold. Comfort foods can also be seasonal. During the summer months my comfort foods are homemade potato salad, hand churned ice cream and my mom’s apple pie. In the cooler and down right cold months my comfort foods tend to be homemade soups and stews.

IMG_2095_1

Just recently my hubby added a new dish I made to his comfort foods list. I think because it was a hearty stew packed with protein, veggies and fiber in the form of beans. Two kinds of beans to be exact. Beans are very rich in fiber as well as protein. I used black beans ( 15 g of fiber in 1 cup) and small white beans (19 g of fiber in 1 cup) to help fill my family up and to provide them with as much nutrition as possible in one dish. That is the great thing about stews. They can be a one pot dish which means easy clean up. At least my son thinks so because he usually does the dishes.

IMG_2138_1

This Comfort Stew is even better the day after you make it. In my humble opinion, letting a dish sit overnight allows the seasonings and other ingredients to meld together and create an explosion of flavor. Because beans are so filling you will probably have leftovers so you can bet on enjoying another delicious bowl of Comfort Stew the next day. We sure did!

IMG_2198_1

IMG_2194_1


Comfort Stew

Ingredients:
2 lbs ground turkey (93% lean)
2 14 oz cans small white beans with liquid
1 14 oz can black beans drained and rinsed
1 14 oz can diced tomatoes with jalapenos
1 14 oz can diced tomatoes with sauce
3 scallions sliced
1 onion diced
1 red pepper diced
1 small Napa cabbage shredded
½ green pepper diced
½ cup celery diced
½ cup water

Seasonings:
1 tbsp salt
1 tbsp worcestershire sauce
1 tsp black pepper
1 tsp onion powder
1 tsp garlic powder
½ tsp nutmeg
½ tsp thyme
½ tsp basil

Brown ground turkey on medium high heat in a large pot. Season meat with salt, black pepper, onion powder and garlic powder. Add scallions, red and green peppers. Stir and reduce heat to medium. Cook for 3 -5 minutes. Add tomatoes, cabbage, water, beans and remaining seasonings. Stir and lower heat slightly. Simmer for 20 minutes.

Follow my blog with Bloglovin

Banana Split Treat

IMG_2816_1

There seems to be a trend going on in the cooking arena. Deconstructed food recipes. Generally, I am not a follower but seeing a number of cooking shows which featured deconstructed recipes got me to thinking about what kind of deconstructed recipe I could create. I figured I should start with a fairly simple recipe rather than try something fancy. Besides, if I tried a more complicated recipe (deconstructed or not) it could be a big fat flop.

IMG_2821_1

Creating a Banana Split Treat turned out to be a very easy way to introduce myself into the world of deconstructed recipes. In case anyone is wondering, a deconstructed recipe is one that takes a standard recipe and rearranges how the dish is constructed but maintains the original ingredients. So for my deconstructed Banana Split Treat I used banana, cherries, ice cream, nuts and a little pound cake to give the recipe a new twist.

IMG_2842_1

Rather than splitting a banana I used two slices of pound cake as the base for the split then built the dessert from there. The end result was a nice sweet treat that I was proud to serve to a few friends at a recent gathering. Nothing fancy. Just a delicious deconstructed treat.

IMG_2833_1

Banana Split Treat

Ingredients:
4 slices pound cake
2 bananas sliced
1 pint vanilla bean ice cream
1 cup maraschino cherries
½ cup wet nuts
¼ cup liqueur (grand marnier, maraschino, etc)
hot fudge for drizzle

Soak cherries in liqueur for at least 1 hour.

Place slice of cake in a bowl. Top with a scoop of vanilla bean ice cream and sliced bananas. Spoon cherries and juice over bananas then add a spoonful of wet walnuts. Drizzle with hot fudge.

Follow my blog with Bloglovin

Sunny Side Burger

IMG_2299_1

I wrote my recipe for Sunny Side Burgers back in the fall but I just recently took the time to really try out the recipe. Actually, I forgot that I had not tested the recipe on my family. Mostly, because it takes a little time to make a good burger and on week nights I am rushing to get dinner on the table after work. On the weekends I am also running around or I have some other ideas in my head and just forgot to try out the burger.

IMG_2319_1

IMG_2321_1

Anyway, I was flipping through the journal I use to do my writing and ran across my Sunny Side Burger recipe so I thought it would be a good time to try it on hubby. I decided to surprise him and make them for lunch rather that pick up a sandwich from our favorite deli. One of the keys to making a good burger is to form a medium sized patty and create a indentation in the middle of the patty. This helps prevent a big bubble from forming in the middle of the patty that you naturally want to mash down. When you press down on your burgers you are releasing all of the wonderful juices which is a no-no.

IMG_2329_1

Burgers, I think, are a very individualized food. Everyone likes their burgers prepared in a different way whether it is rare, medium rare or well done. We also like to put different toppings on our burgers. The Sunny Side Burger has basic ingredients but can still be customized to your own tastes like any other recipe you find on dmariedining.com. Try making my version then let me know what you think and if you add a little something to it.

IMG_2345_1

Enjoy!

Sunny Side Burgers

Ingredients:
1 lb ground sirloin (4 burgers)
8 slices crispy bacon
4 eggs
4 slices beefsteak tomatoes
4 slices pepper jack cheese
2 tbsp butter
1 tbsp black pepper
1 tbsp salt
1 tsp onion powder
1 tsp worcestershire sauce
1 ½ tbsp vegetable oil
4 ciabatta rolls sliced

Optional:
shredded lettuce
shredded cheeses

Form ground sirloin into 4 patties. Sprinkle with worcestershire, salt, pepper and onion powder. Make a thumb impression in the middle of the burger.

Place vegetable oil in an iron skillet and heat on medium high heat. Add hamburger patties and brown on one side until a crust is formed. Flip burger and cook on the other side to your desired level of rareness. Do Not flatten the burger or all of the delicious juices will escape. Remove burger from the pan and place on a paper towel to rest.

In a non-stick pan melt butter then add egg. Cook until desired hardness of the egg. Slice ciabatta rolls. Toast slightly (optional). Assemble burgers by placing burger on bottom half of the ciabatta roll. Top burger with slice of cheese, egg, lettuce, tomato then two slices of bacon. Place the remaining bun on top and enjoy.

Follow my blog with Bloglovin