Monthly Archives: March 2015

Whiskey Glazed Ham

IMG_8004_1

I confess! I am a meat lover and I eat pork. Before my vegetarian brothers and sisters get up in arms, I want you to know I also love veggies. I sometimes create meals that are meatless but probably not as often as I should. Still, we have veggies with every meal and usually include a salad too. Don’t get me wrong. I am not feeling guilty because I eat meat but I just felt I needed to say that out loud. Of course if you have been following dmariedining.com it is obvious we are a meat eating family. However, my youngest son and I are really the only pork lovers in the household.

IMG_8110_1

Growing up we had pork quite a bit besides chicken. In my lifetime, I have probably eaten almost every part of pig from the snoot to the tail. Those of you with southern roots have probably done the same. Nothing goes to waste with southern cooks. Now that I am older and cook for myself there are parts of a pig you could not pay me enough to eat. Bacon, pork chops, ribs, sausage and ham are things I like to eat but I do limit how often we eat them.

IMG_8124_1

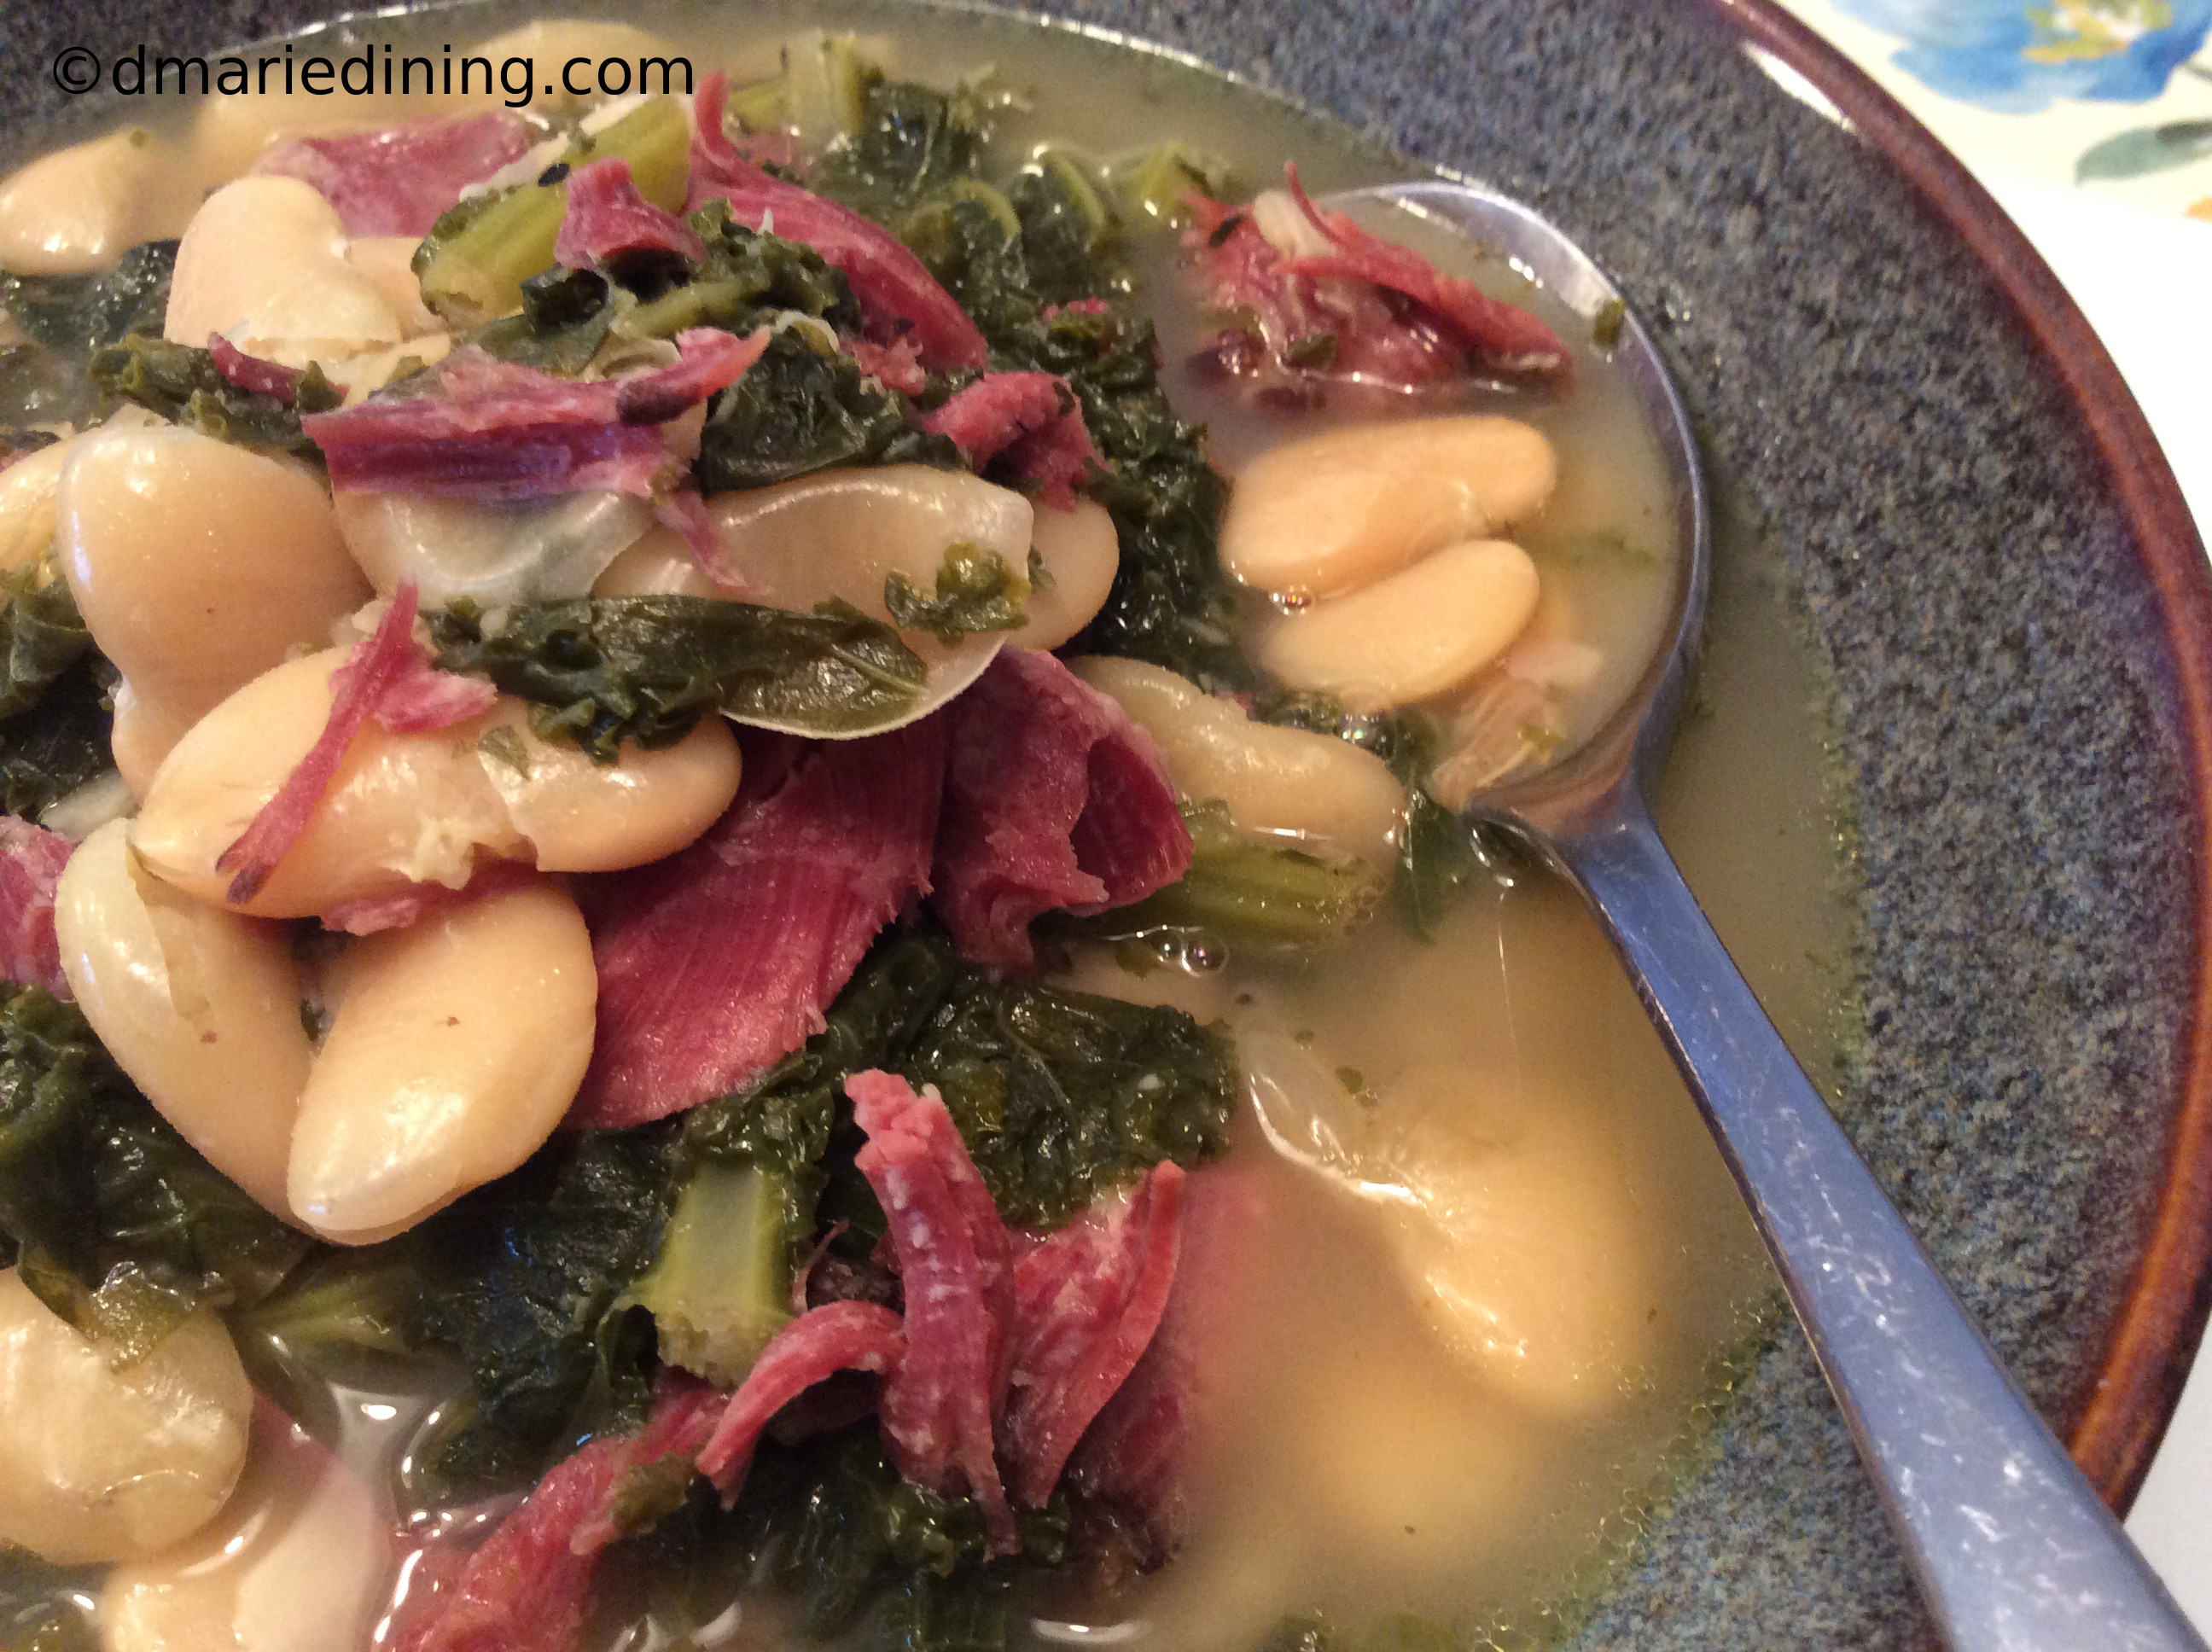
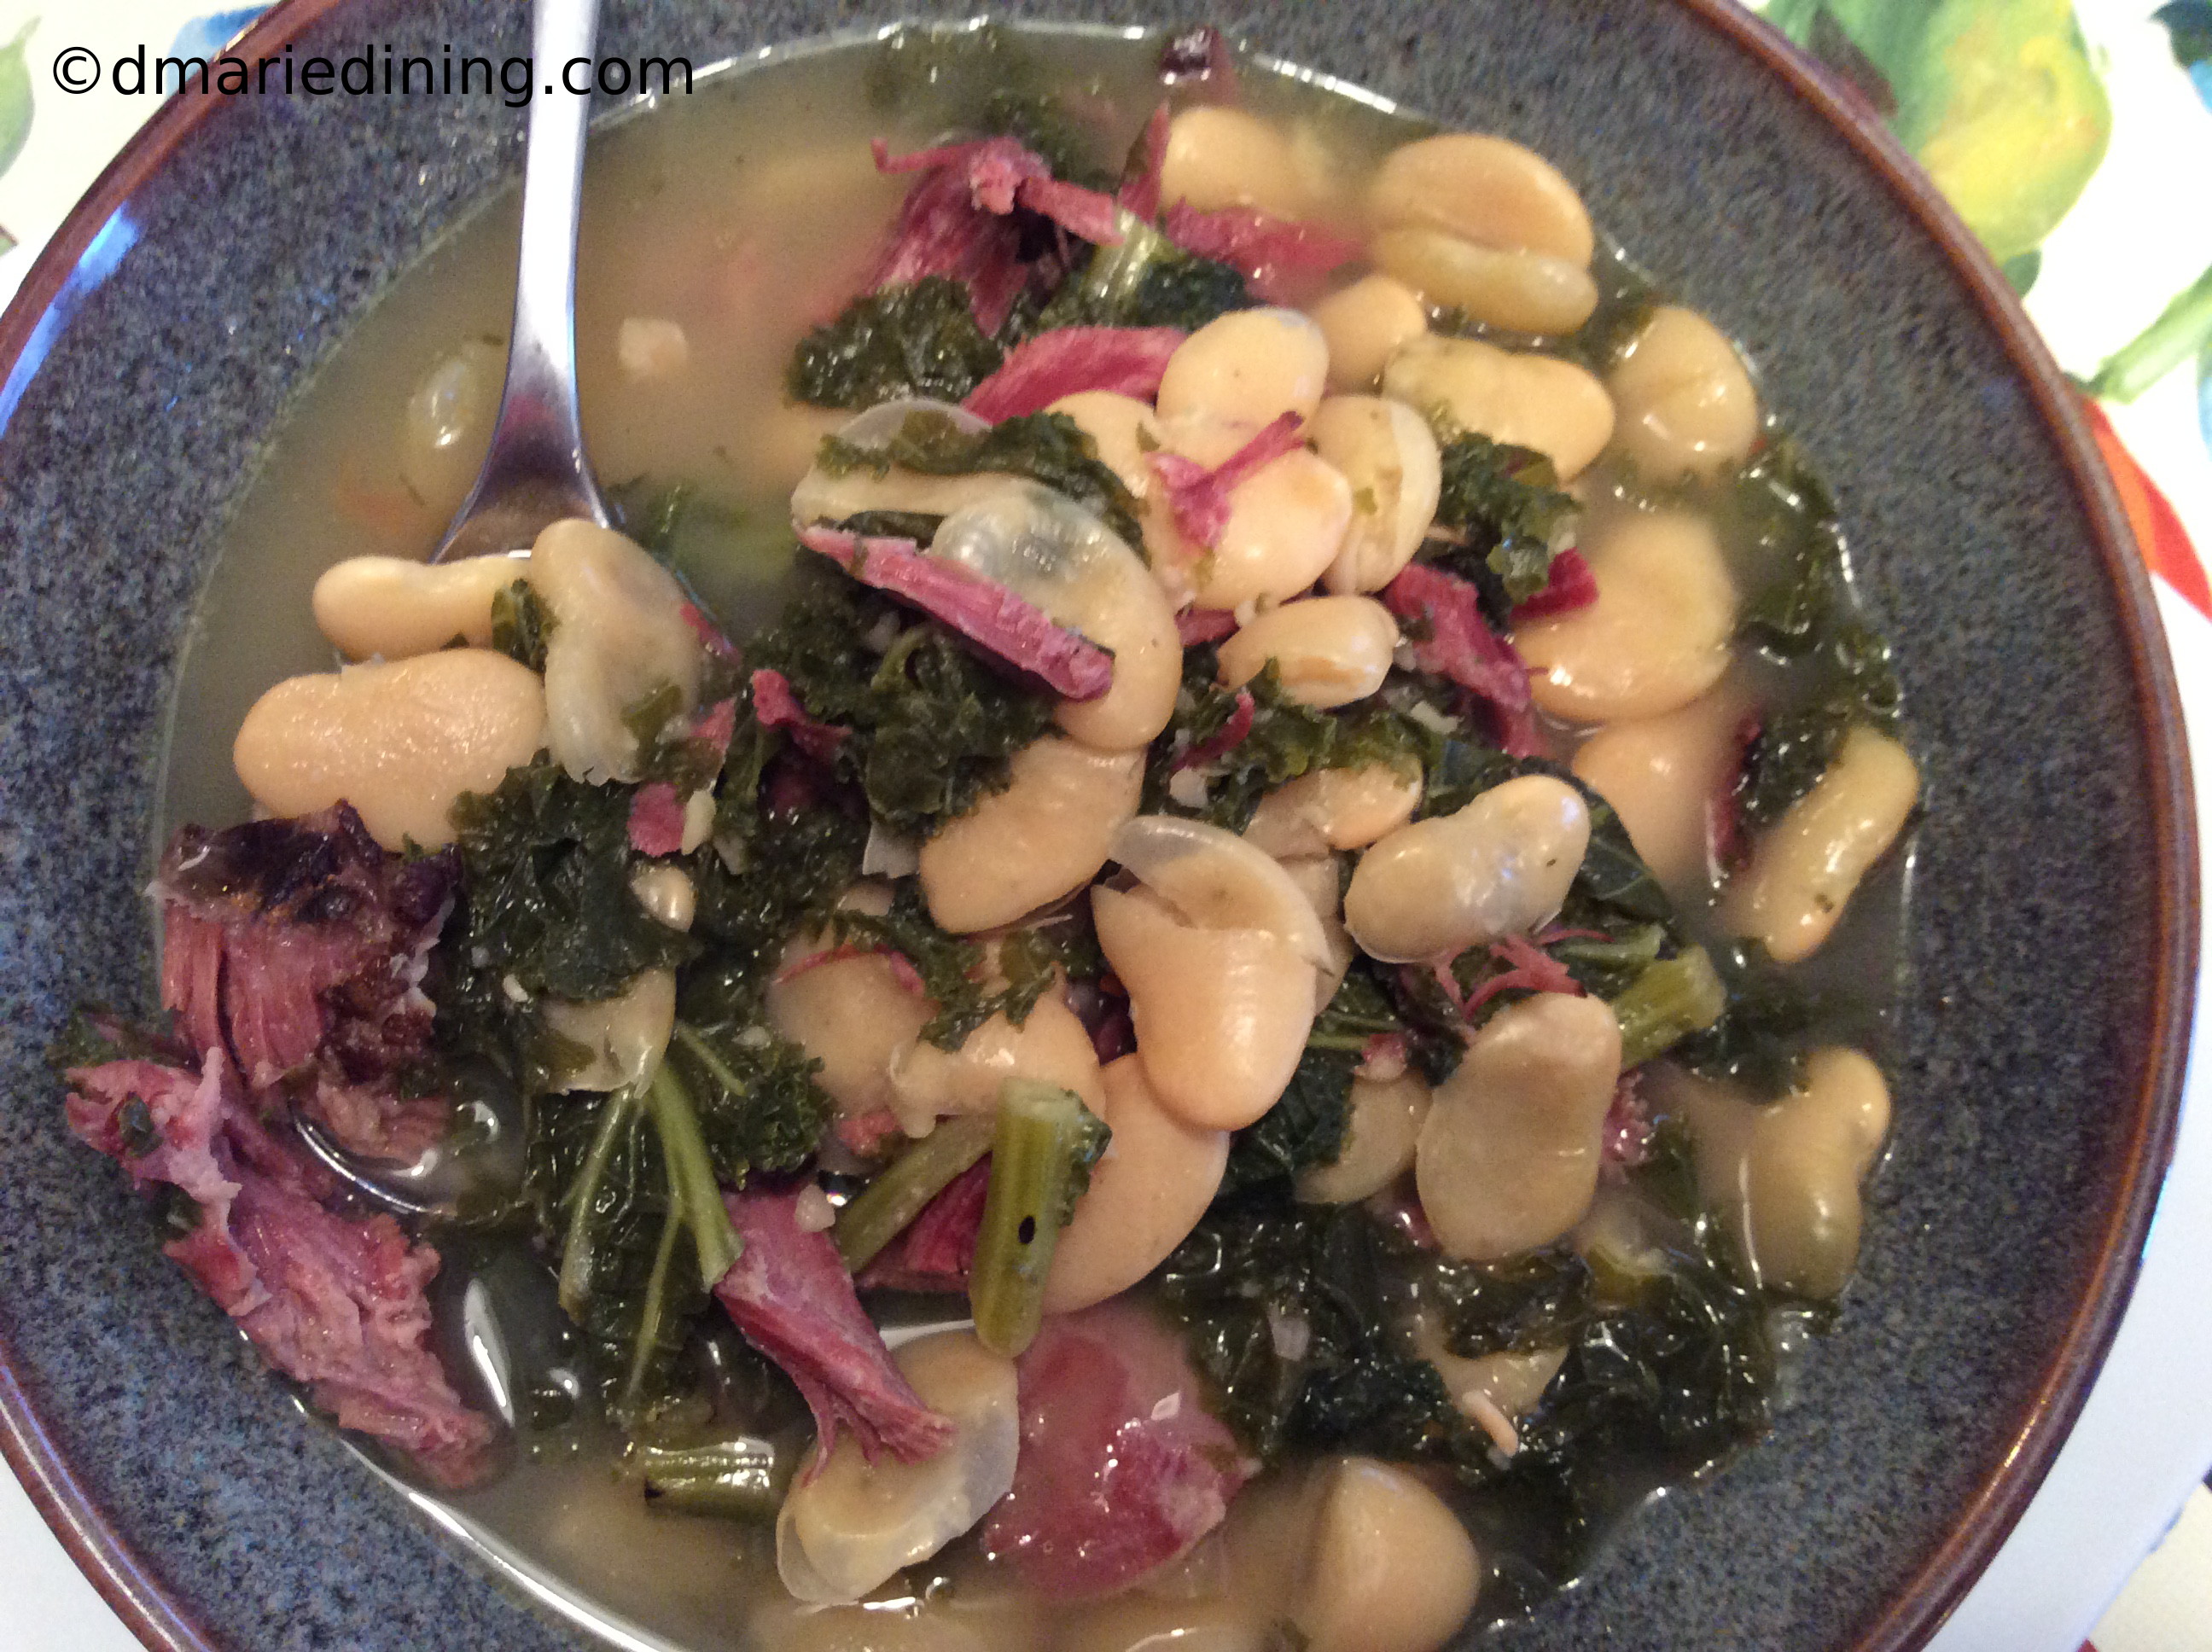
Last weekend I finally decided to fix the ham I have had in the freezer for a while. Because we do limit how much pork we eat I thought my family would eat it one night and then I would have to freeze the leftovers. What was I thinking? As soon as I took the ham out of the oven my son was asking if he could taste it. After cutting a few slices I looked away for a second and they were gone. When I asked him what happened to all of the slices his comment to me was “You knew what you were getting into when you cooked the ham”. Translation…. Mom you know I love ham so what did you expect!?!

IMG_8116_1

Needless to say the leftovers I thought I would have to freeze were gone in three days. Between my son and me I think we had ham for breakfast, lunch or dinner each day. At this point, I am all hammed out but I must say it was good while it lasted.
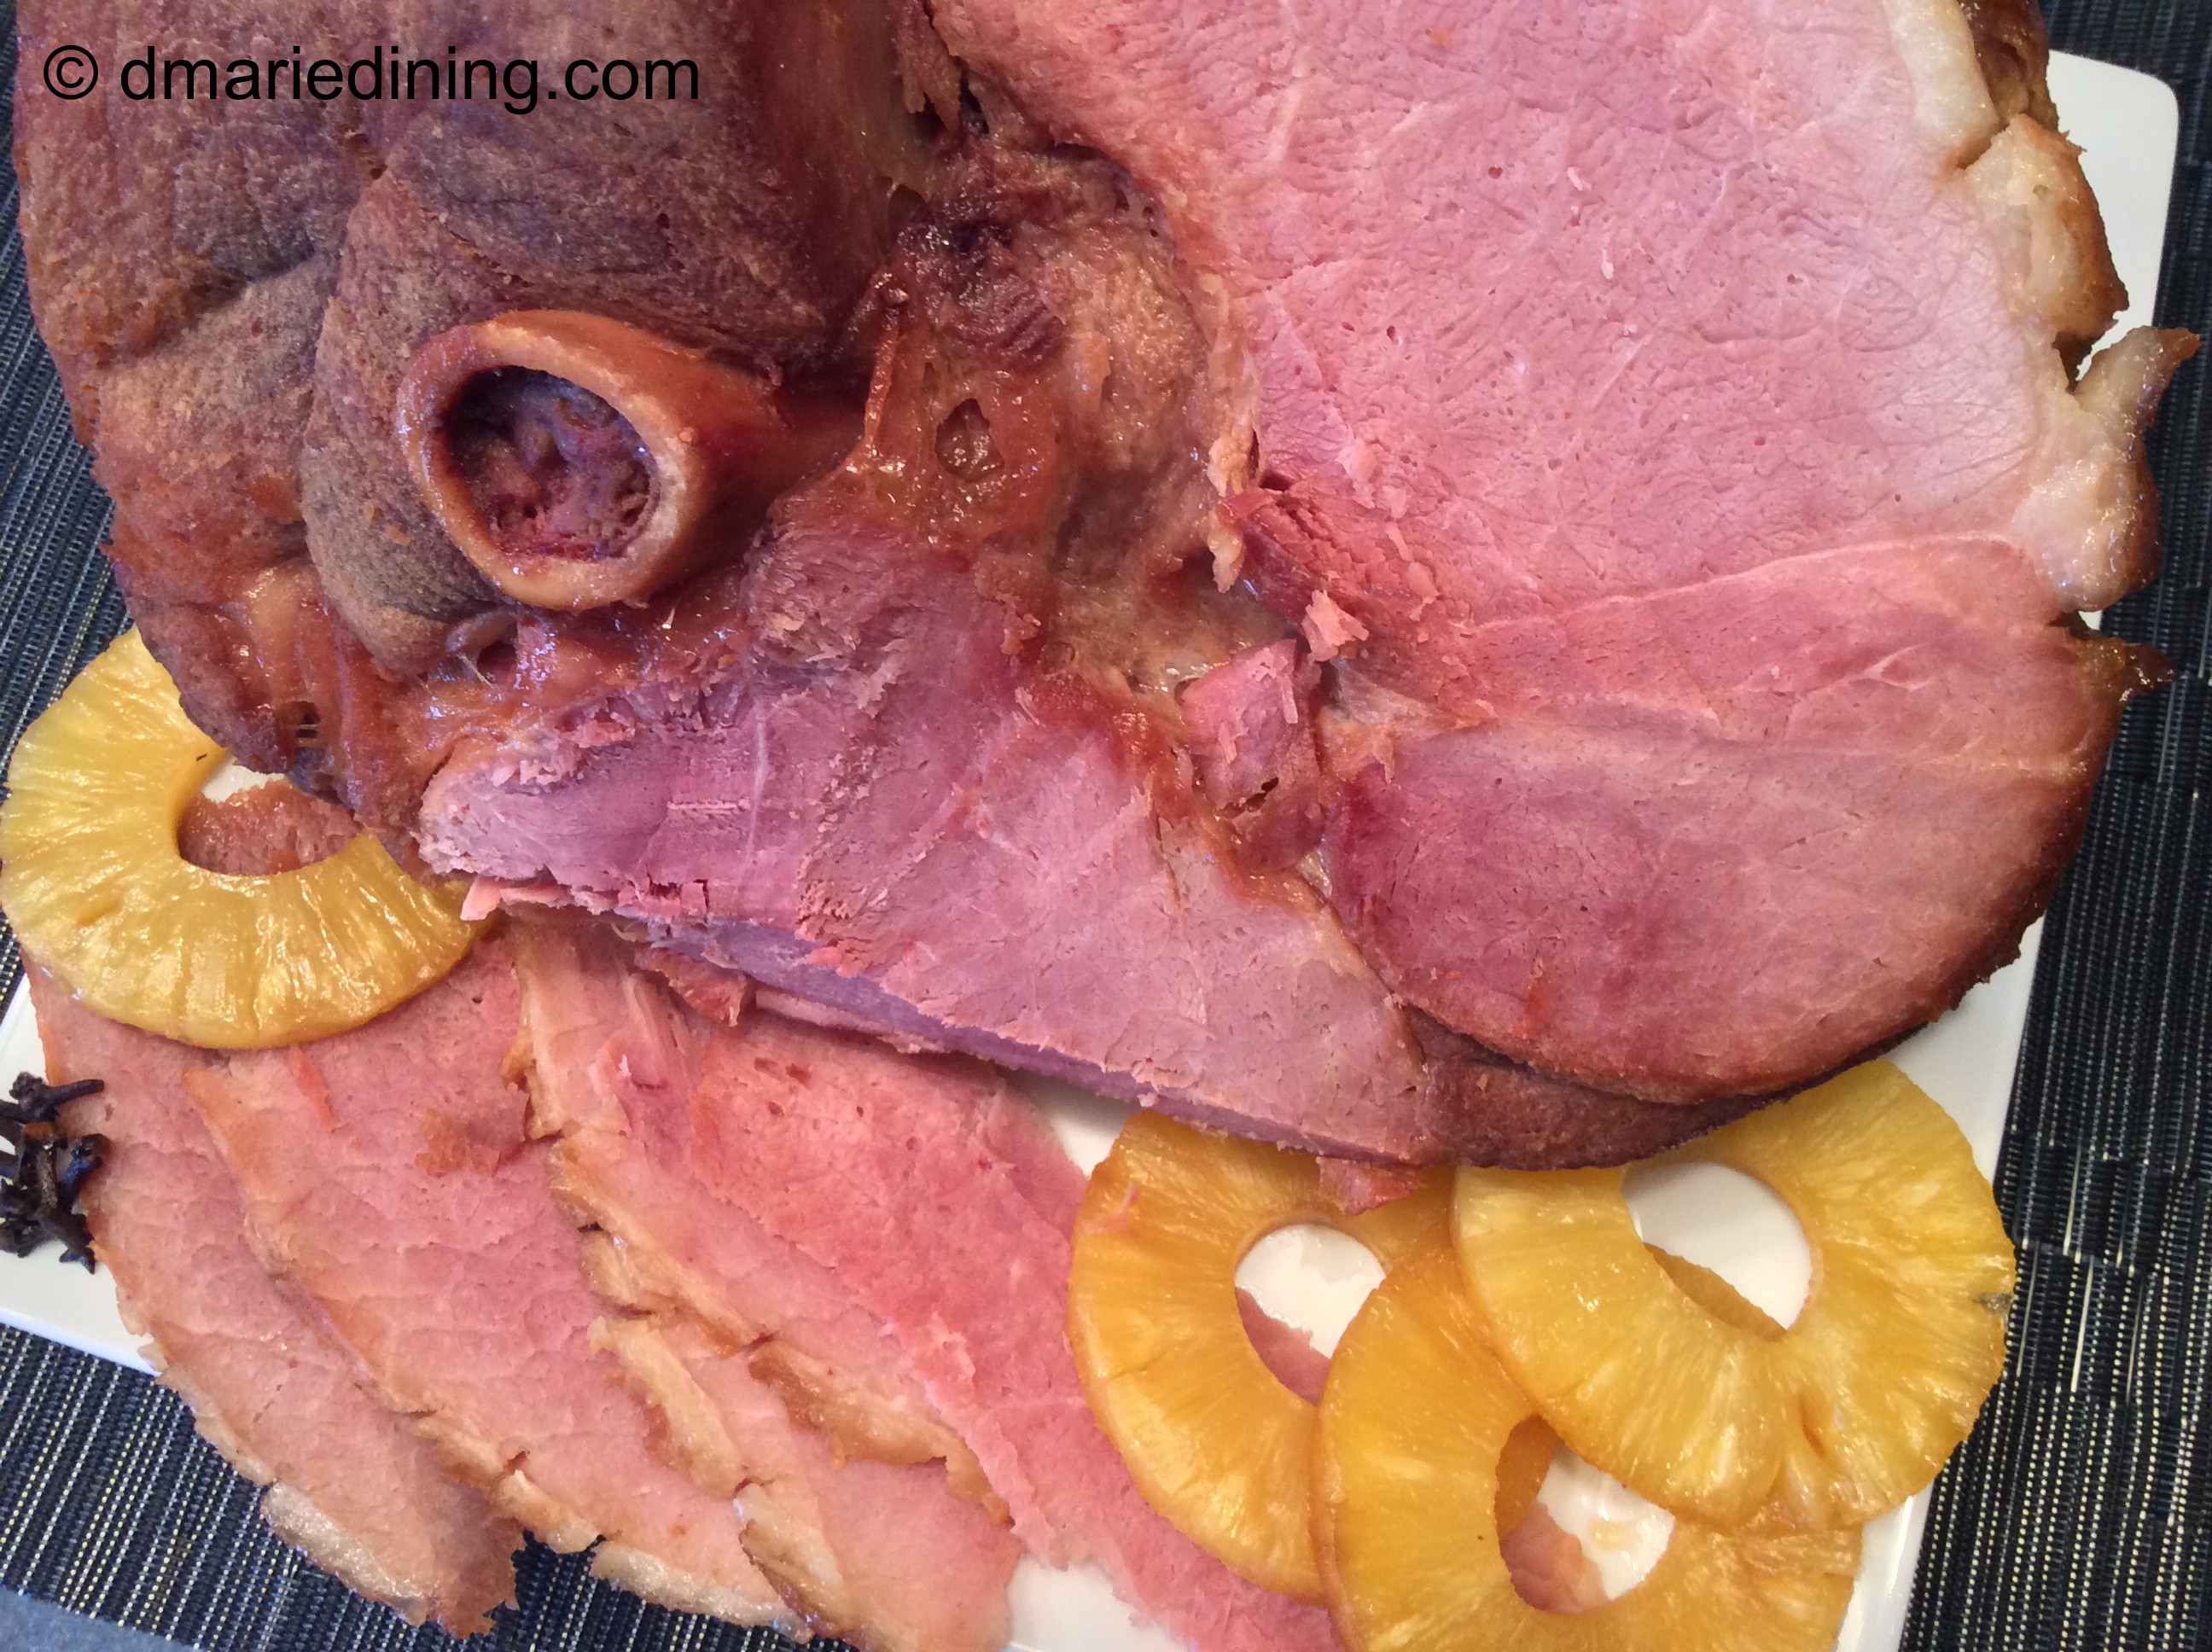
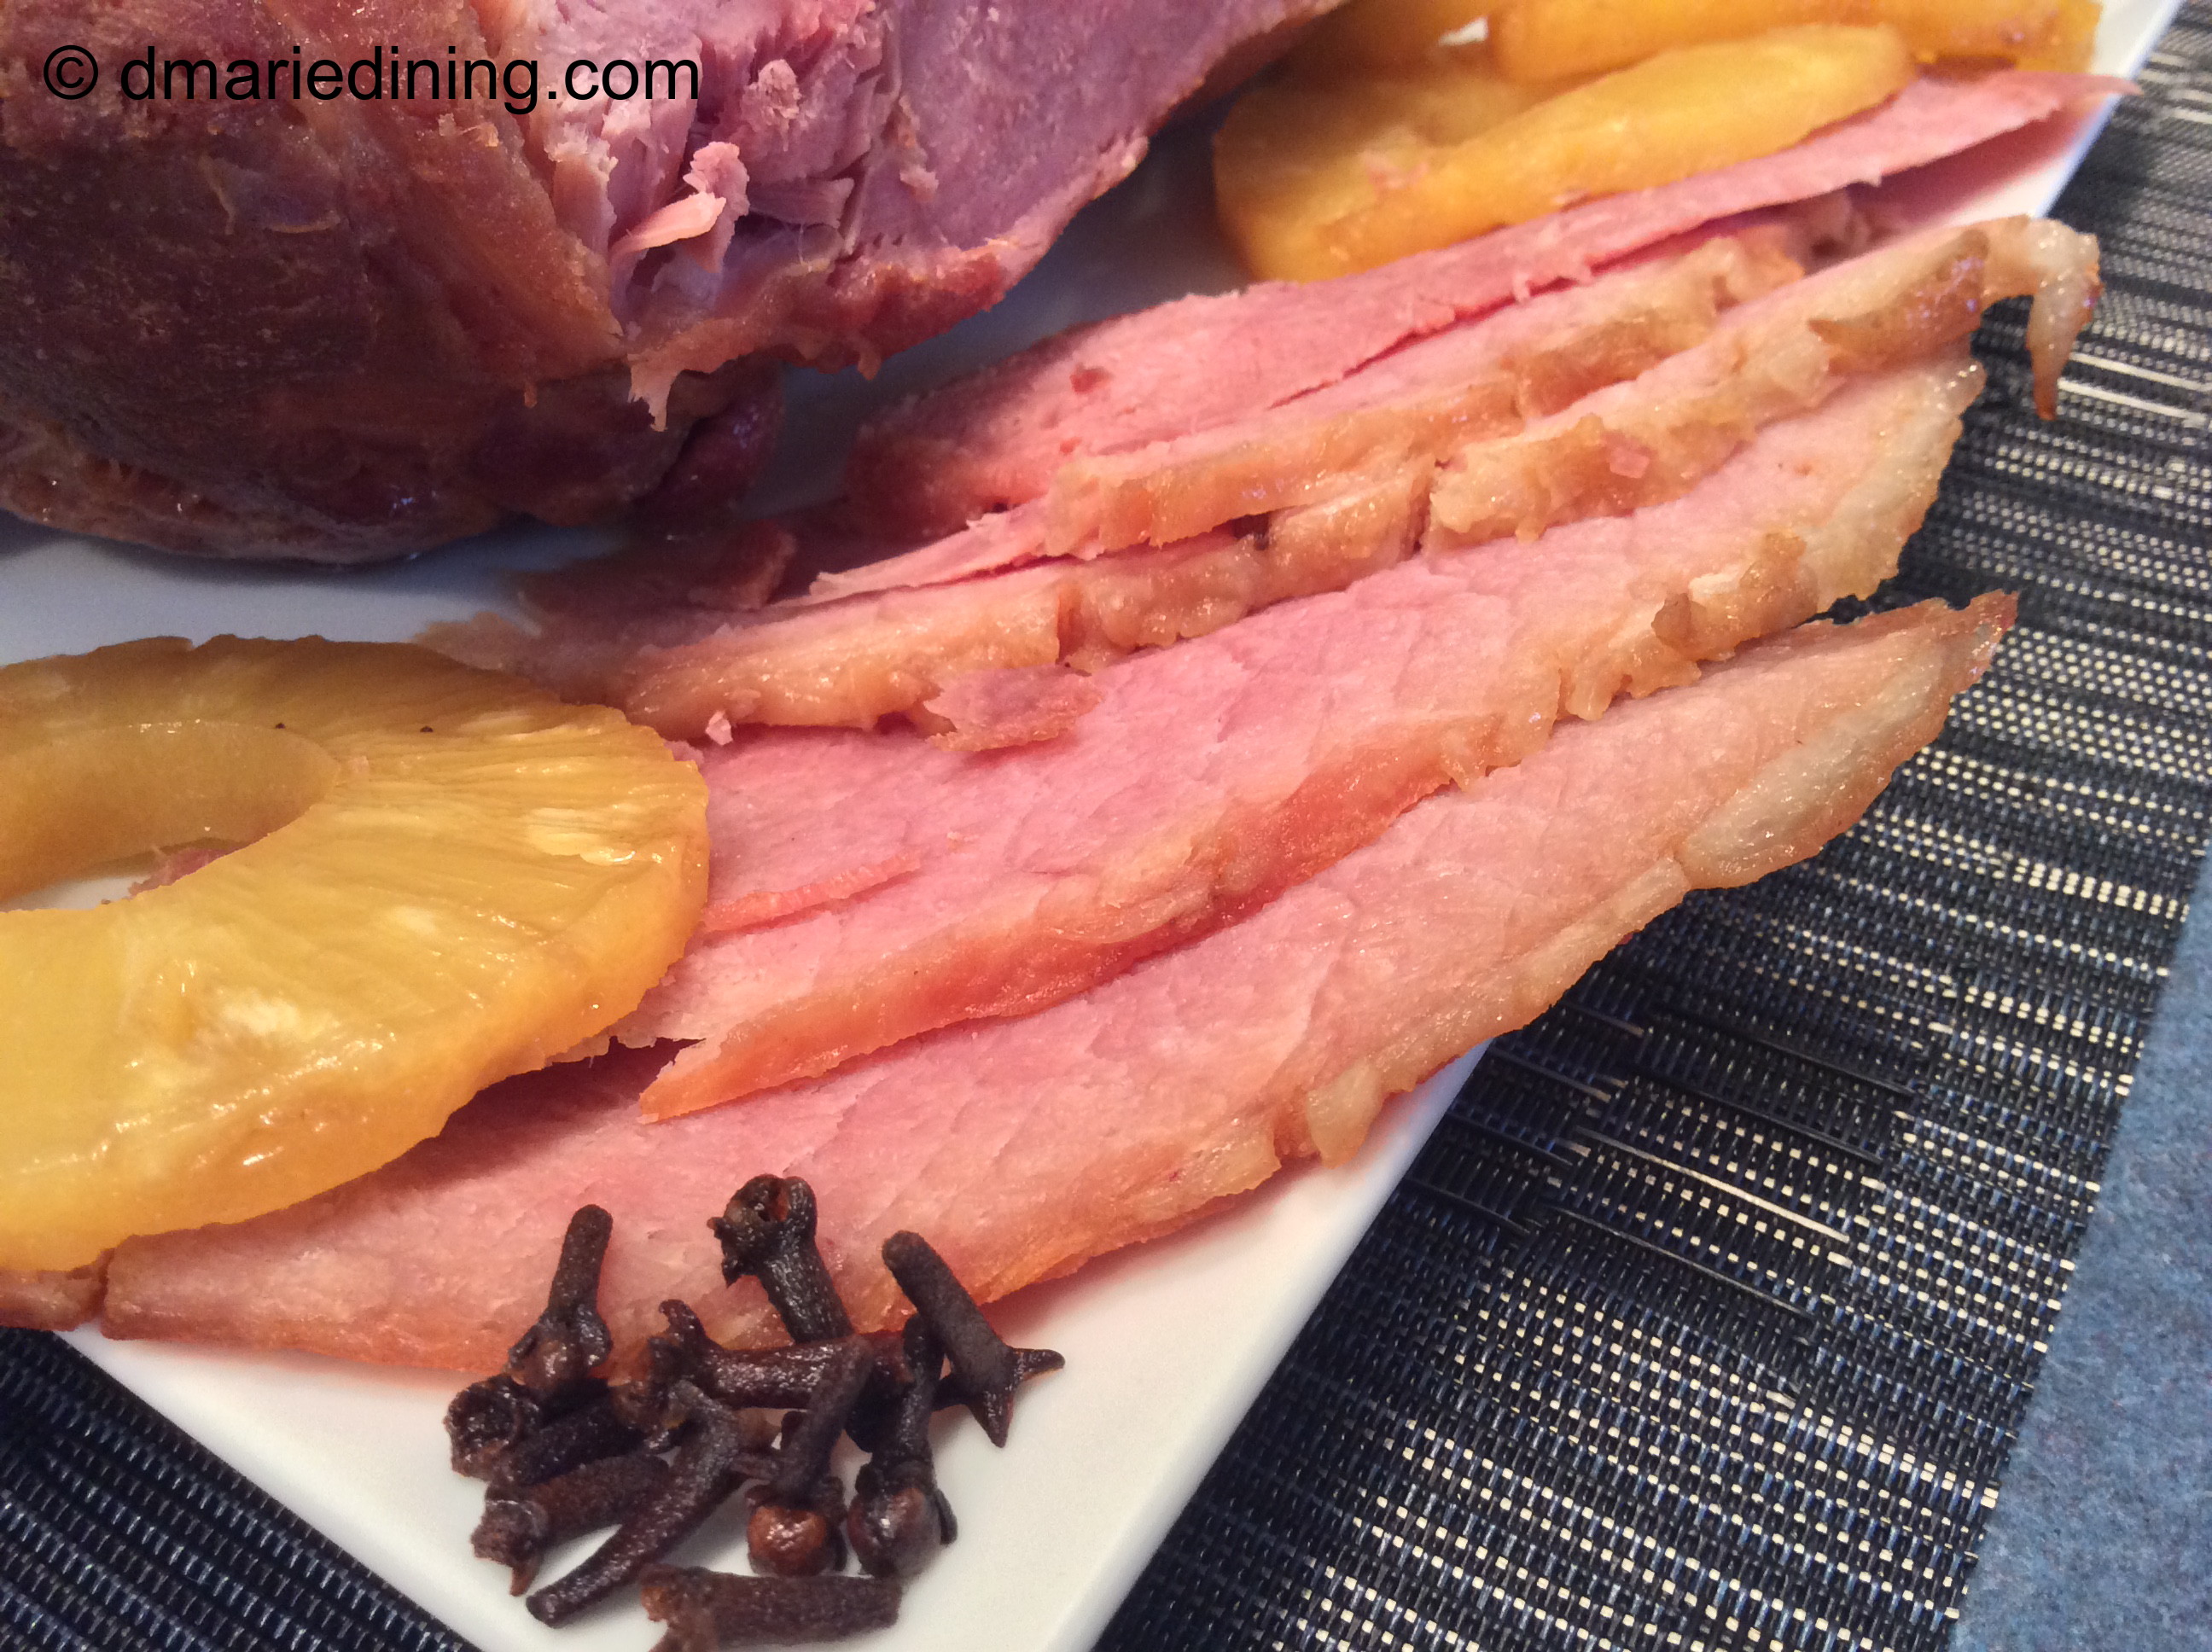
IMG_8142_1

Whiskey Glazed Ham

Ingredients:
1 12 lb ham
1 4 oz can slice pineapple (reserve juice)
1 cup 7 UP or ginger ale
1 cup brown sugar
½ cup whiskey
1 tbsp Dijon mustard
8 cloves

Preheat oven to 350 degrees.

Place ham in a large pot and fill ½ way with water. Boil for 1 ½ to 2 hours over medium high heat. (helps to remove salt) Save broth for another recipe.

Place ham in a roasting pan and pour 7 UP over the ham while hot. In a medium bowl mix together brown sugar, mustard, whiskey and juice from pineapple. Score the ham then dot with cloves and lay the pineapple slices around the ham (secure with toothpicks). Pour brown sugar mixture over ham. Bake for 35 to 40 minutes basting every 10 minutes. Allow the ham to rest for 10 minutes before slicing.


Follow my blog with Bloglovin

Butter Bean and Kale Soup with Smoked Turkey

IMG_7117_1

For me, eating soup is something you do all year round. Especially, during the winter months when the weather chills your bones and makes your teeth chatter kind of like today. I was up and out of the house early this morning and the thermometer was in the single digits. At that point, I knew I would make a hearty, healthy pot of butter bean and kale soup with smoked turkey.

IMG_7133_1

I am not sure of why I thought of this combination for the soup but since I love beans and I love kale I figured why not put the two together. Both the beans and the kale are very healthy and full of vitamins and minerals that help increase energy and help to fight against many diseases. Smoked turkey is also a healthier choice compared to beef and adds a ton of flavor.

IMG_7167_1

If you are looking for something unique and flavorful to fix the next time you want a hearty soup, try making a butter bean and kale soup. I think you will be pleasantly surprised at how good butter beans and kale are together.

IMG_7175_1

Butter Bean and Kale Soup with Smoked Turkey

Ingredients:
3 cans butter beans undrained
3 cups fresh kale
4 cups water
2 smoked turkey legs
1 tbsp roasted garlic or ½ tsp garlic powder
1 tbsp salt
½ tbsp black pepper
½ tsp Adobo
½ tsp onion powder
½ tsp red pepper flakes (optional)

Cook turkey in a pressure cooker with 4 cups of water for 30 minutes. Strain 4 cups of broth into a large pot (may need to add a little more water). Add butter beans, kale, roasted garlic and sea to the broth. Stir and let simmer over medium heat for 25 – 30 minutes until kale is done.

Optional: If using dried butter beans prepare according to package and use the turkey broth as the liquid for cooking. Add other ingredients half way through the cooking process for the beans.

May also cook smoked turkey on the stove for 1 to 1 ½ hours until turkey is tender.

Follow my blog with Bloglovin

Strawberry Crepes

IMG_7354_1

Those of you that have been following dmariedining.com know that I do not consider myself a real baker. However, I have been stretching my wings over time and now I am more comfortable making baked desserts. Looking at the title of the recipe you might say I have really stepped up my game by creating a crepe recipe. That is only partially true so don’t get too excited. Remember, I try to make quick and easy recipes as much as possible. Crepes I think will take a little bit of work for me to learn how to perfect. For this particular recipe I took the easy way out and purchased prepared crepes. They are still delicious but a lot less work and energy.

IMG_7356_1

The most wonderful thing about crepes is that they can be either a simple dessert or a light breakfast. Plus, you can fill crepes with fruits, whipped cream or nothing at all. The first time I experienced crepes it was for breakfast. Long ago, my family would go to one of the local diners to have breakfast after visiting the barber.  I loved their blueberry and strawberry crepes. The crepes were light , delicate and stuffed with a creamy filling then topped with tons of fresh fruit.

IMG_7366_1

The key to any great dish is flavor, freshness and eye appeal. After checking out my strawberry crepes recipe I think you will agree it meets all of those elements. If my local diner can make a great tasting strawberry crepe, I figure I can too. Who knows, maybe they use prepared crepes too!

IMG_7374_1

Strawberry Crepes

Ingredients:
1 package prepared crepes
8 oz mascarpone cheese
1 cup heavy cream
1 pint strawberries sliced thin
1 tsp vanilla extract
1 tsp coffee liqueur
½ cup sugar
½ tsp corn starch
¼ tsp nutmeg

In a small bowl beat together heavy cream, mascarpone cheese, sugar, vanilla, coffee liqueur until mixture forms stiff peaks. Set aside.

In a small sauce pot combine, ¼ cup orange juice 2 tbsp sugar, ¼ tsp nutmeg, ½ tsp corn starch and ½ cup strawberries. Simmer on medium heat until liquid reduces and creates a syrup.

To Assemble:

Spoon a nice helping of whipped cream across the middle of a crepe. Layer with sliced strawberries. Fold one end of the crepe over the filling then gently roll up. Work slowly as the crepes are very delicate. Spoon strawberry syrup over the crepe and add a dollop of whipped cream. Enjoy!

Follow my blog with Bloglovin

Eggplant Stew

IMG_7617_1

Sometimes when I am at the store buying groceries I pick up different meats and vegetables thinking I can come up with a fabulous recipe for this or that. Most of the time I have an actual recipe in mind but other times I am winging it. That is what happened when I came up with the idea of making an eggplant stew.

IMG_7614_1

I wasn’t sure what to make when I bought a couple of eggplants but I love eggplant so I threw them in the cart with the other veggies. By the end of the week I still had not come up with an idea for the eggplant but since I did not want them to start turning brown I decided to make an Eggplant Stew.

IMG_7634_1

Stews are usually hearty and include meat somewhere in the mix. In this case, I wanted to substitute the eggplant for meat and create a vegetarian meal. All it took to make a nice hearty stew were a few chunky vegetables to compliment the eggplant and a few subtle seasonings to allow the flavor of each veggie to shine through. If you are a fan of eggplant, I think you will like this recipe.

IMG_7665_1

Remember, there is more to eggplant than making a casserole or frying.

IMG_7646_1

Eggplant Stew

Ingredients:
2 eggplant peeled and sliced
1 large onion cut in half then sliced
1 large green pepper cut in half then sliced
1 large tomato cut into wedges
2 medium red potatoes cubed
1 14 oz can fire roasted tomatoes
1 cup chicken broth
1 tbsp salt
½ tbsp black pepper
½ tsp garlic powder
½ tsp Adobo
½ tsp basil
¼ cup olive oil
cooking spray

Preheat oven to 400 degrees.

Spray rimmed cookie sheet with cooking spray. Layer the eggplant and other veggies on the cookie sheet then sprinkle with seasonings. Drizzle olive oil over veggies. Roast veggies for 35 – 40 minutes until soft then remove from oven. Place veggies in a large pot along with chicken broth and fire roasted tomatoes. Add a little more salt if needed. Simmer over low heat for 20 minutes.

Follow my blog with Bloglovin

Tortellini Salad with Arugula

IMG_7523_1

Pasta is something my hubby and youngest son could eat every other day. I on the other hand eat pasta less frequently. But, on the occasions that I really have a taste for pasta I prefer to keep it light if possible. The other day I thought about finally writing up the recipe to my delicious pasta salad (according to some friends) but switched gears when I was looking through the frig and saw a beautiful bag of arugula.

IMG_7530_1

Arugula has a unique nutty taste and I like using it in various salads and in my Chicken and Pasta with Lemon Cream Sauce recipe. Since making a light pasta dish was my goal I thought tortellini would be a good choice to go with the arugula. Tortellini is small but can be quite filling. Plus, tortellini is fille with wonderful things like cheese, spinach and sun dried tomatoes. I usually buy mixed tortellini just so I can have an abundance of flavors playing with my taste buds.

IMG_7548_1

My son is not much of a salad person so I was not sure if he would even try the tortellini salad. I had two things going for me though. One… he loves any kind of pasta and two…. he loved the Chicken and Pasta with Lemon Cream Sauce recipe which had arugula in it. True to form, he gave me a thumbs up because of the pasta. Now I know for sure no matter what recipe I make my son will eat it as long as it has pasta. I also know tortellini and arugula make a pretty good salad.

IMG_7554_1

Tortellini Salad with Arugula

Ingredients:
1 20 oz pkg of mixed tortellini
1 bag arugula
1 small tomato seeded and sliced thin
½ cup Gazebo Room Greek Salad Dressing and Marinade
½ cup feta cheese
½ cup calamata olives
¼ cup shaved parmesan cheese
½ tsp cracked black pepper
salt (optional since olives are salty)

Place arugula in a large bowl. Add olives, feta cheese and tomatoes. Top with shaved parmesan cheese and sprinkle with cracked black pepper.

Prepare tortellini according to package and drain. Add hot tortellini to the bowl then pour salad dressing over pasta. Gently toss pasta and arugula together until well mixed. Enjoy as a warm salad or chilled slightly.

Follow my blog with Bloglovin

Bizza (Pizza Buns)

IMG_7093_1

The other day I was watching one of my favorite cooking shows that featured cinnamon buns. I like cinnamon buns but sometimes they are a bit too sweet for me. I am not a big sweet eater even though I love chocolate but it has to be dark chocolate which is more bitter than sweet. Anyway, I though it would be nice to come up with a bun recipe that was more savory than sweet like a pizza bun. The idea was to use the same method of building a cinnamon bun but with different ingredients.

IMG_7098_1

Of course when you think of pizza you think of pizza dough, sauce and cheese. Simple ingredients for a simple dish. I have to say that when I first pulled the Bizza (more on the name later) out of the oven it was not the prettiest of sights. Everything looked kind of mushed together but as I pulled each of the buns apart they started to look pretty good. The final test for whether or not I could post the recipe for a Bizza on dmariedining.com was in the taste. My hubby looked hesitant to try it and my youngest son just looked hungry. After my son took a bite he nodded his head (like a cool teenager would) and my hubby said it reminded him of a calzone which he loves. Score one for dmariedining.com!

IMG_7108_1

Now, you might still be wondering where the name Bizza came from. It was my hubby’s idea. Since I told him the recipe was a take on a cinnamon bun in the style of a pizza he came up with the name Bizza to represent a bun and a pizza. That is how the Bizza was born.  The Bizza has become one of my” go to” quick lunches for the family on the weekends.  Try it.  I bet you’ll become a fan of the Bizza.

IMG_7140_1

IMG_7146_1

Bizza (Pizza Buns)

Ingredients:
1 pkg pizza crust
1 15 oz jar of pizza sauce
½ cup pepperoni slices
½ cup mozzarella cheese shredded
¼ cup fontina cheese shredded
½ tsp oregano
¼ tsp red pepper flakes (optional)
cooking spray
flour
round cake pan

Preheat oven to 425 degrees.

Spray cake pan with cooking spray. Spoon a layer of pizza sauce in the bottom of the pan. Sprinkle a little mozzarella cheese over the sauce. Set aside.

Sprinkle flour on a clean flat surface. Place pizza dough on flour and using a floured rolling pin roll out the dough slightly. Spread pizza sauce evenly over the pizza dough leaving a ¼ inch boarder around the edges. Sprinkle mozzarella cheese over the sauce. Layer pepperoni over the cheese then sprinkle the fontina cheese over the pepperoni. Start at one end of the pizza dough and begin gently rolling it forward and try to keep it tight to create a log. If the dough is too sticky to handle, pat your hands with flour.

Cut the log into 4 – 5 pieces. Place each bun in the baking pan end side up. Bake for 10 – 15 minutes until the pizza dough is cooked and browned. Remove from the oven and let the Bizza rest for 5 minutes. Place a plate over the baking pan and then flip the buns onto the plate. You may need to run a butter knife around the edge of the baking pan to loosen the buns before flipping onto the plate. Sprinkle with mozzarella cheese while the Bizza is still warm. Gently pull buns apart and serve.

Follow my blog with Bloglovin

Creamy Shrimp and Pasta

IMG_7300_1

Creamy shrimp and pasta has become a party favorite when we host big celebrations or a small get together. Typically, I use penne pasta when I make pasta for a party lately I have been trying different types of pasta with this dish. The last time I made this for my family I used mafalda pasta which looks like little lasagna pasta ribbons. I fell in love with this pasta and so did the hungry folks that gobbled it up.

IMG_7338_1

My son’s best friend (who I consider my third son) recently spent the weekend with us so the two of them could hang out. I had decided to include my creamy shrimp and pasta recipe on dmariedining.com so I needed to prepare the dish so I could take some photos. I thought the guys could have a little for lunch and then I could have leftovers for later. I quickly found out that “leftovers” is not in a teenager’s vocabulary. Fortunately, I had put aside of bowl of the pasta for my hubby before the boys jumped on the pot. I on the other hand only had one forkful!

IMG_7326_1

My youngest son surprised my when he said Mom I know I eat a lot but K cleaned out the pot. I asked them if all of the pasta was gone and K said with a big grin on his face “Sorry, I just love pasta!”. I am happy anytime my family enjoys the meals I make so I couldn’t be upset. Plus, by the sound of their forks scraping the bottom of the bowls I knew they liked it. What more can you ask for when feeding a hungry crew?

IMG_7339_1

Creamy Shrimp and Pasta

Ingredients:
1 lb penne pasta
1 lb extra large shrimp peeled and deveined
2 cloves garlic chopped
1 scallion chopped
1 tbsp basil chopped
1 tbsp parsley
1 tsp salt
1 tsp ground black pepper
½ tsp red pepper flakes
1 14oz fire roasted tomatoes
1 cup white wine
¾ cup heavy cream or half and half
½ cup parmesan
¼ cup olive oil

Prepare pasta according to package.  Saute shrimp in olive oil over medium high heat in a large frying pan. Season with salt, pepper and garlic. Cook until shrimp is pink. Remove shrimp from the pan and add tomatoes, scallions, parsley, red pepper flakes and wine. Cook for 1 minute then stir in cream. Bring to a boil. Reduce heat to medium low and simmer for 10 minutes until sauce thickens. Add cheese, basil, pasta and shrimp. Toss until well mixed.


Follow my blog with Bloglovin

Potato Chip Butter Cookies

IMG_7238_1

Many, many moons ago my brother gave me a recipe for potato chip cookies. When he first told me about them I could not imagine eating a cookie made with potato chips. I thought he was crazy and I must admit I turned my nose up to the idea. The amazing thing about these cookies is that you cannot taste the potato chips at all!

IMG_7246_1

One of the things I love about my brother Gregg is that he is adventurous and willing to take risks in life. He is always moving forward no matter what life throws his way and I truly admire him for it. That is also my goal in life to always move forward no matter how many peaks and valleys I encounter along the journey.  To this day, Gregg inspires me and makes  me laugh every time we get together.

IMG_7589_1

The flavors of salty and sweet are actually a great combination. Plus the buttery taste is wonderful. The cookies basically melt in your mouth which is always a good sign of a good cookie. Although this is a butter cookie it can be made into a chocolate potato chip cookie by adding a few chocolate chips. Yummy no matter how you make them.  Potato Chip Butter Cookies are delicious!

IMG_7610_1

Potato Chip Butter Cookies

Ingredients:
1 cup butter softened
1 cup sifted powdered sugar
1 ½ cups all purpose flour
¾ cup crushed potato chips
½ cup finely chopped pecans
1 large egg yolk
1 tsp vanilla extract
3 tsp powdered sugar

Preheat oven to 350 degrees.

In a large mixing bowl combine butter and 1 cup of powdered sugar using an electric mixer on medium speed. Add egg yolk and vanilla to the bowl then beat together until well mixed. Gradually add flour. Gently stir in potato chips and pecans.

Grease a cookie sheet. Shape rounded teaspoons of the cookie dough and place on the cookie sheet approximately ½ apart. Bake for 10 – 12 minutes until cookies are lightly browned. Transfer to a wire rack. Sprinkle with remaining powdered sugar (or not) using a sifter while the cookies are still warm. Store in an airtight container.

Follow my blog with Bloglovin

Open Faced Taco

IMG_5583_1

An Open Faced Taco came to mind when I was looking for something to do with the extra tortillas I had on hand. I usually roll up the tortillas and make enchiladas but I had a taste for tacos not enchiladas. Instead of making a basic folded soft taco I imagined I could make an open faced taco similar to an open faced sandwich.

IMG_5619_1

Just like an open faced sandwich my open faced taco can be eaten with either a knife and fork or with your fingers. Depending on the meal, I like the idea of eating with my fingers to catch all the wonderful bits and pieces that try to escape my mouth. Fried chicken, open faced tacos or pizza. All of them are finger licking good but for now open faced tacos are at the top of my list.

IMG_5624_1

IMG_5622_1

Open Faced Taco

Ingredients:
4-6 tortillas
1 lb ground turkey or beef (optional: shredded chicken)
1 avocado sliced
1 14 oz can black beans drained
1 cup shredded lettuce
½ cup Mexican cheese or pepper jack cheese
½ cup fresh salsa
¼ cup red onion finely sliced
¼ cup taco sauce
¼ cup vegetable oil
¼ cup sliced black olives
½ cup water
1 tbsp butter
1 tbsp salt
1 tsp black pepper
1 tsp Adobo
1 1 oz pkg taco seasoning
Heat vegetable oil in a non- stick frying pan on medium heat. Lightly brown tortillas on each side. Drain on paper towels. Pour out oil from the pan. Reduce heat to low melt butter. Add black beans, red onion, ½ tbsp salt and ½ cup water. Warm the beans for 3 – 5 minutes then gently mash the beans. Turn off heat.

Brown ground turkey on medium high heat in a large frying pan. Drain off any grease. Reduce heat to medium low. Add seasonings along with ½ cup water and taco seasoning. Stir to mix well. Let simmer for 15 minutes.

Assemble Taco:
Taco
Spread a spoonful of black beans on bottom of taco
Meat
Taco Sauce
Black Olives
Lettuce
Fresh Salsa
Cheese

Follow my blog with Bloglovin

Layered Bean Dip

IMG_6403_1

I have been in a Tex-Mex mood ever since my son said I needed some “diverse” recipes. My latest recipe is Layered Bean Dip. I tested this one on some Super Bowl fans to see how well it would go over at a party. Just in case it sat in the dish untouched I made a traditional dip as a backup. Well, the Layered Bean Dip went like hot cakes. By the time the Super Bowl was over there was only one small scoop of Layered Bean Dip left. My hubby ate that with his lunch the next day.

IMG_6426_1

I have to give credit to one of our good neighbors across the street for giving me the idea of making a Layered Bean Dip. She brought it over to a picnic a while ago and I never forgot how delicious if tasted. I just had to figure out how to create my own version. As with any recipe, all you need to do to make it your own is play with the ingredients. Experiment with the seasonings and see which flavors compliment each other.

IMG_6444_1

Layered Bean Dip can quickly become one of your signature dishes for parties or any time you want to treat yourself, family or friends.

IMG_6447_1

Layered Bean Dip

Ingredients:
1 16 oz can refried beans
1 16 oz jar salsa ( Serrano)
1 14 oz can black beans drained
1 small can black olives drained
8 oz sour cream
4 oz cream cheese
1 packet taco seasoning
1 cup shredded taco or Mexican cheese
1 cup shredded lettuce
2 green onions sliced
½ cup fresh salsa
¼ cup pickled jalapeno peppers
½ tsp cumin
1 deep dish pie plate

Combine refried beans, taco seasoning and cumin. Spread refried beans evenly in the bottom of pie dish. Blend together sour cream and cream cheese until smooth. Spread over refried beans. Layer regular salsa, black beans, green onion, pickled jalapeno peppers, fresh salsa, lettuce, and cheese. Sprinkle with black olives. Chill for 1 hour or overnight.

Follow my blog with Bloglovin