Category Archives: Main Course

Tex Mex Chicken Salad

IMG_1204_1

Summer is slowly fading which means all the delicious backyard veggies, fresh corn and fresh herbs I grew will also fade away. Before fall settles in I thought I would come up with a dish that we could have year round but would remind me of our hot and lazy summer days. Tex Mex Chicken Salad became my summer reminder.

IMG_1206_1

Chicken salad was one of my favorite meals growing up. My mom made some of the best chicken salad around and always made little blueberry muffins to go with the salad. It took me a while but I mastered make my own wonderful version of chicken salad. Because chicken is so versatile it can be combined with a lot of different ingredients to make a fantastic salad.

IMG_1215_1

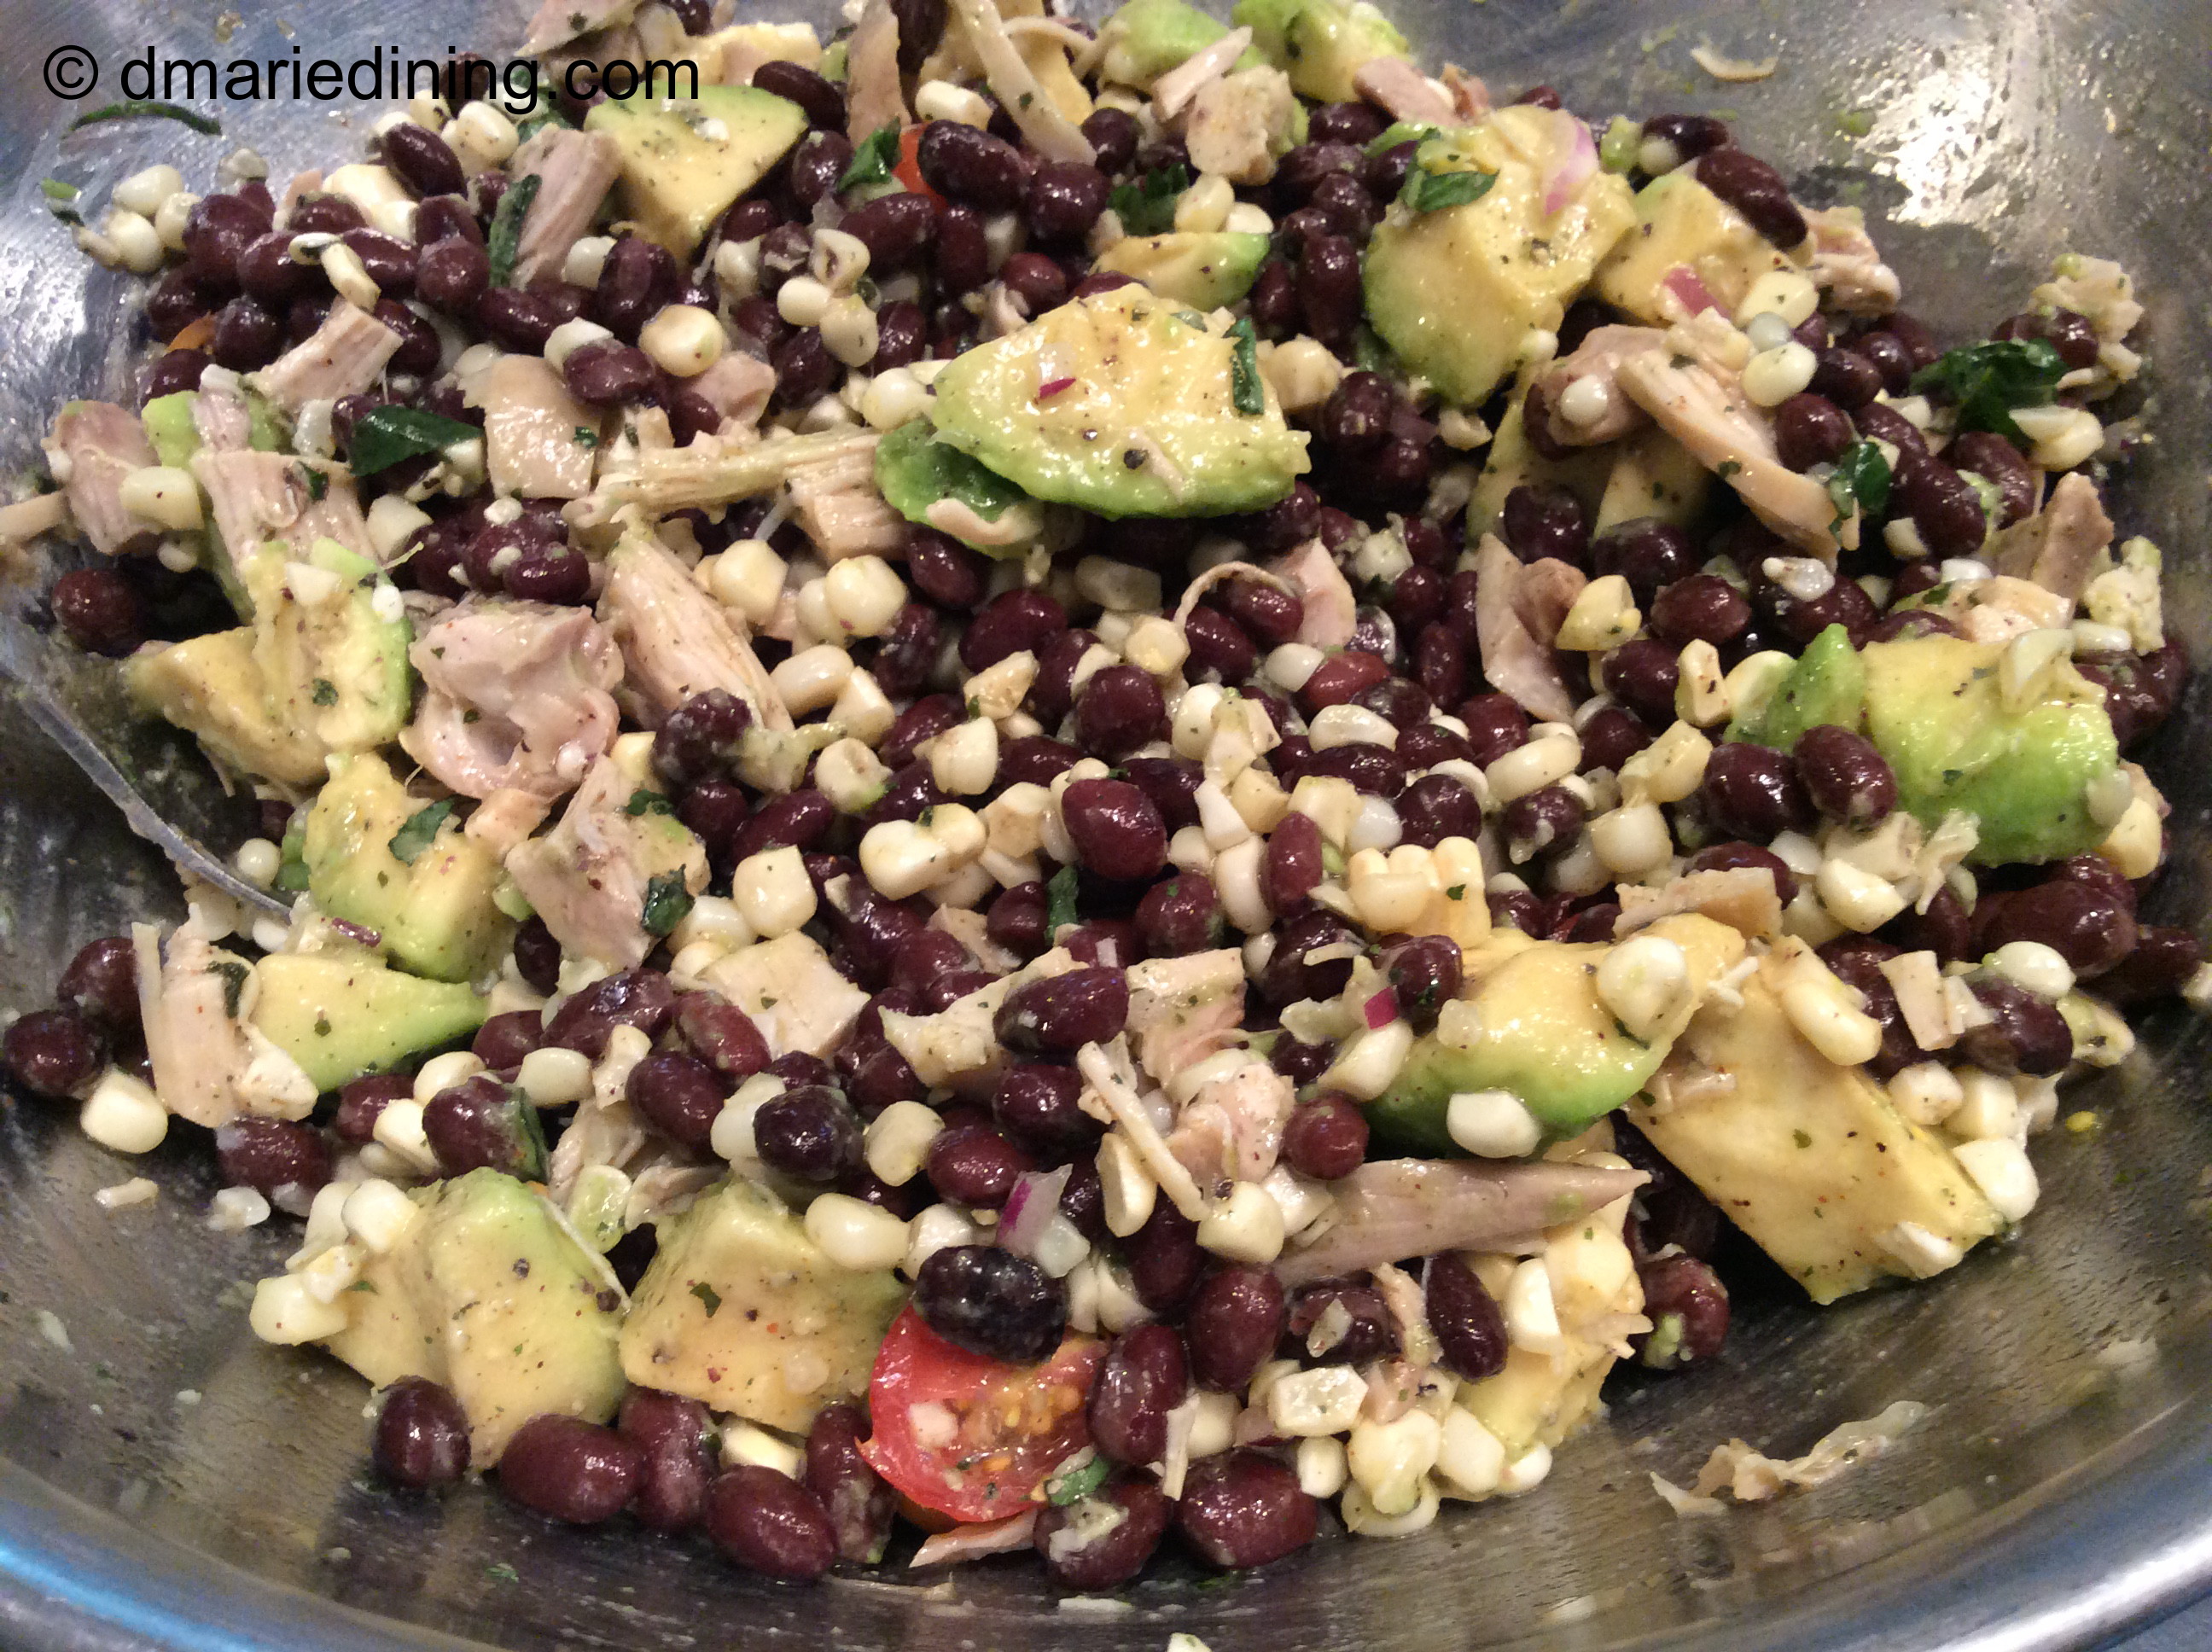
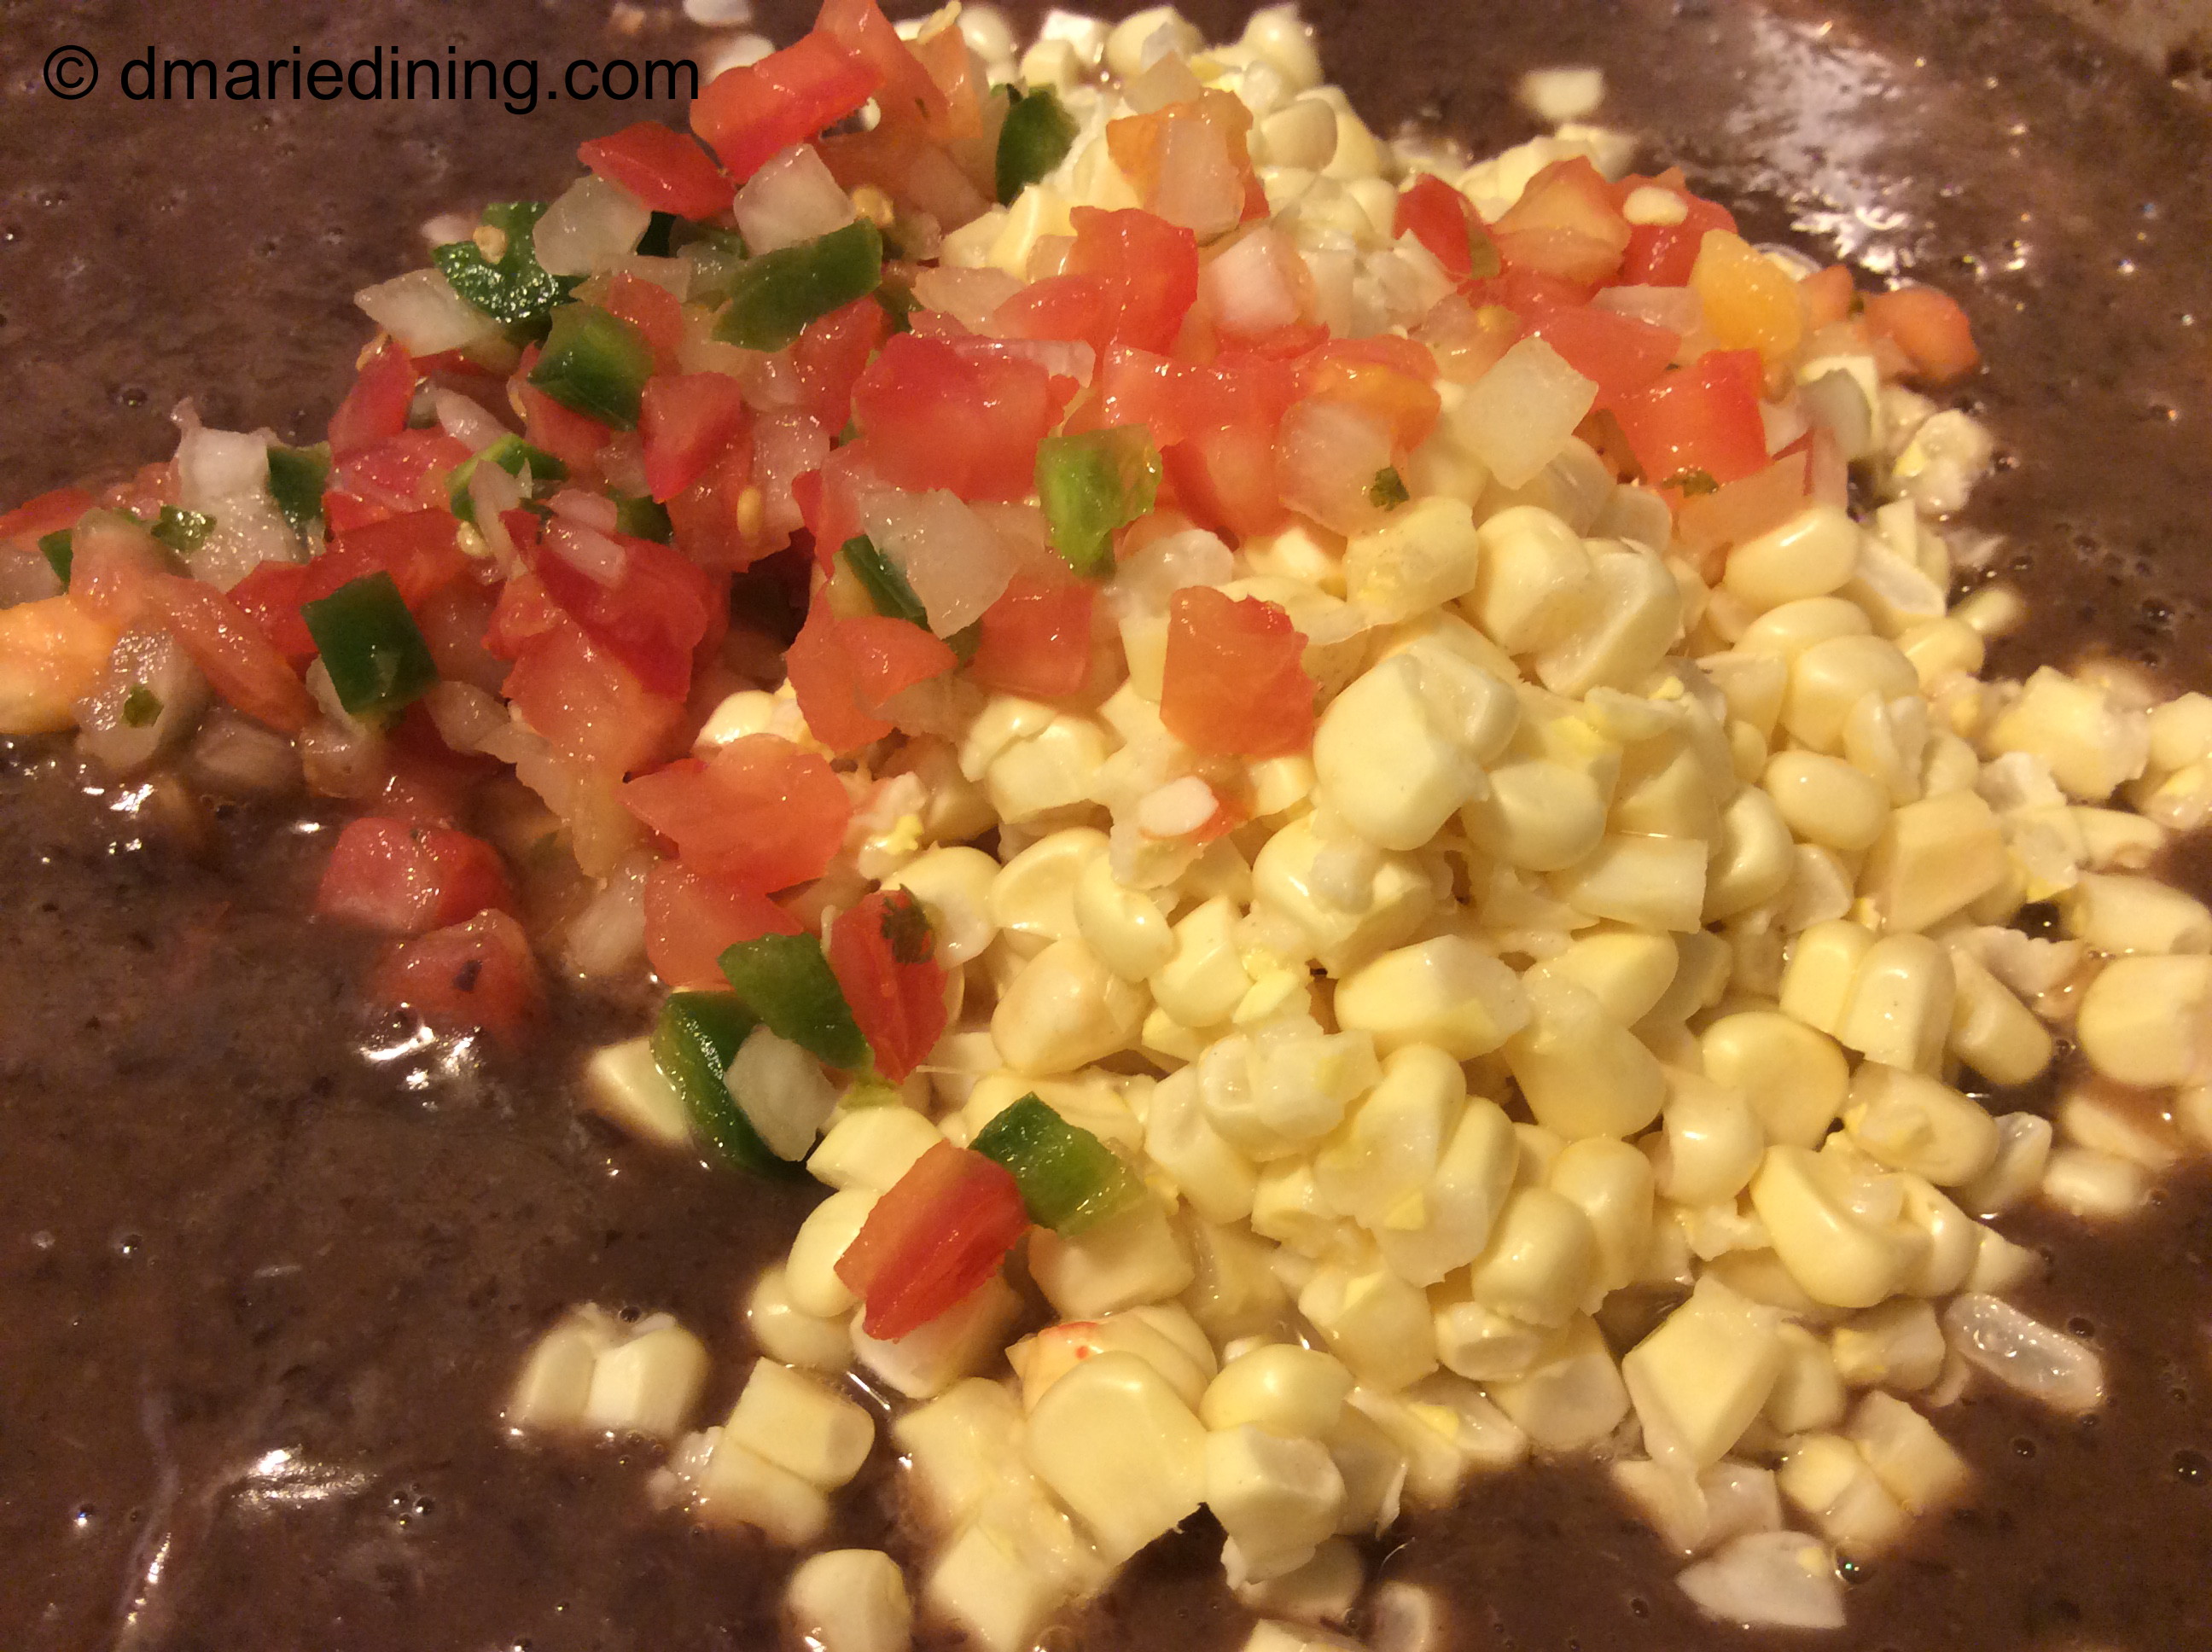
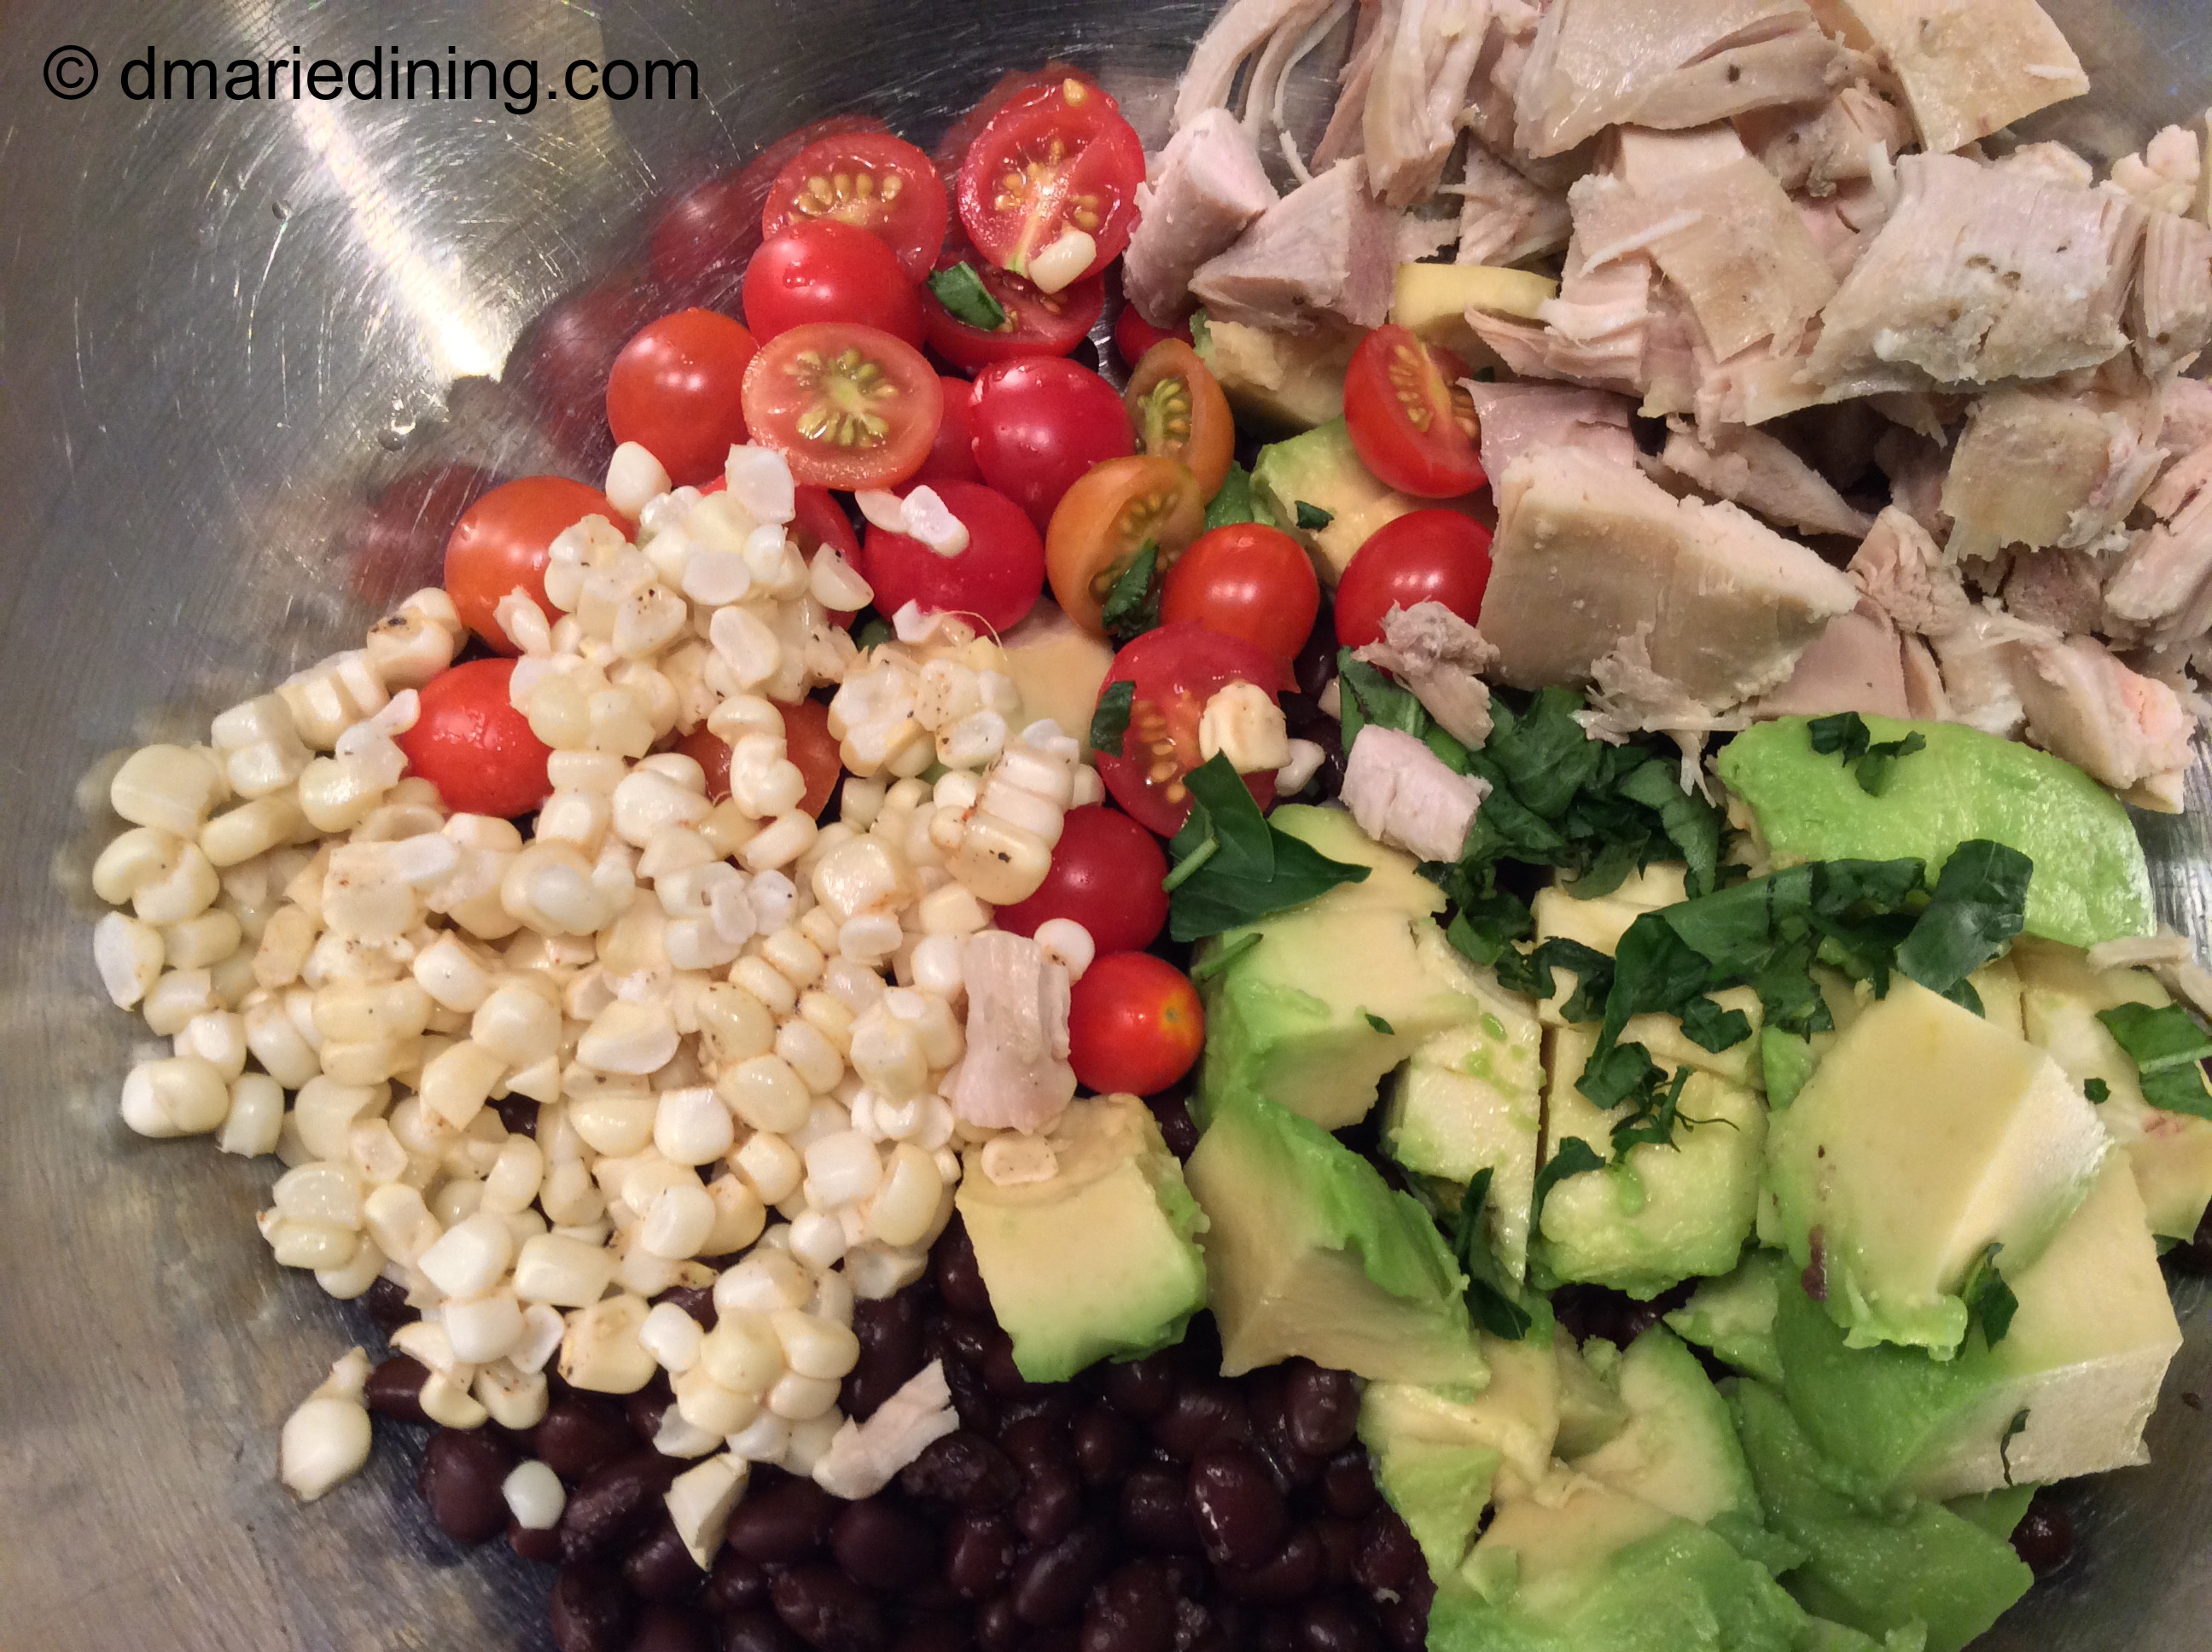
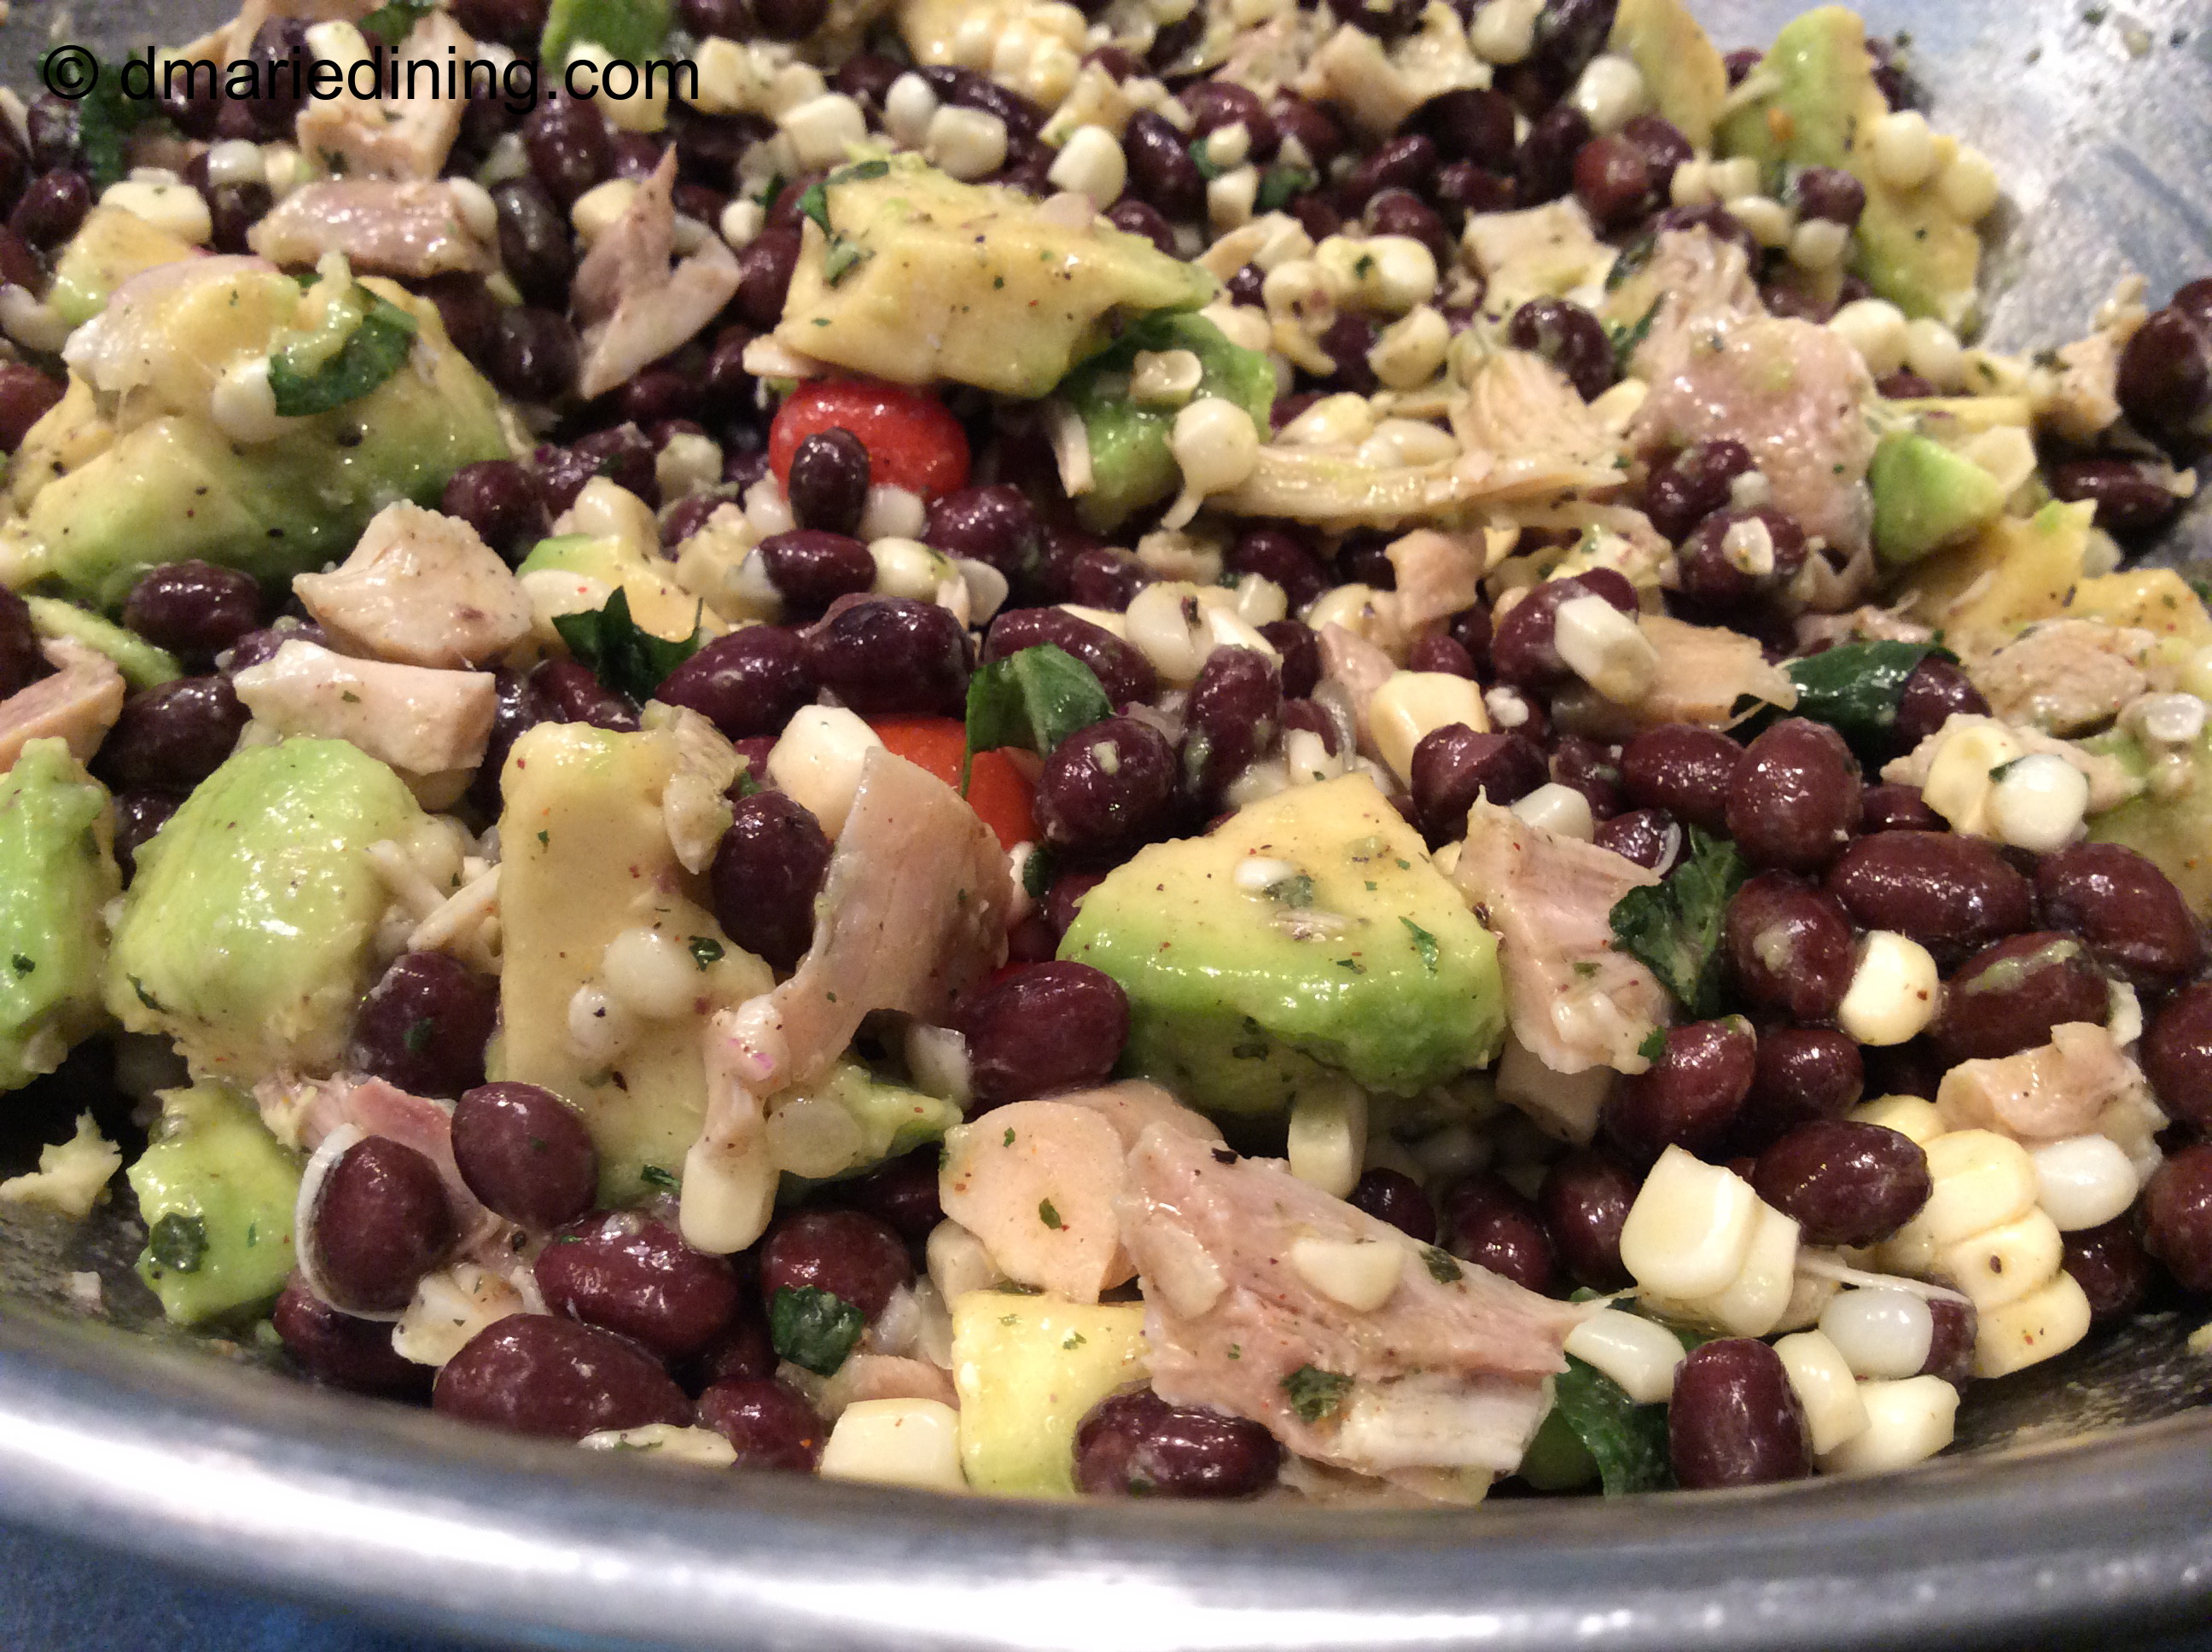
Tex Mex Chicken Salad combines black beans, corn (the reason I call it Tex Mex) and avocado along with fresh herbs. Lemon and lime juice help brighten the flavors. As always, my family likes heat so I add a little cayenne or chopped jalapeno peppers to spice up the salad.

IMG_1211_1

Even though summer will fade into fall it doesn’t mean we cannot continue to enjoy the great tastes of summer. Remember, all it takes is a little chicken, a few fresh veggies and memories of those hot, lazy days we enjoyed so much.

Tex Mex Chicken Salad

Ingredients:
4 cooked chicken thighs diced
3 ears fresh corn shucked
2 15oz cans black beans rinsed and drained
5 fresh basil leaves chopped
½ cup small cherry tomatoes
½ cup olive oil
1 ripe avocado diced
1 tbsp red onion diced small
1 tsp parsley
1 tsp cilantro
1 tsp chili powder
1 tsp cracked black pepper
1 tsp salt
1 tsp cayenne (optional)
juice from ½ lemon
juice from ½ lime

Dressing:
Place olive oil, lemon juice, lime juice, cayenne, parsley and cilantro in a small bowl. Whisk together.

Salad:
In a large bowl add chicken, corn, avocado, tomatoes, red onion, salt, pepper, chili powder and basil. Pour dressing over salad and gently toss.

Follow my blog with Bloglovin

Country Style Ribs with Sauerkraut

IMG_0722_1

Sauerkraut is one of those foods you really have to taste to determine if you like it or not. My son’s first reaction when he saw me cooking Country Style Ribs and Sauerkraut was to say “I don’t like sauerkraut”. Of course, I had never fixed sauerkraut for my family so my reply to him was “Just try a little then decide if you like it or not”. A few minutes after I let him try a spoonful to taste he exclaimed “I  like this!”.

IMG_0726_1

I think I can safely say almost everyone knows about country style ribs (nice thick pork ribs). But, what the heck is sauerkraut? Sauerkraut is pickled (fermented) cabbage. The word sauerkraut means “sour cabbage”. For many, it is an acquired taste and you may love it or hate it after you try sauerkraut.  I fall into the love it category. My mom made spare ribs and sauerkraut on many occasions and taught me her secret for taking the bitterness out of the sour cabbage. Brown sugar!

IMG_0736_1

Sauerkraut actually has quite a few health benefits. There are a number of diets that feature sauerkraut as the star to help reduce weight, lower cholesterol and fight against certain forms of cancer. The biggest benefit of sauerkraut is that it is inexpensive so it is light on the pocket book.

IMG_0754_1

If you have the time and the energy, you can easily make your own sauerkraut and store it in the frig or freeze it. Personally, I find it easier to buy it, freeze it and then pull it out whenever I want to make Country Style Ribs and Sauerkraut. Maybe in my next phase of life I will add making sauerkraut from scratch to my list of things to do. Until then…….

IMG_0766_1

Country Style Ribs and Sauerkraut

Ingredients:
1 pkg country style spare ribs
1 pkg sauerkraut
1 small onion sliced
1 cup water
¼ cup dark brown sugar
4 – 5 small red potatoes sliced thick
2 tbsp butter
1 tbsp salt
1 tbsp black pepper
½ tsp onion powder
paprika

Preheat oven to 350 degrees.

Place sauerkraut in the bottom of a baking dish. Add water then season with a little salt and black pepper. Crumble brown sugar over the sauerkraut and dot with butter. Layer potatoes on one side of the baking dish.

Season country style ribs with salt, pepper and onion powder. Sprinkle with paprika. Lay ribs over sauerkraut. Cover with foil and bake for 1 hour (baste ribs and potatoes after 30 minutes) then remove foil and continue baking for an additional 45 minutes to 1 hour.

Bon Appetit!

Follow my blog with Bloglovin

Pork and White Bean Stew

IMG_1140_1

I spotted some nice country style ribs at the grocer while shopping this week. They looked so good and were on sale so I couldn’t pass them up. I was sure I could come up with a new recipe to include the country style ribs so they landed in my cart.

IMG_1144_1

Country style ribs are thick and meaty and are great in chili, stew or all by themselves. I am not sure if I should classify my Pork and White Bean Stew as a stew or a chili dish. I will leave that up to others. For now I will call it a stew. I just liked the idea of the pork with white beans and a few fresh veggies. Plus, one pot dishes are at the top of my list when it comes to cooking. Who wants to clean a lot of pots and pans when you can toss everything into one pot? Definitely, not me. In the case of my Pork and White Bean Stew I did use two pots. I used a pressure cooker to speed up the process of making the pork nice and tender. If you are not comfortable using a pressure cooker I would stick to cooking the pork a little longer to make sure it is tender. Just don’t over cook the meat or it will be dry and chewy.

IMG_1156_1

The flavors of the pork were amazing with the white beans. At the last minute, I decided to throw some fresh chopped tomatoes from our garden into the pot to give the dish a pop of color. The smell of the home grown tomatoes hit my nose before I could even take a bite of the stew. Wow, what a difference between home grown tomatoes and hot house tomatoes. Home grown beats out store bought tomatoes every time.

IMG_1175_1

Stew or chili? I am still not sure which one describes this dish the best. Whatever you decide to call it, I know you will like it.

IMG_1185_1

Pork and White Bean Stew

Ingredients:
4 – 6 thick country style ribs cubed
2 15oz cans cannellini beans (do not rinse/drain)
1 can green chiles
2 small tomatoes large dice
1 small onion diced
1 small green pepper diced
1 clove garlic minced
3 cups chicken broth
2 cups water
1tbsp cilantro
1 tbsp salt
1 tbsp ground black pepper
1 tsp cumin
1 tsp nutmeg
1 tsp parsley chopped
½ tsp cayenne (optional)
1 pkg whit chicken chili dry mix

Place pork in a large bowl and sprinkle with salt, pepper and cayenne. Toss until well coated. If comfortable with using a pressure cooker, place pork in pressure cooker with water and cook for 30 minutes to tenderize meat. Then place pork and remaining ingredients in a large pot along with 1 cup of juice from pressure cooker. Skim off grease. Cook for 1 hour. If not comfortable with using a pressure cooker, place all ingredients in a large pot and cook for 2 hours over medium high heat until meat is tender.

Follow my blog with Bloglovin

Shrimp Lo Mein

   IMG_0153_1The day I made Shrimp Spring Rolls I also made Shrimp Lo Mein. Most of the ingredients I used as the filling for the spring rolls was also used to create Shrimp Lo Mein. How great is that? Two meals and I only cooked one time.

IMG_0148_1

As I said in my Shrimp Spring Rolls post, my family loves Asian cuisine. We could eat it a couple times each week but I am sure that would get old as time goes on. We all need variety when it comes to food. At least I do. Anyway, Since I had quite a few extra ingredients I decided to make a quick Shrimp Lo Mein. The other thing my hubby and son love is pasta so Shrimp Lo Mein was definitely right up their alley. Thankfully, it did not take much to get them to agree to be my taste tester for this recipe.

IMG_0180_1

In case you didn’t know, there are all types of noodles used to make Lo Mein. I used Chinese noodles since that is what I used to make the Shrimp Spring Rolls. However, you can also used thin wonton noodles which are stringy and cooked in wonton noodle soup because they are light and delicate. Wide wonton noodles can also be used for Lo Mein. These noodles are often used in heartier soups like beef noodle soup. Of course you can just look for Lo Mein noodles which are thick and used in stir-fried noodle dishes made with a heavy sauce or gravy. In researching the variety of noodles used for my recipe I found out that Lo Mein noodles are probably the best choice when making a Lo Mein dish because they stand up better to reheating.

IMG_0225_1

Bottom-line. You can use whatever noodle you like to make Shrimp Lo Mein. In a pinch I think I would even use spaghetti noodles or linguine noodles if that was the only thing available. The most important thing to remember is add a little love to your recipe. It makes everything taste good.

IMG_0226_1

Shrimp Lo Mein

Ingredients:
1 lb large shrimp peeled and deveined
1 pkg lo mein noodles
1 pint snap peas
1 cup shredded carrots
1 tbsp sriracha sauce
2 tbsp olive oil
4 tbsp oyster sauce
½ tsp black pepper
½ tsp salt
¼ tsp cayenne pepper (optional)
juice from ½ lemon

Prepare lo mein noodles according to package. Drain and set aside.

Heat olive oil in a medium size non-stick frying pan over medium high heat. Add shrimp, sriracha sauce and lemon juice. Season with a little salt and pepper. Stir shrimp until they turn pink. Remove shrimp from pan and set aside in a small bowl. Add carrots, snap peas and a little more salt and pepper (add cayenne pepper if you really like heat) to the frying pan. Stir and let cook for 1 minute. Add oyster sauce and mix with veggies until they are well coated. Reduce to low heat and cook for another 2 minutes. Toss with lo mein noodles. Enjoy!

Follow my blog with Bloglovin

Black Bean and Corn Gazpacho

IMG_0404_1

I am one of those people that enjoys soup year round. Similar to my Auntie M who drinks hot tea 365 days a year no matter what the temperature is outside. Of course on the hottest of days in the summer when I have a craving for soup, I prefer a gazpacho style soup.

IMG_0478_1

Gazpacho is a soup made with raw veggies and is usually served chilled but can be warmed. Most gazpacho soups have a tomato base with multiple layers of flavor and textures. The ingredients and thickness of the gazpacho often depends on the region in which it is made. While researching the history of gazpacho I learned that in Spain some of the original recipes included bread, vinegar, water,oil and garlic. Other recipes added fruits and nuts to the recipes.

IMG_0484_1

I decided to create a very simple version of gazpacho that would be delicious whether served chilled or slightly warmed. Black Bean and Corn Gazpacho fits that description as both black beans and corn are good when served hot or cold. The best thing about this soup is that it is relatively light and is very flavorful with fresh corn. So, the next time you have a craving for a nice healthy soup in the middle of a hot summer day think about making some Black Bean and Corn Gazpacho. Hot or cold you can’t go wrong with this soup.

IMG_0492_1

Black Bean and Corn Gazpacho

 Ingredients:
3 15.5 oz cans black beans rinsed
1 small onion diced
4 cups chicken broth
1 ½ cups fresh corn kernels
½ cup fresh salsa or diced tomatoes
¼ cup half and half
2 tbsp sour cream
1 tsp cilantro
1 tsp black pepper
1 tsp salt
1 tsp parsley
½ tsp red pepper flakes (optional)

Place beans, onions, broth and seasonings in a large pot over medium high heat. Cook for 20 minutes until beans and onions are tender. Remove from heat and puree beans using a hand blender or in a regular blender. Place pot back on the heat and reduce to a simmer. Stir in sour cream and half and half. Simmer for another 5 minutes then stir in corn and salsa. Continue simmering for 10 minutes. Remove from heat and let cool.

Follow my blog with Bloglovin

Buffalo Chicken and Spinach Flatbread

IMG_8944_1

Cooking with flatbreads is an easy way to get a meal on the table when you don’t have a lot of time to prepare something more complex. I am not a big “pizza” fan but I do enjoy them now and then. The rest of the family can eat pizza any time. If I am going to eat pizza, I want it to be special and not the basic cheese or pepperoni pizza you find every where.

IMG_8948_1

One of my son’s favorite pizza choices is Buffalo Chicken so I thought I would try making my own version. The great thing about flatbreads is that they are versatile. You can use just about any topping you like on the flatbread and it will taste wonderful. Of course you need to add a few seasonings to give it an extra kick. We like spicy flavors in my family so besides using Buffalo wing sauce on the chicken I also added pepper jack cheese and red pepper flakes to the toppings. Depending your tolerance for “heat” you can add or subtract the amount of spice you use.

IMG_8965_1

The first time I made my Buffalo Chicken Flatbread we had it for lunch. This turned out to be a very hearty meal with the thick slices of chicken, spinach, onions and cheese. Protein, veggies and dairy! What more could you ask for in a meal? As you can imagine we had a very light dinner that night.

IMG_8979_1

Look for more flatbread recipes on dmariedining.com. You cannot beat them for a healthy, quick and easy meal!

IMG_8988_1

Buffalo Chicken Flatbread

Ingredients:
1 14oz flatbread (Trader Joe’s Ciabatta Flatbread)
1 pkg pre-cooked sliced chicken (Trader Joe’s)
1 cup shredded mozzarella cheese
1 cup baby leaf spinach
½ cup buffalo wing sauce
½ cup shredded pepper jack cheese
½ cup thinly sliced red onion or shallots
¼ cup crumbled blue cheese (optional)
1 tbsp olive oil
½ tbsp red pepper flakes
salt
black pepper

Preheat oven to 425 degrees.

Place chicken in a medium sized bowl. Drizzle buffalo wing sauce over chicken then toss to coat the chicken.

Place flatbread on a cookie sheet then brush flatbread with olive oil. Sprinkle ½ cup mozzarella cheese over flatbread. Layer flatbread with spinach then sprinkle with a little salt and black pepper. Next layer chicken, onions and remaining cheeses over the spinach. Bake for 12 – 15 minutes until cheese melts and turns slightly brown. Let cool for a few minutes then cut with a pizza slicer.

For a crispier crust place the flatbread directly on a rack in the oven. Check flatbread package for full instructions on cooking crust.

Follow my blog with Bloglovin

Eggplant Wheels

IMG_0411_1

Eggplant Wheels are kind of like individual eggplant parmesan servings. The elements are basically the same but arranged for individual servings. I like the idea of making a simple serving of eggplant as opposed to the longer process of layering and assembling an eggplant parmesan casserole.

IMG_0421_1

Why do I call them eggplant wheels? To be honest, it is because I could not think of what else to call them. It is not really a casserole so since the eggplant slices are shaped like a wheel I called the dish eggplant wheels. Corny? Maybe. But, for now the name eggplant wheels is fitting.

IMG_0427_1

The wonderful thing about this dish is that the servings are just right. One thick slice of eggplant is just enough of a side dish to go with whatever else you are serving. Of course if you are eating this as a main course you can eat as many Eggplant Wheels as your tummy can hold. If I am eating Eggplant Wheels as an entree, I may add pasta as a side dish or I may top the pasta with the eggplant. Yum!

IMG_0445_1

IMG_0525_1

Eggplant Wheels

Ingredients:
1 24 oz jar spaghetti sauce
1 medium wide eggplant sliced into ½ inch rounds
2 large beefsteak tomatoes sliced
8 oz ricotta cheese
1 cup mozzarella cheese
½ cup grated parmesan cheese
1 tsp salt
1 tsp black pepper
1 tsp basil
½ tsp seasoned salt
½ tsp garlic powder
½ tsp onion powder
½ tsp red pepper flakes
1 tbsp oregano

Preheat oven to 350 degrees.

In a small bowl mix the ricotta cheese, basil, oregano. onion powder, garlic powder, red pepper flakes seasoned salt and grated parmesan cheese. Set aside.

Spoon a little spaghetti sauce in the bottom of a long casserole dish. Place eggplant wheels on top of the sauce. Season with salt and black pepper. Top each eggplant wheel with a spoonful of the ricotta cheese mixture. Spoon spaghetti sauce over the ricotta cheese then sprinkle mozzarella cheese on top. Bake for 45 minutes to 1 hour until the eggplant is cooked and the cheese is melted and slightly browned.

Follow my blog with Bloglovin

BCT Sandwiches (Bacon, Cucumber and Tomato)

IMG_0651_1

BCT (Bacon, Cucumber and Tomato) sandwiches are a nice little treat for breakfast, lunch or dinner. Instead of a heavy load of bacon, eggs, potatoes and pancakes, a light but filling sandwich is the way I like to roll. Nothing against a big breakfast but after eating that much food I am ready for a very long nap.

IMG_0657_1

A take on the classic BLT, the BCT provides refreshing veggies and the smoky taste of bacon. I first experienced having a breakfast sandwich with BCT when my hubby brought one home from a trip to the gas station that also has a deli inside. It was on a particular Saturday which I deemed cereal day because I was not into making breakfast that day and no one else volunteered. Since hubby wasn’t in the mood for cereal he decided to pick up a breakfast sandwich when he went to get gas (he is such a good multi-tasker). I must say I was a little envious when he showed me his sandwich and I looked down at my soggy cereal.

IMG_0686_1

Needless to say, I decided I could re-create hubby’s Bacon, Cucumber and Tomato sandwich and turn it into a sandwich for breakfast, lunch or dinner. For breakfast and lunch the BCT is pretty straightforward. Although, to elevate the BCT as a lunch sandwich I sometimes add lettuce or fresh baby leaf spinach. For dinner, I will add a few thin slices of turkey breast or smoked salmon with capers.

IMG_0701_1

No matter when you decide to eat a BCT I know you will like it. Especially, if you are tired of cereal.

IMG_0710_1

BCT Sandwiches (Bacon, Cucumber and Tomato)

Ingredients:
4 sliced bagels
1 large tomato sliced
1 medium cucumber sliced
½ lb bacon fried slightly crisp
4 – 5 tbsp softened cream cheese

Toast bagels. Spread both sides of bagel with cream cheese. Layer one side of bagel with tomato, cucumber then top with bacon.

Optional:
thin slices of turkey breast
slices of smoked salmon and capers
fresh baby leaf spinach

Follow my blog with Bloglovin

Stuffed Chicken Breast Wrapped in Bacon

IMG_0052_1

Today was another one of those days I needed to quickly get dinner on the table because folks were hungry. I know my hubby and son are spoiled but I created those monsters so I live with it. Besides, this was a time when I was hungry too.

IMG_0044_1

Fortunately, I had planned ahead and had thin chicken breasts ready for a new recipe I wanted to try. Stuffed Chicken Breasts Wrapped in Bacon. I figured this one would be a winner just because of the ingredients my family loves to eat. Chicken, fresh spinach, bacon and brie.

IMG_0059_1

Hubby gave me a thumbs up after the first couple of bites. The fresh spinach kept the chicken moist on the inside and the brie added a nice rich creamy flavor to the chicken. Bacon. What can you say about bacon except that it goes with just about anything you can cook.

IMG_0066_1

I was able to get dinner on the table in under an hour so you know this recipe is definitely quick and easy.

IMG_0076_1

IMG_0080_1

Stuffed Chicken Breast Wrapped in Bacon

Ingredients
8 thin chicken breasts
8 slices of brie
8 slices of bacon
2 cups baby leaf spinach
1 tsp garlic powder
1 tsp salt
1 tsp dried basil
1 tsp black pepper
1 tsp smoked paprika

Preheat oven to 425 degrees.

Season each slice of chicken breast with salt, black pepper, garlic powder and basil. Layer spinach and two slices of brie on four slices of chicken breasts. Top each chicken breast with remaining slices. Wrap two slices of bacon around chicken breasts and secure with tooth picks or roasting pins. Place on a rimmed baking sheet. Bake for 20 minutes until chicken is cooked through and bacon is slightly crisp. Let chicken rest for 5 minutes. Remove pins prior to serving.


Follow my blog with Bloglovin

Shrimp and Pasta Salad

IMG_9720_1

Pasta salads are one of the most versatile dishes anyone can prepare. A pasta salad basically consists of pasta and any vegetable, meat or seafood you can think of tossed with a nice dressing. Since there are such a variety of pasta noodles available it is easy to be creative. Even if you use the same basic ingredients when you prepare a pasta salad it can become new all over again by using a different type of pasta. Shells, gemelli, bow tie and cavatappi are a few of the pastas I like to use in cold salads. They have little ridges that absorb whatever dressing you use and most of them just have a cool shape.

IMG_9726_1

For my Shrimp and Pasta Salad I used small pasta shells because I wanted the pasta to cuddle some of the dressing and provide a subtle burst of flavor with every bite. The veggies I used with this pasta salad were meant to make the dish colorful with the deep green of the asparagus and the bright red of the peppers and tomatoes. The shrimp added a pretty pink hue that pulled everything together.

IMG_9731_1

Most of us are first attracted to a dish because of the way it looks. If a dish looks weird, we figure it will taste weird too. Although that is not always true it is human nature to judge certain things by the way they look. That is way it is important to add rich vibrant color to every meal. My Shrimp and Pasta Salad is both appealing to the eye and tasty on the tongue. Try it as a main course or side dish. Either way I think you enjoy this simple flavorful salad.

IMG_9749_1

IMG_9737_1

Shrimp and Pasta Salad

Ingredients:
2 lbs ex-large shrimp peeled and deveined
2 boiled eggs chopped
1 bunch asparagus cut into 1” pieces
1 bag arugula
1 box small pasta shells
1 large tomato seeded and diced into cubes
1 shallot sliced thin
½ cup red pepper diced
½ cup black olives chopped (optional)
½ cup vinaigrette
½ tsp lemon zest
1 tsp black pepper
1 tsp salt
1 tsp parsley
1 tsp cilantro
1 tsp old bay seasoning
1 tbsp butter
2 tbsp olive oil
1juice from ½ lemon

Prepare pasta shells according to the package – al dente. Set aside.

In a large skillet heat butter with olive oil over medium high heat. Add shrimp and lemon juice. Stir and then add ½ tsp salt, ½ black pepper and old bay seasoning. Cook until shrimp are pink. Remove with a slotted spoon and place in a bowl. Set aside.

Add veggies (except for tomatoes) to the same skillet and add remaining seasonings. Cook for 2- 3 minutes until veggies soften slightly but still crisp. Do not over cook.

In a large bowl add pasta, shrimp, veggies, arugula, eggs, tomatoes and olives. Drizzle with vinaigrette and gently mix. Serve with a nice side salad.

Follow my blog with Bloglovin