Tag Archives: blog

Stuffed Chicken Breast Wrapped in Bacon

IMG_0052_1

Today was another one of those days I needed to quickly get dinner on the table because folks were hungry. I know my hubby and son are spoiled but I created those monsters so I live with it. Besides, this was a time when I was hungry too.

IMG_0044_1

Fortunately, I had planned ahead and had thin chicken breasts ready for a new recipe I wanted to try. Stuffed Chicken Breasts Wrapped in Bacon. I figured this one would be a winner just because of the ingredients my family loves to eat. Chicken, fresh spinach, bacon and brie.

IMG_0059_1

Hubby gave me a thumbs up after the first couple of bites. The fresh spinach kept the chicken moist on the inside and the brie added a nice rich creamy flavor to the chicken. Bacon. What can you say about bacon except that it goes with just about anything you can cook.

IMG_0066_1

I was able to get dinner on the table in under an hour so you know this recipe is definitely quick and easy.

IMG_0076_1

IMG_0080_1

Stuffed Chicken Breast Wrapped in Bacon

Ingredients
8 thin chicken breasts
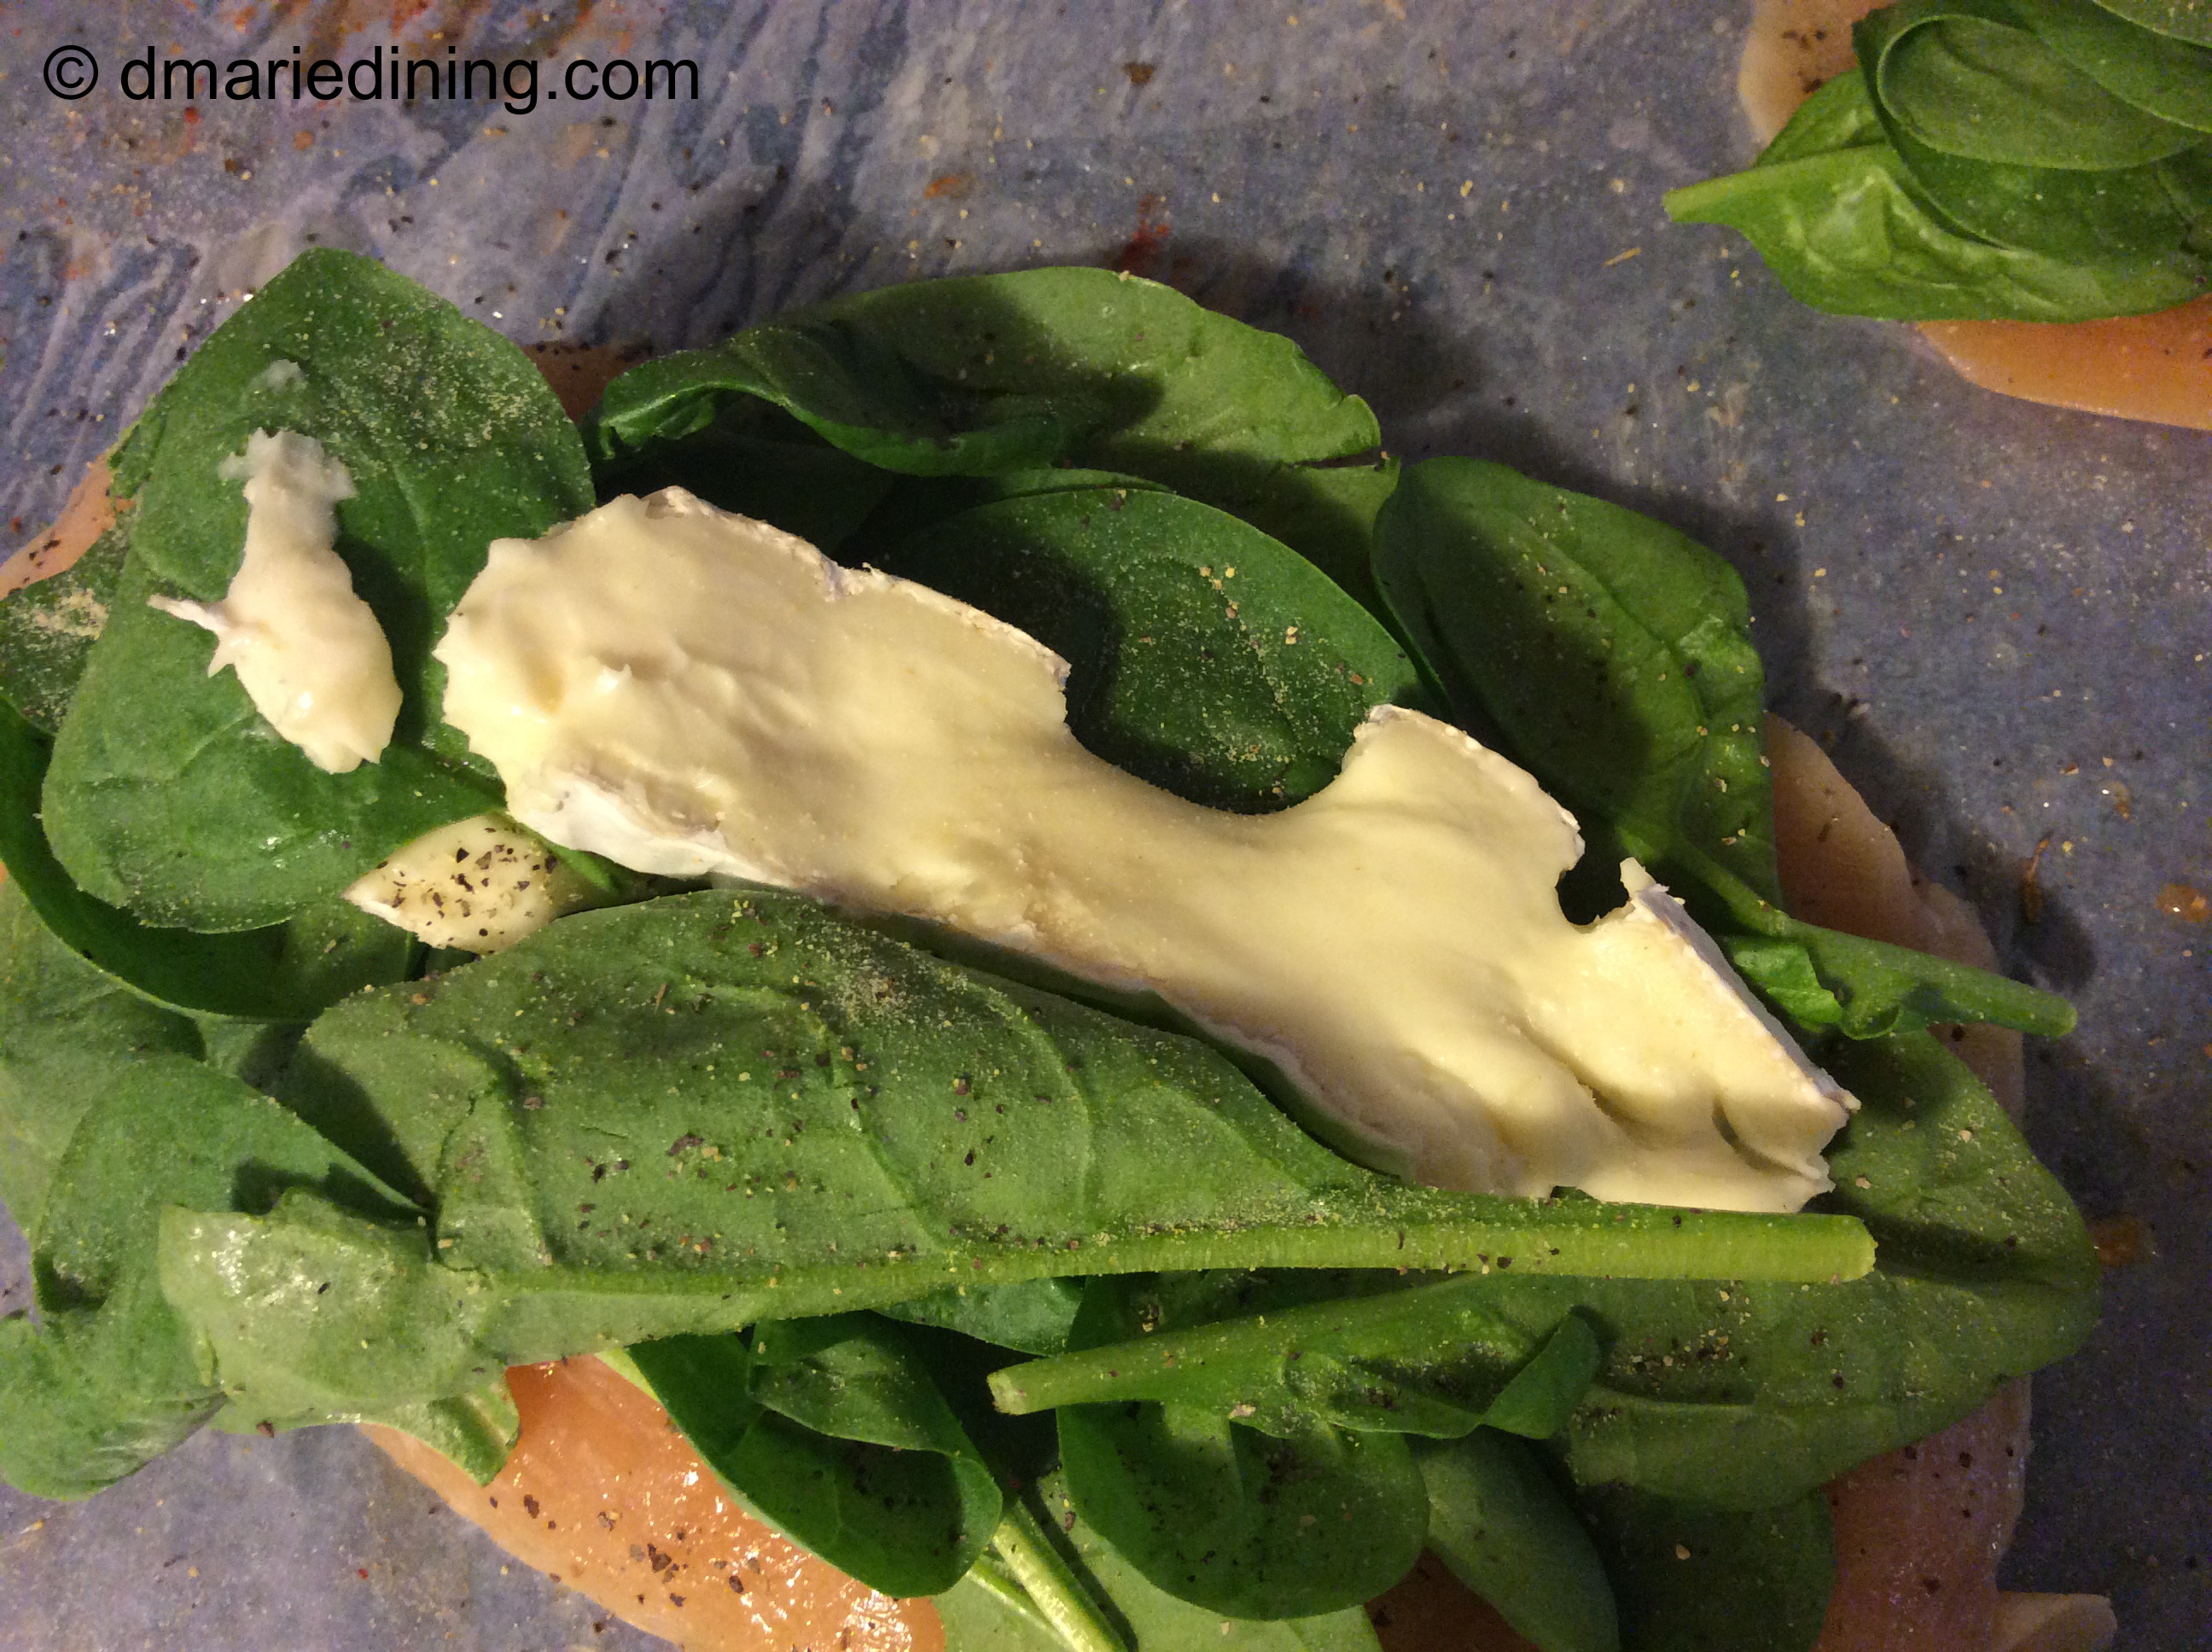
8 slices of brie
8 slices of bacon
2 cups baby leaf spinach
1 tsp garlic powder
1 tsp salt
1 tsp dried basil
1 tsp black pepper
1 tsp smoked paprika

Preheat oven to 425 degrees.

Season each slice of chicken breast with salt, black pepper, garlic powder and basil. Layer spinach and two slices of brie on four slices of chicken breasts. Top each chicken breast with remaining slices. Wrap two slices of bacon around chicken breasts and secure with tooth picks or roasting pins. Place on a rimmed baking sheet. Bake for 20 minutes until chicken is cooked through and bacon is slightly crisp. Let chicken rest for 5 minutes. Remove pins prior to serving.


Follow my blog with Bloglovin

Fruit Cups

IMG_8999_1

When you think of fruit cups I am sure you think of fresh (or canned) fruit chopped up and mixed together. Kind of like the fruit cup they would serve you in grade school for lunch. Well this Fruit Cup is nothing like the fruit cup from our childhood memories. My alternate version of a fruit cup is a pastry cup full of fresh (or canned) fruit simmered down with pecans then topped with a glob of vanilla ice cream.

IMG_8993_1

I came up with the idea of creating pastry fruit cups when I was thinking of what else I could make with the extra large muffin tins I used to bake big muffins. I also was trying to decide what to make with the leftover pastry dough my mom gave me so I could work on a new quiche recipe. Rather than make a big pie I thought I could create individual Fruit Cups that would be like a slice of pie.

IMG_9004_1

The great thing about Fruit Cups is that you can fill them with any kind of fruit you like and make several different types at once. For this post I tried making peach fruit cups. They tasted like mini peach pies with a hint of pecans. Apples were a good substitute for the peaches when I made this for my hubby because he likes apple pie but blueberry and blackberry also work well with this recipe. I just had to tweak it a little and instead of using brown sugar and cinnamon I used only regular sugar and lemon zest to brighten the flavors.

IMG_9018_1

Try making Fruit Cups the next time you have a desire for pie but don’t want the whole thing only a muffin sized slice.

IMG_9014_1

Fruit Cups

Ingredients:
1 pkg of Pillsbury pie sheets (or your own crust)
2 15 oz cans peaches in heavy syrup
2 tbsp brown sugar
2 tbsp butter
1 tbsp sugar
1 tsp cinnamon
½ tsp nutmeg
½ cup pecans chopped
1 egg lightly beaten with 1 tsp of water
cooking spray

Preheat oven to 350 degrees.

Spray 4 large muffin tins with cooking spray.

Add peaches with syrup, butter, sugars, cinnamon and nutmeg to a medium sized pot and simmer for 20 minutes over medium heat.

Cut out four 6 ½ inch circles (I used a cereal bowl to measure) from the pie sheets re-rolling the excess dough if necessary. Place each circle in the muffin tin then with a slotted spoon fill will fruit & nut mixture. Add a little of the juice from fruit to each cup. Fold over top of pie sheet to close the cup. Brush with egg wash and then vent with a knife. Bake for 25 – 30 minutes until crust is golden brown. Serve with a scoop of ice cream.

Optional:
Sliced Apples
Blueberries
Blackberries
Strawberries

If using berries, substitute sugar for brown sugar and add a little lemon zest.

Follow my blog with Bloglovin

Shrimp and Pasta Salad

IMG_9720_1

Pasta salads are one of the most versatile dishes anyone can prepare. A pasta salad basically consists of pasta and any vegetable, meat or seafood you can think of tossed with a nice dressing. Since there are such a variety of pasta noodles available it is easy to be creative. Even if you use the same basic ingredients when you prepare a pasta salad it can become new all over again by using a different type of pasta. Shells, gemelli, bow tie and cavatappi are a few of the pastas I like to use in cold salads. They have little ridges that absorb whatever dressing you use and most of them just have a cool shape.

IMG_9726_1

For my Shrimp and Pasta Salad I used small pasta shells because I wanted the pasta to cuddle some of the dressing and provide a subtle burst of flavor with every bite. The veggies I used with this pasta salad were meant to make the dish colorful with the deep green of the asparagus and the bright red of the peppers and tomatoes. The shrimp added a pretty pink hue that pulled everything together.

IMG_9731_1

Most of us are first attracted to a dish because of the way it looks. If a dish looks weird, we figure it will taste weird too. Although that is not always true it is human nature to judge certain things by the way they look. That is way it is important to add rich vibrant color to every meal. My Shrimp and Pasta Salad is both appealing to the eye and tasty on the tongue. Try it as a main course or side dish. Either way I think you enjoy this simple flavorful salad.

IMG_9749_1

IMG_9737_1

Shrimp and Pasta Salad

Ingredients:
2 lbs ex-large shrimp peeled and deveined
2 boiled eggs chopped
1 bunch asparagus cut into 1” pieces
1 bag arugula
1 box small pasta shells
1 large tomato seeded and diced into cubes
1 shallot sliced thin
½ cup red pepper diced
½ cup black olives chopped (optional)
½ cup vinaigrette
½ tsp lemon zest
1 tsp black pepper
1 tsp salt
1 tsp parsley
1 tsp cilantro
1 tsp old bay seasoning
1 tbsp butter
2 tbsp olive oil
1juice from ½ lemon

Prepare pasta shells according to the package – al dente. Set aside.

In a large skillet heat butter with olive oil over medium high heat. Add shrimp and lemon juice. Stir and then add ½ tsp salt, ½ black pepper and old bay seasoning. Cook until shrimp are pink. Remove with a slotted spoon and place in a bowl. Set aside.

Add veggies (except for tomatoes) to the same skillet and add remaining seasonings. Cook for 2- 3 minutes until veggies soften slightly but still crisp. Do not over cook.

In a large bowl add pasta, shrimp, veggies, arugula, eggs, tomatoes and olives. Drizzle with vinaigrette and gently mix. Serve with a nice side salad.

Follow my blog with Bloglovin

Andouille Sausage with Tomato Gravy

IMG_0094_1

Tonight I fixed andouille sausage with tomato gravy over pasta. I used chicken andouille sausage and made a rue with beer then added fire roasted tomatoes. I am not sure why or how I decided to make a tomato gravy. The idea just came to me on my long drive home from work. I was racking my brain to come up with something quick for dinner because I no longer felt like making the seafood salad I had planned. I knew I had andouille sausage at home and thought they would be good in a gravy so tomato gravy was born.

IMG_0103_1

Tomato gravy is really just a rue made with beer and fire roasted tomatoes. I don’t make gravy too often because it can be very heavy and of course fattening if made the way my grand-mom use to make it. Her gravy was delicious and good for twirling your biscuits in but now that I am older I cannot have a lot of biscuits and gravy. My hips will not allow it.

IMG_0113_1

Anyway, the andouille sausage and tomato gravy was good. One of those turn up the bowl to your lips so you can get every drop kind of good. You know what I mean. Everyone (I hope) has experienced at least once in their lifetime a dish that made you want to lick the bowl but you settled for secretly lifting the bowl to your lips and sucking up the juices. If you have not had that experience I feel sorry for you. Maybe this will be one of those dishes for you.

IMG_0117_1

The slight heat from the sausage and the smokiness of the fire roasted tomatoes was a wonderful combination. The beer added another level of flavor because of the lemon grass, coriander and orange spices in the beer. I am not a real beer drinker but I do like to cook with it so I look for different flavors of beer that might elevate a dish. Beer can add a subtle punch to any recipe instead of overpowering the dish like other types of alcohol.

IMG_0126_1

I am sure I will be making andouille sausage with tomato gravy again and again judging by the two bowls my hubby had tonight. Quick and easy is still my motto.

IMG_0125_1

Andouille Sausage with Tomato Gravy

Ingredients:
8 chicken andouille sausage links
2 15 oz cans fire roasted tomatoes
1 bag baby leaf spinach (optional)
1 bottle good beer / ale
¼ cup vegetable oil
½ cup water
3 tbsp flour
1 tsp salt
1 tsp black pepper
1 tsp Adobo
1 tsp worcestershire
1 tsp onion powder
½ tsp gumbo file (optional)
½ tsp cilantro
¼ tsp nutmeg
¼ tsp cayenne

Preheat oven to 425 degrees.

Cut a few slits in each andouille sausage link and place them on a rimmed baking sheet and cook for 15 minutes until browned. Remove from oven and set aside.

In a large frying pan add vegetable oil and flour over medium high heat. Whisk together until smooth and continue whisking until mixture turns a light cocoa brown. Be careful not to burn the rue so whisk constantly. Slowly pour in beer while continuing to whisk the rue. Add water, tomatoes and seasonings. Reduce heat to a simmer then add spinach. Stir to coat spinach with gravy then add sausage. Cook for an additional 15 minutes. Serve over curly pasta, mash potatoes or rice.

Follow my blog with Bloglovin

Chopped Salad

IMG_9670_1

Salads! A quick and light meal during warm weather. A refreshing side dish with heavier meals during cooler weather and good for you all year round. I am in salad mode which means I am into preparing some type of salad for my family almost every night for dinner. Fortunately, my family loves salads as long as I give them variety.

IMG_9669_1

It really isn’t hard to come up with new combinations of of ingredients when I create salads. However, I do have to make sure the combination of ingredients work as a salad. A few times I have had some wild salad ideas but I decided against posting them because although I like sauerkraut it just didn’t seem to work well with tomatoes, cheese and carrots.

IMG_9680_1

One of the best things about chopped salads is that chopping up everything that goes into the salad keeps it simple. The only thing I worry about is making sure there is a great combination of flavors and textures. Like the crunch of salty bacon and the smooth creamy taste of boiled eggs and avocado. Plus, lots of sweet tomatoes and just the right bite from carrots and red onions.

IMG_9699_1

There are so many options of veggies to use when making a chopped salad. If you like certain veggies and they compliment each other, go for it. Chop them up. Put them in a bowl and dress it up with a nice salad dressing. You cannot go wrong.

IMG_9703_1

Chopped Salad

 Ingredients:
2 heads of romaine chopped
2 salmon fillets blackened and flaked
6 slices crisp bacon chopped
3 boiled eggs chopped
1 avocado diced
1 cup cherry tomatoes cut in half
½ cup green or red peppers diced
½ cup shredded carrots chopped
½ cup shaved parmesan cheese
¼ cup oil based dressing
½ tsp black pepper
½ tsp seasoned salt
½ tsp red onion small diced

Combine all ingredients in a large bowl and toss gently.

Optional:
grilled chicken chopped
grilled turkey chopped
grilled shrimp

Follow my blog with Bloglovin

Grilled Chicken Salad

IMG_9840_1

Grilled Chicken Salad is another family favorite when the weather is warm and no one wants to eat a real heavy meal. Chicken of course is good any time of the year but chicken salad is one of those dishes I tend to make when I need a quick meal and I am too tired to turn on the oven or stove. I like to make Grilled Chicken Salad when my hubby is in the mood to do a lot of grilling. Grilling is his territory not mine so I take advantage whenever hubby is ready to fire it up.

IMG_9879_1

That being said the last time I made Grilled Chicken Salad for the family I didn’t wait for hubby to grill the chicken for me. Instead, I went to Trader Joe’s and purchased packaged grilled chicken which is actually very tasty with a great grilled flavor. Home grilled is wonderful but if you are short on time check out the grilled chicken at Trader Joe’s.

IMG_9889_1

Most chicken salad is just chicken and a few veggies. I kick it up another level by adding fruit. Grannie Smith apples, fennel, green grapes and golden raisins provide both a sweet and slightly sour taste to the salad. The combination of sweet and sour along with different levels of texture from the chicken, walnuts and tomatoes made this one of my signature dishes.

IMG_9893_1

To really put a smile on my family’s face I served the chicken salad on a bed of lettuce then sliced up a little brie and served it with crackers. De-li-ci-ous!

Grilled Chicken Salad

Ingredients:
2 pkgs grilled chicken cubed (approximately 2 cups)
2 boiled eggs
½ cup sliced apples
½ cup sliced fennel
½ cup chopped walnuts
½ cup cherry tomatoes sliced in half
½ cup green grapes sliced in half
¼ cup golden raisins
½ tsp salt
½ tsp cracked black pepper
½ tsp onion powder
¼ tsp dill
¼ tsp celery seed
¼ tsp cilantro
¼ tsp parsley
¼ tsp red pepper flakes
3 tbsp mayonnaise
2 tbsp ranch dressing
1 tbsp sour cream
juice from ½ a lemon

Remove yolks from boiled eggs and then chop the egg whites. Place all ingredients in a large bowl and gently mix until chicken, veggies and fruit are well coated with dressing. Chill for 30 minutes to 1 hour then serve on a bed of lettuce or with crackers.

Follow my blog with Bloglovin

Fried Spare Ribs

IMG_8569_1

Last Christmas my brother “O” insisted on making Fried Spare Ribs as an appetizer. I will admit I was skeptical for two reasons. One, because he wanted to make ribs as an appetizer prior to a big Christmas dinner. Two, because he wanted to fry the ribs. I had never heard of fried spare ribs and could not imagine what they would look like or how they would taste.

IMG_8581_1

Usually, when I fix ribs it takes hours in the oven or on the grill. I figured that frying ribs would make them tough. Well, I was wrong. I was surprised at how tender the ribs were and even more surprised at how everyone gathered in the kitchen waiting for the ribs  drooling. As fast as as the ribs came out of the pot they were gobbled up.

IMG_8583_1

Compliments to my brother “O” for giving me a new idea for ribs even if he did not share his exact recipe. Of course, since I am a decent cook it didn’t take much for me to figure out how to make my own delicious Fried Spare Ribs. I can say with confidence that once you try fried ribs you may not look at BBQ ribs the same way any more.

IMG_8573_1

Fried Spare Ribs

Ingredients:
2 pkgs baby back ribs or 1 slab of ribs cut up
4 cups vegetable oil
1 ½ cups flour
1 tbsp seasoned salt
1 tbsp black pepper
1 tbsp Adobo seasoning
1 tbsp salt
1 tbsp onion powder
1 tbsp smoked paprika

Heat oil in a large dutch oven over medium high heat until lightly smoky.

Combine flour, Adobo seasoning, onion powder, seasoned salt and paprika in a large plastic zip lock bag then shake to mix ingredients.

Season ribs with salt and black pepper. Drop 5 – 6 ribs into the plastic bag then shake to coat ribs. Shake off excess flour and gently drop ribs into hot oil. Cook for 10– 15 minutes turning ribs mid-way through cooking process. Drain on paper towels and serve immediately.

Follow my blog with Bloglovin

Grilled Corned Beef and Pastrami Sandwiches

IMG_8726_1

I had just come back home from a 3 day business meeting when I decided I should cook dinner for my hubby and youngest son since I knew they had been eating take out while I was gone. However, I was mentally tired and did not feel like making something too complex for dinner. On my way to the grocery store I kept trying to think of a simple meal that would satisfy their tummies, be easy for me and make them remember how much they missed my cooking.

IMG_8714_1

Rolling through the grocery store doors it hit me. Sandwiches would be easy to make but they couldn’t be just any ol’ sandwiches. Grilled Corned Beef and Pastrami sounded like a good combination. I had never made them for the family but I recently discovered my hubby likes Reuben sandwiches. Who knew after all these years. I didn’t have any sauerkraut and I didn’t have the time or the energy to fix some for the sandwiches. So, I decided to use corned beef and pastrami along with pepper jack cheese, provolone cheese, Kumato tomatoes and thousand island dressing. I used Kumato tomatoes on the sandwiches only because I like the color and taste of the tomatoes. Of course any type of tomato will work.

IMG_8731_1

As I said earlier I was mentally tired so making fancy side dishes to go with the sandwiches was out of the question. To at least make the sandwiches seem really special I added a sliced deli pickle and potato chips with aged cheddar and cracked black pepper.

IMG_8755_1

Don’t let anyone tell you that sandwiches are boring when it comes to dinner. Actually, they can be pretty exciting if you remember flavor and texture are the key to any meal. The different flavors of the meats along with the contrast of flavors of the cheese mixed with the tang of the thousand island dressing put a little pizazz into my Grilled Corned Beef and Pastrami Sandwiches. Both of my men loved the sandwiches and let me know they missed me and definitely missed my cooking.

IMG_8746_1

Grilled Corned Beef and Pastrami Sandwiches

Ingredients:
6 slices sourdough bread
½ lb sliced corned beef
½ lb sliced pastrami
¼ lb pepper jack cheese sliced
¼ lb provolone cheese sliced
1 small tomato sliced thin
2 tbsp thousand island dressing
6 tsp softened butter

Spread a little thousand island dressing on one slice of bread. Top with 2 slices pepper jack cheese then slices of corned beef and pastrami. Add slices of tomato then top with two slices of provolone cheese. Place second slice of bread on top of cheese. Spread butter on one side of the bread.

Heat 2 tbsp of butter on a griddle over medium high heat. Place sandwich butter side down on heated griddle. Spread butter on other side of the bread. Flip sandwich once browned on one side. Brown second side of bread. Serve with pickles and chips.

Follow my blog with Bloglovin

Brussel Sprout Hash

IMG_9212_1

Okay, let’s all admit it. Brussel sprouts can be a little stinky when you cook them. Not everyone can enjoy the strong taste of brussel sprouts but if you are adventurous I say give it a try. Brussel sprouts have great qualities one of which is they are healthy. Brussel sprouts are packed with vitamins C and K. While reading up on the benefits of eating brussel sprouts I found out that they help support the body’s detox system, our antioxidant system and our inflammatory/ anti-inflammatory system. Not many veggies are able to bring such benefits all at once.

IMG_9229_1

I came up with my brussel sprout hash recipe the same way I come up with quite a few of my creations. I needed to do something with the fresh brussel sprouts I threw into my shopping cart earlier in the week hoping I would be inspired by their presence in my frig. This time I actually was inspired by the brussel sprouts. I couldn’t bear to just boil them or simply roast them. But, I did want to bake them along with onions, peppers and potatoes and turn them into a hash. This recipe was created with just me in mind because neither my hubby nor my youngest son likes brussel sprouts. Me? I love them. I just don’t prepare them often because like I said in the beginning they can be a little stinky.

IMG_9242_1

On the day I made the brussel sprout hash my hubby came home and asked if I smelled something funny in the house. It wasn’t a strong smell but he could smell something different in the air. Of course I couldn’t say no and had to admit I had cooked brussel sprouts. After wrinkling up his nose he pulled out the the air freshener and sprayed the whole house. Totally unnecessary but what can I say. Brussel sprouts have their own unique aroma but they sure do taste good.

IMG_9247_1

Brussel Sprout Hash

Ingredients:
1 lb brussel sprouts cut in half
3 small red potatoes diced
2 shallots sliced
½ red pepper diced
3 tbsp olive oil
2 tbsp balsamic vinegar
1 tsp basil
1 tsp parsley
1 tsp salt

Preheat oven to 350 degrees.

In a large bowl toss brussel sprouts and balsamic vinegar. Coat a rimmed baking sheet with 1 tbsp olive oil. Add brussel sprouts, potatoes, peppers and shallots to baking sheet. Sprinkle with seasonings and toss. Pour remaining olive oil over veggies. Bake approximately 1 hour until veggies are soft and golden.

Follow my blog with Bloglovin

Cannellini and Kale

IMG_9397_1

Many moons ago when I was single and purchased my first home I lived next door to a wonderful elderly Italian couple. Ernie and John B. welcomed me into the neighborhood and into their home with open arms. I quickly became part of their extended family and was blessed with many delicious Italian treats Ernie always liked to share.

IMG_9426_1

Ernie was a great cook and I looked forward to her knock on my door to say she had something extra she wanted to me to try. Besides Ernie’s holiday pizzelles there was one treat I looked forward to eating. It was a simple cannellini bean and garlic dish made with olive oil and Italian seasonings. Simple but delicious. Probably the most important ingredient Ernie added was love. I have always said that food prepared with love is the best food in the world.

IMG_9431_1

I have since moved from the old neighborhood and my extended Italian family has passed on. I have fond memories of Ernie and John and only recently remembered her cannellini and bean recipe. In honor of Ernie, I decide to create my own version of her dish. I souped up the cannellini and garlic by adding fresh chopped kale and red pepper slices for color. The creaminess of the beans, the sweetness of the red peppers and slight crunch of the kale ( I like it al dente in some recipes) created a ping pong of textures in my mouth. Throw in nice Italian seasonings and you have a fantastic side dish or meal.

IMG_9448_1

I think Ernie would be proud of my version of her delicious beans and would give me a big hug for honoring her memory.

IMG_9455_1

Cannellini and Kale

Ingredients:
2 cups chopped kale
2 15oz cans cannellini beans drained and rinsed
2 cloves garlic sliced
½ red pepper seeded and sliced thin
½ cup chicken broth
2 tbsp olive oil
½ tbsp salt
½ tbsp oregano
¼ tsp onion powder
¼ tsp red pepper flakes (optional)

Heat olive oil over medium high heat in a large frying pan. Add kale and saute until slightly wilted (cook longer if you do not like kale al dente) for 3 – 5 minutes. Add garlic, sliced red pepper and seasonings. Stir then add chicken broth and beans. Stir to mix beans with kale and peppers. Reduce heat to medium and let simmer for 10 – 15 minutes.