All posts by dmariebates

Country Style Ribs with Sauerkraut

IMG_0722_1

Sauerkraut is one of those foods you really have to taste to determine if you like it or not. My son’s first reaction when he saw me cooking Country Style Ribs and Sauerkraut was to say “I don’t like sauerkraut”. Of course, I had never fixed sauerkraut for my family so my reply to him was “Just try a little then decide if you like it or not”. A few minutes after I let him try a spoonful to taste he exclaimed “I  like this!”.

IMG_0726_1

I think I can safely say almost everyone knows about country style ribs (nice thick pork ribs). But, what the heck is sauerkraut? Sauerkraut is pickled (fermented) cabbage. The word sauerkraut means “sour cabbage”. For many, it is an acquired taste and you may love it or hate it after you try sauerkraut.  I fall into the love it category. My mom made spare ribs and sauerkraut on many occasions and taught me her secret for taking the bitterness out of the sour cabbage. Brown sugar!

IMG_0736_1

Sauerkraut actually has quite a few health benefits. There are a number of diets that feature sauerkraut as the star to help reduce weight, lower cholesterol and fight against certain forms of cancer. The biggest benefit of sauerkraut is that it is inexpensive so it is light on the pocket book.

IMG_0754_1

If you have the time and the energy, you can easily make your own sauerkraut and store it in the frig or freeze it. Personally, I find it easier to buy it, freeze it and then pull it out whenever I want to make Country Style Ribs and Sauerkraut. Maybe in my next phase of life I will add making sauerkraut from scratch to my list of things to do. Until then…….

IMG_0766_1

Country Style Ribs and Sauerkraut

Ingredients:
1 pkg country style spare ribs
1 pkg sauerkraut
1 small onion sliced
1 cup water
¼ cup dark brown sugar
4 – 5 small red potatoes sliced thick
2 tbsp butter
1 tbsp salt
1 tbsp black pepper
½ tsp onion powder
paprika

Preheat oven to 350 degrees.

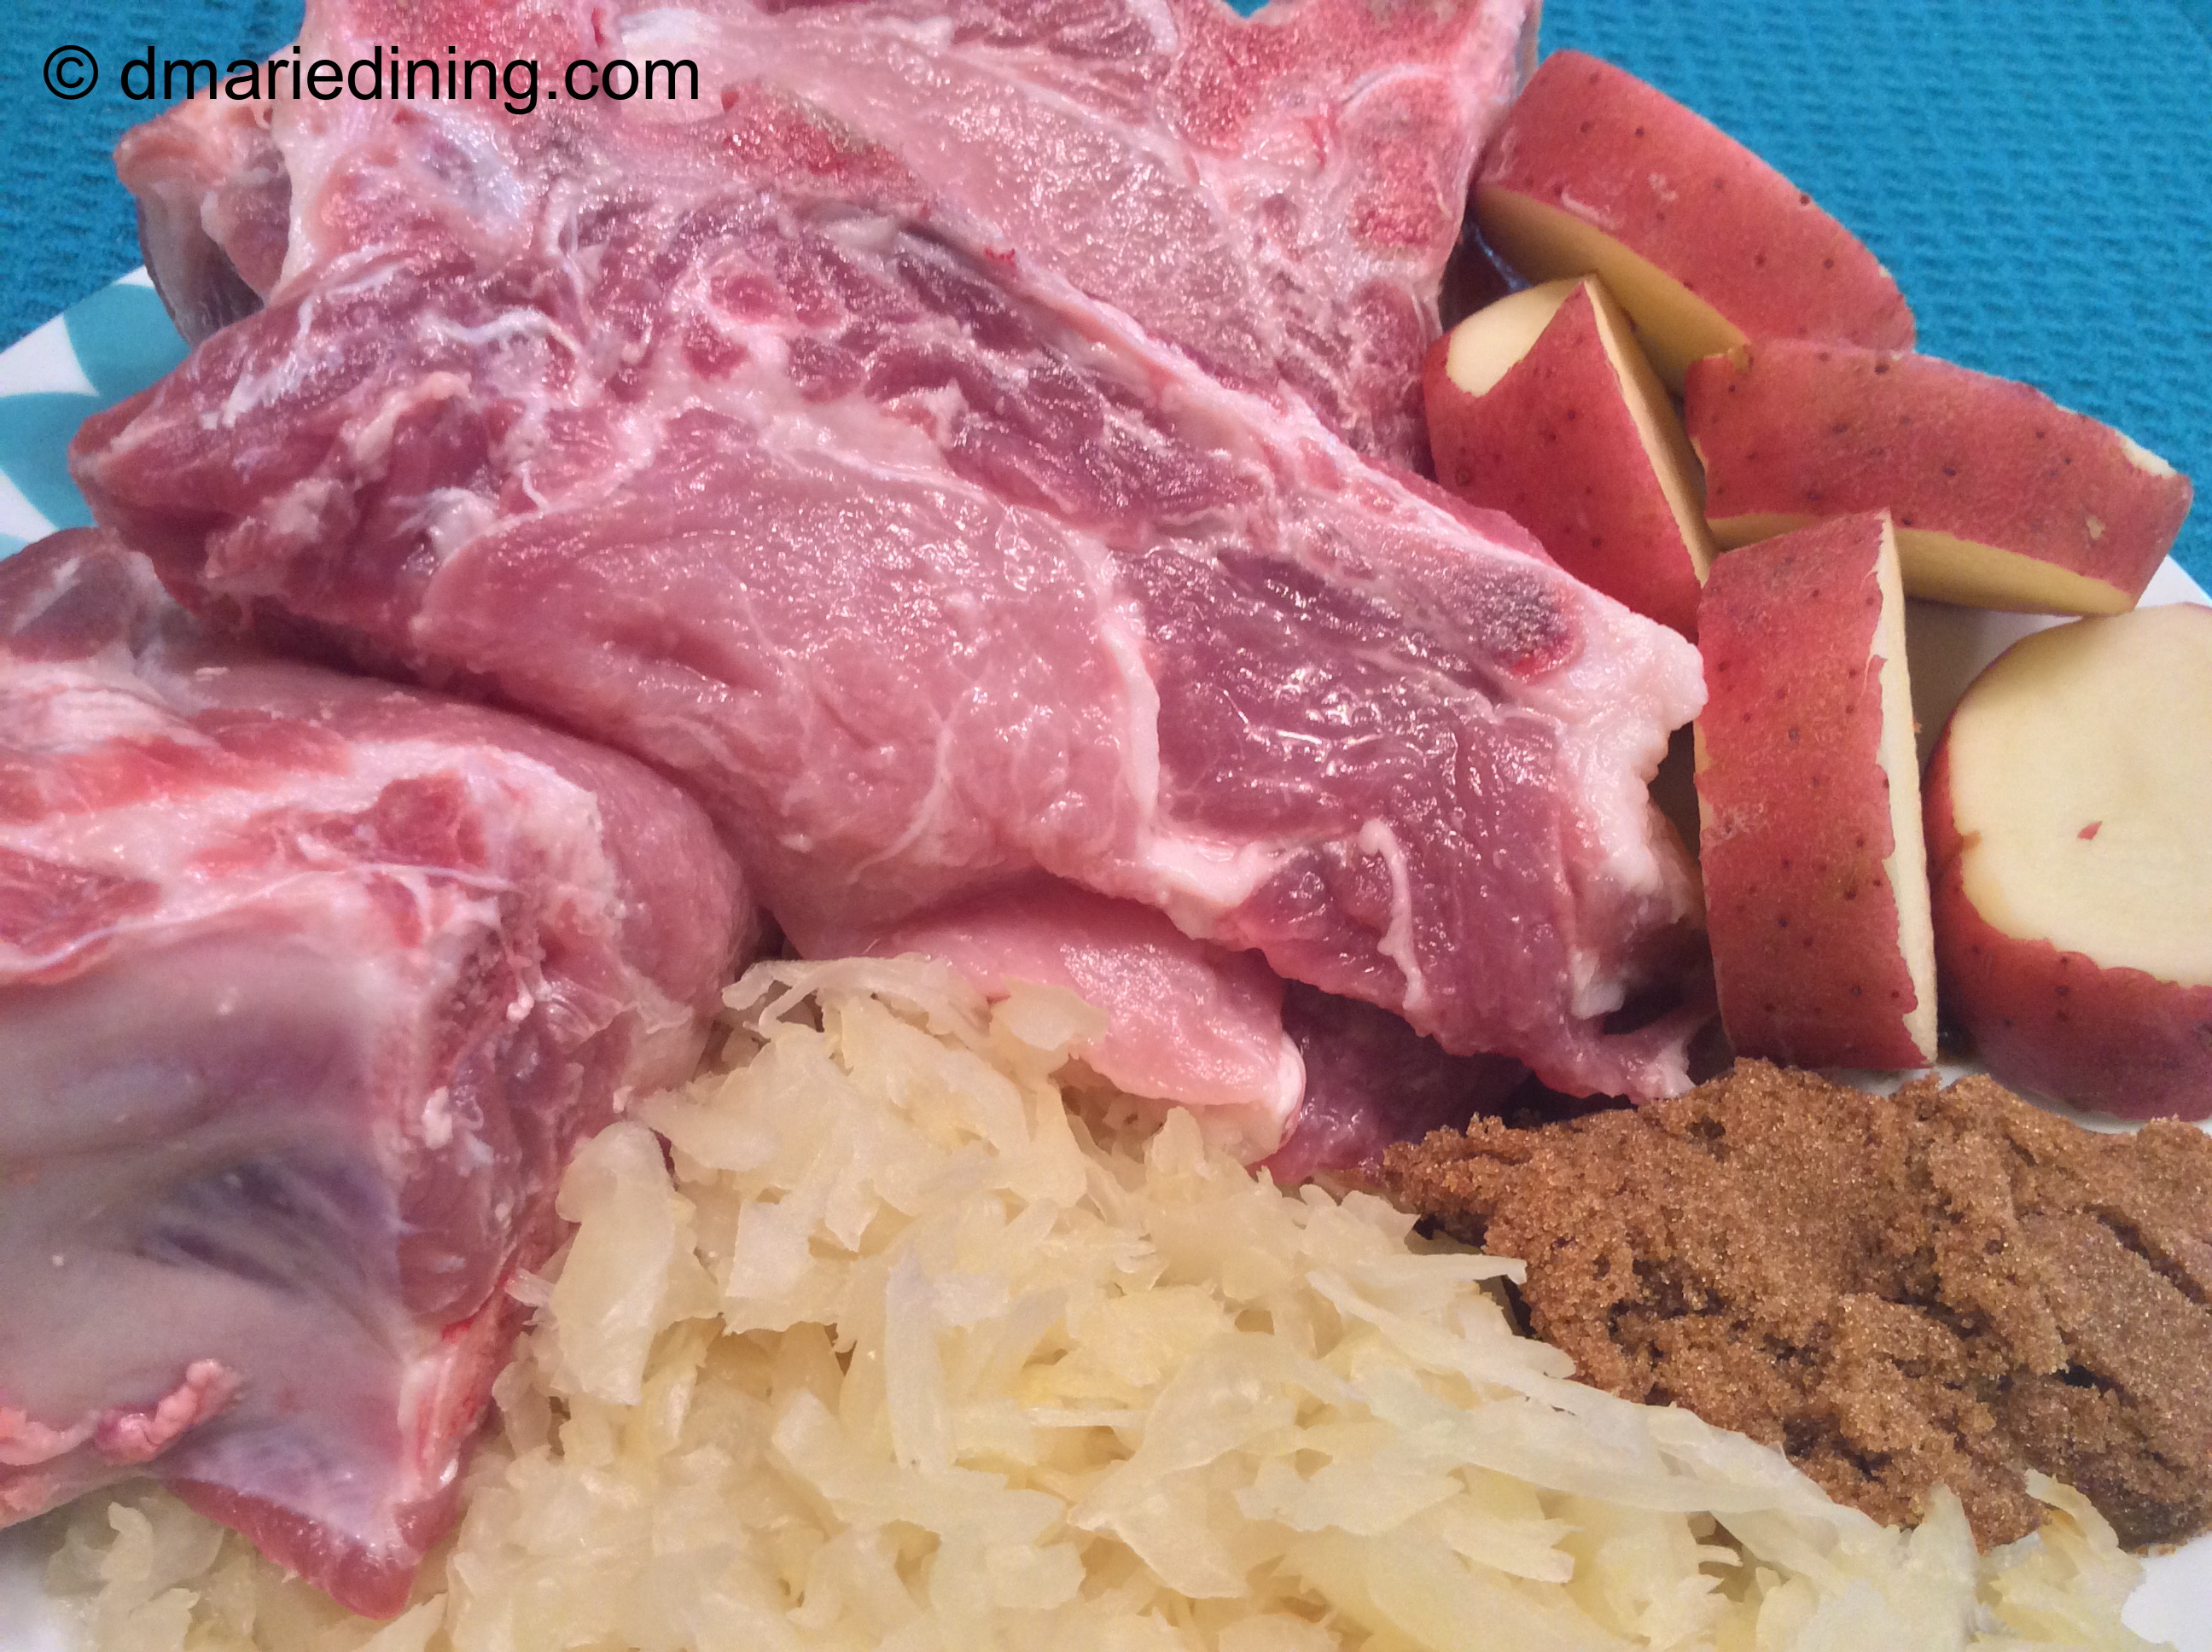
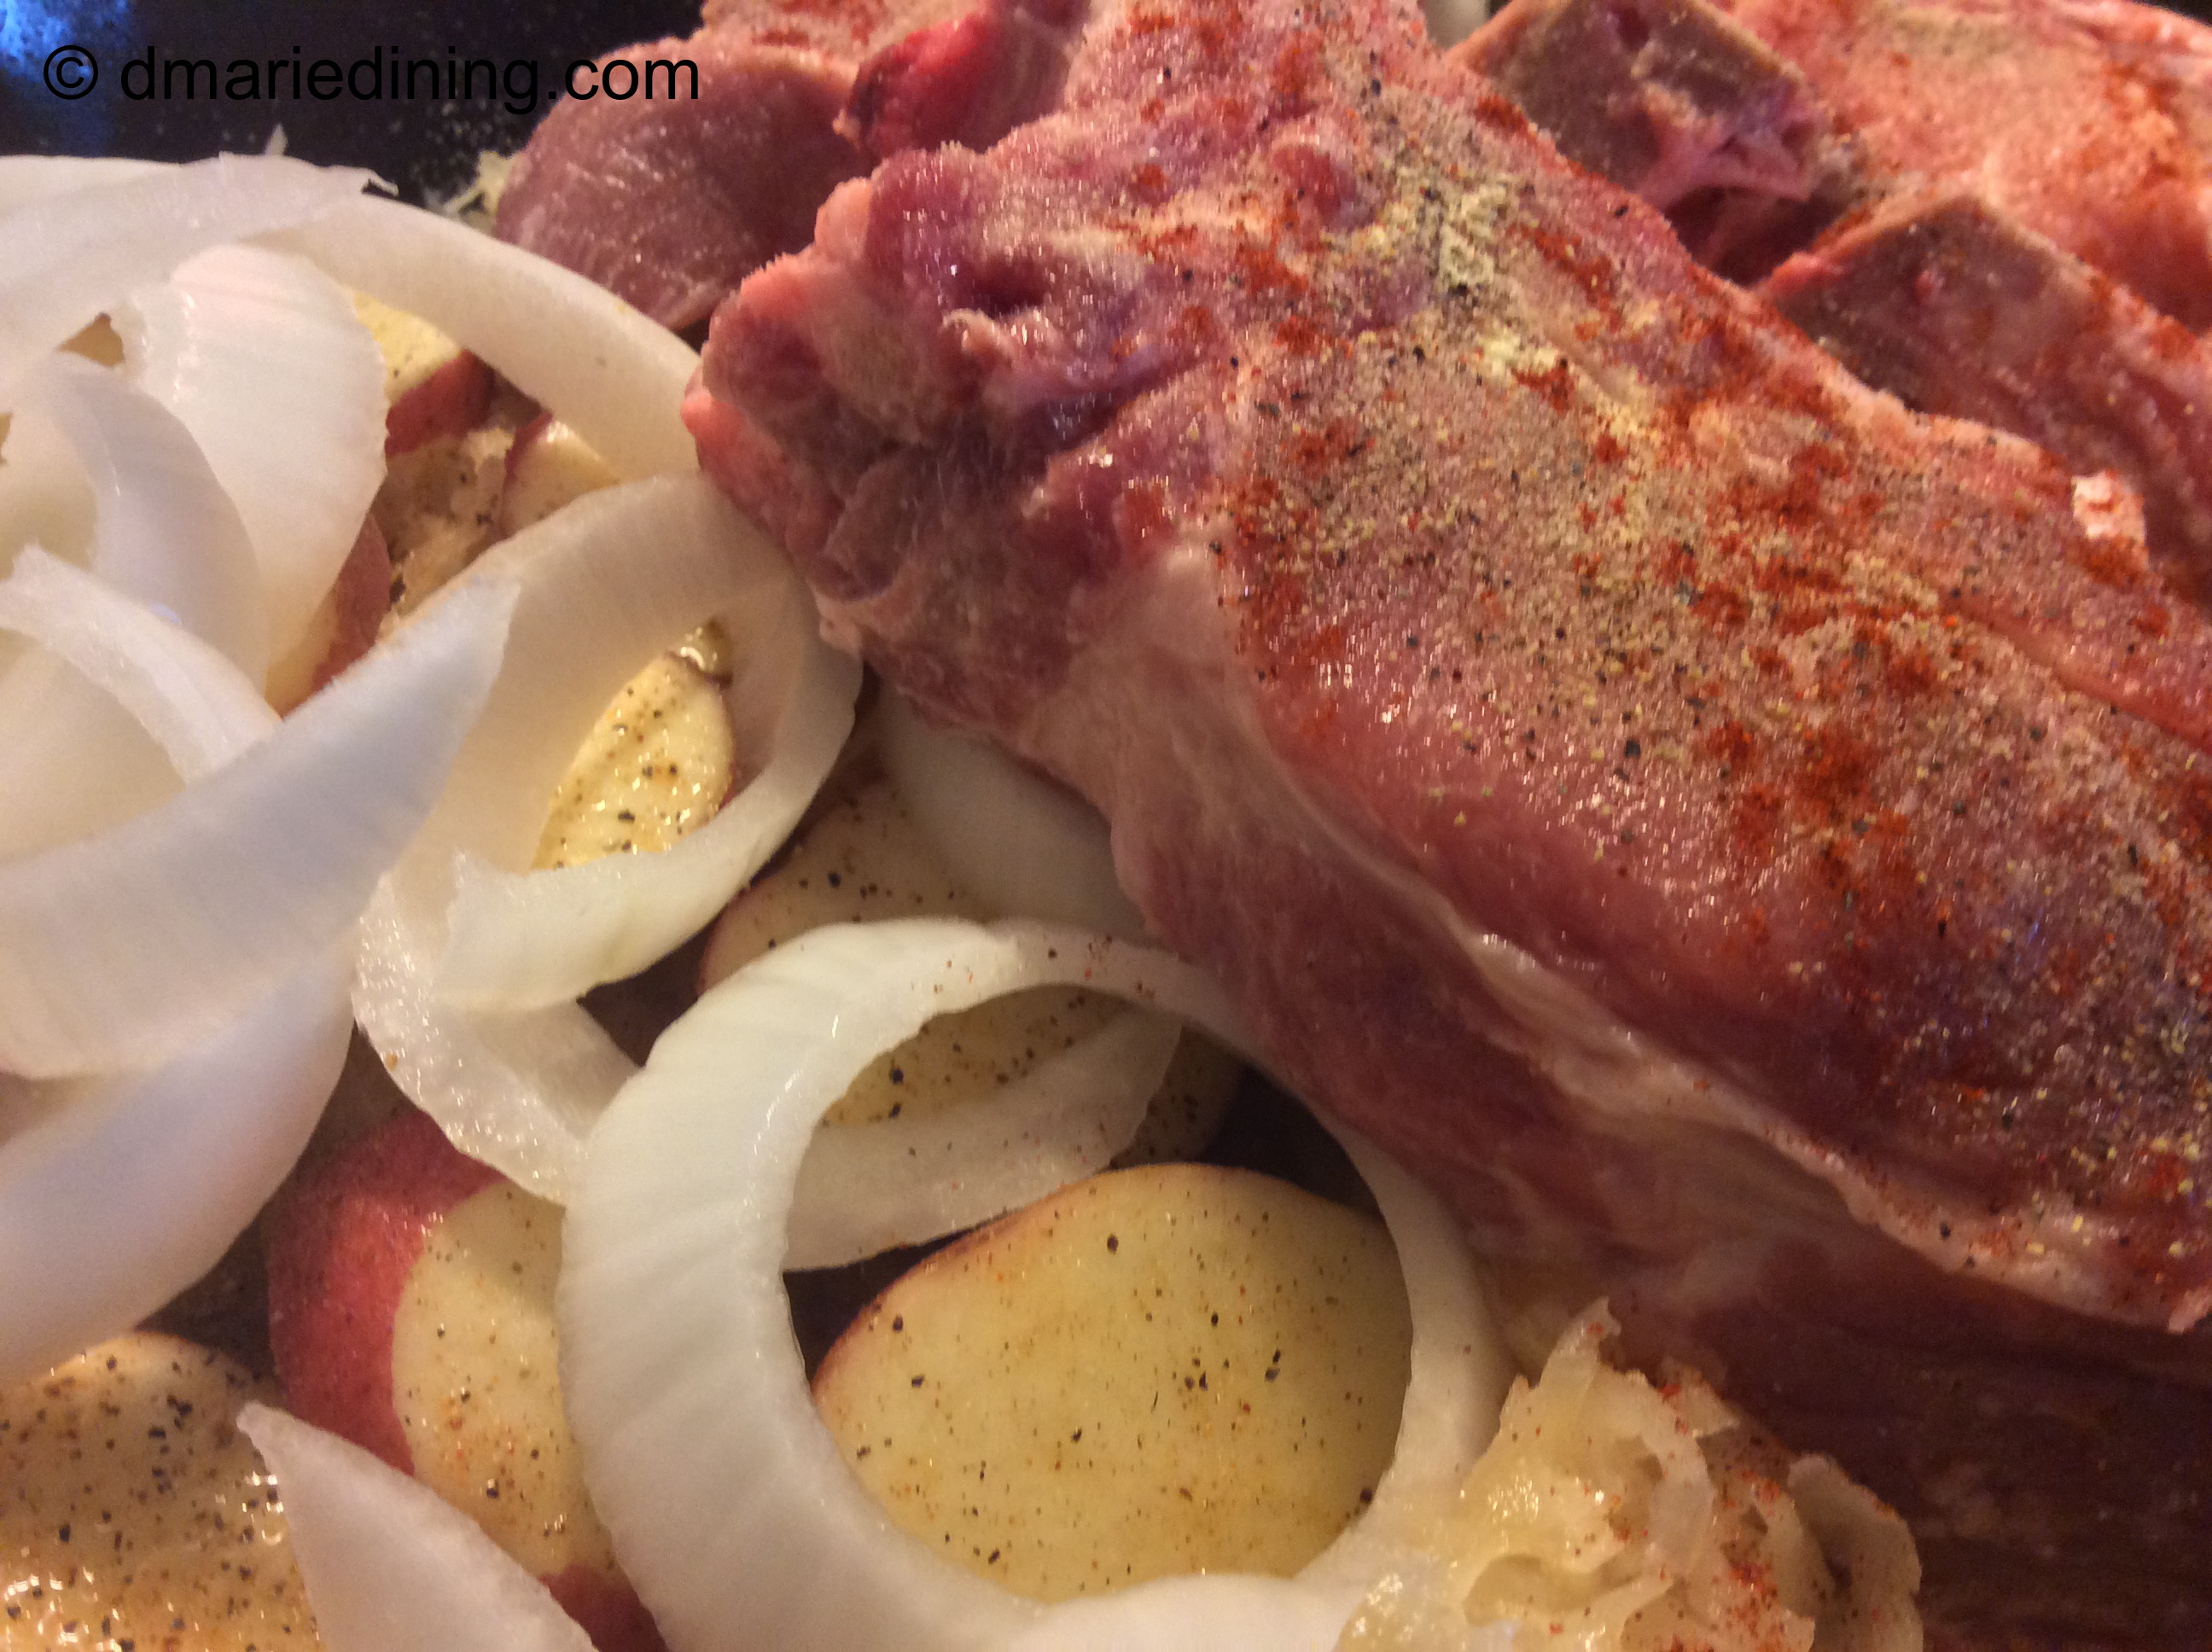
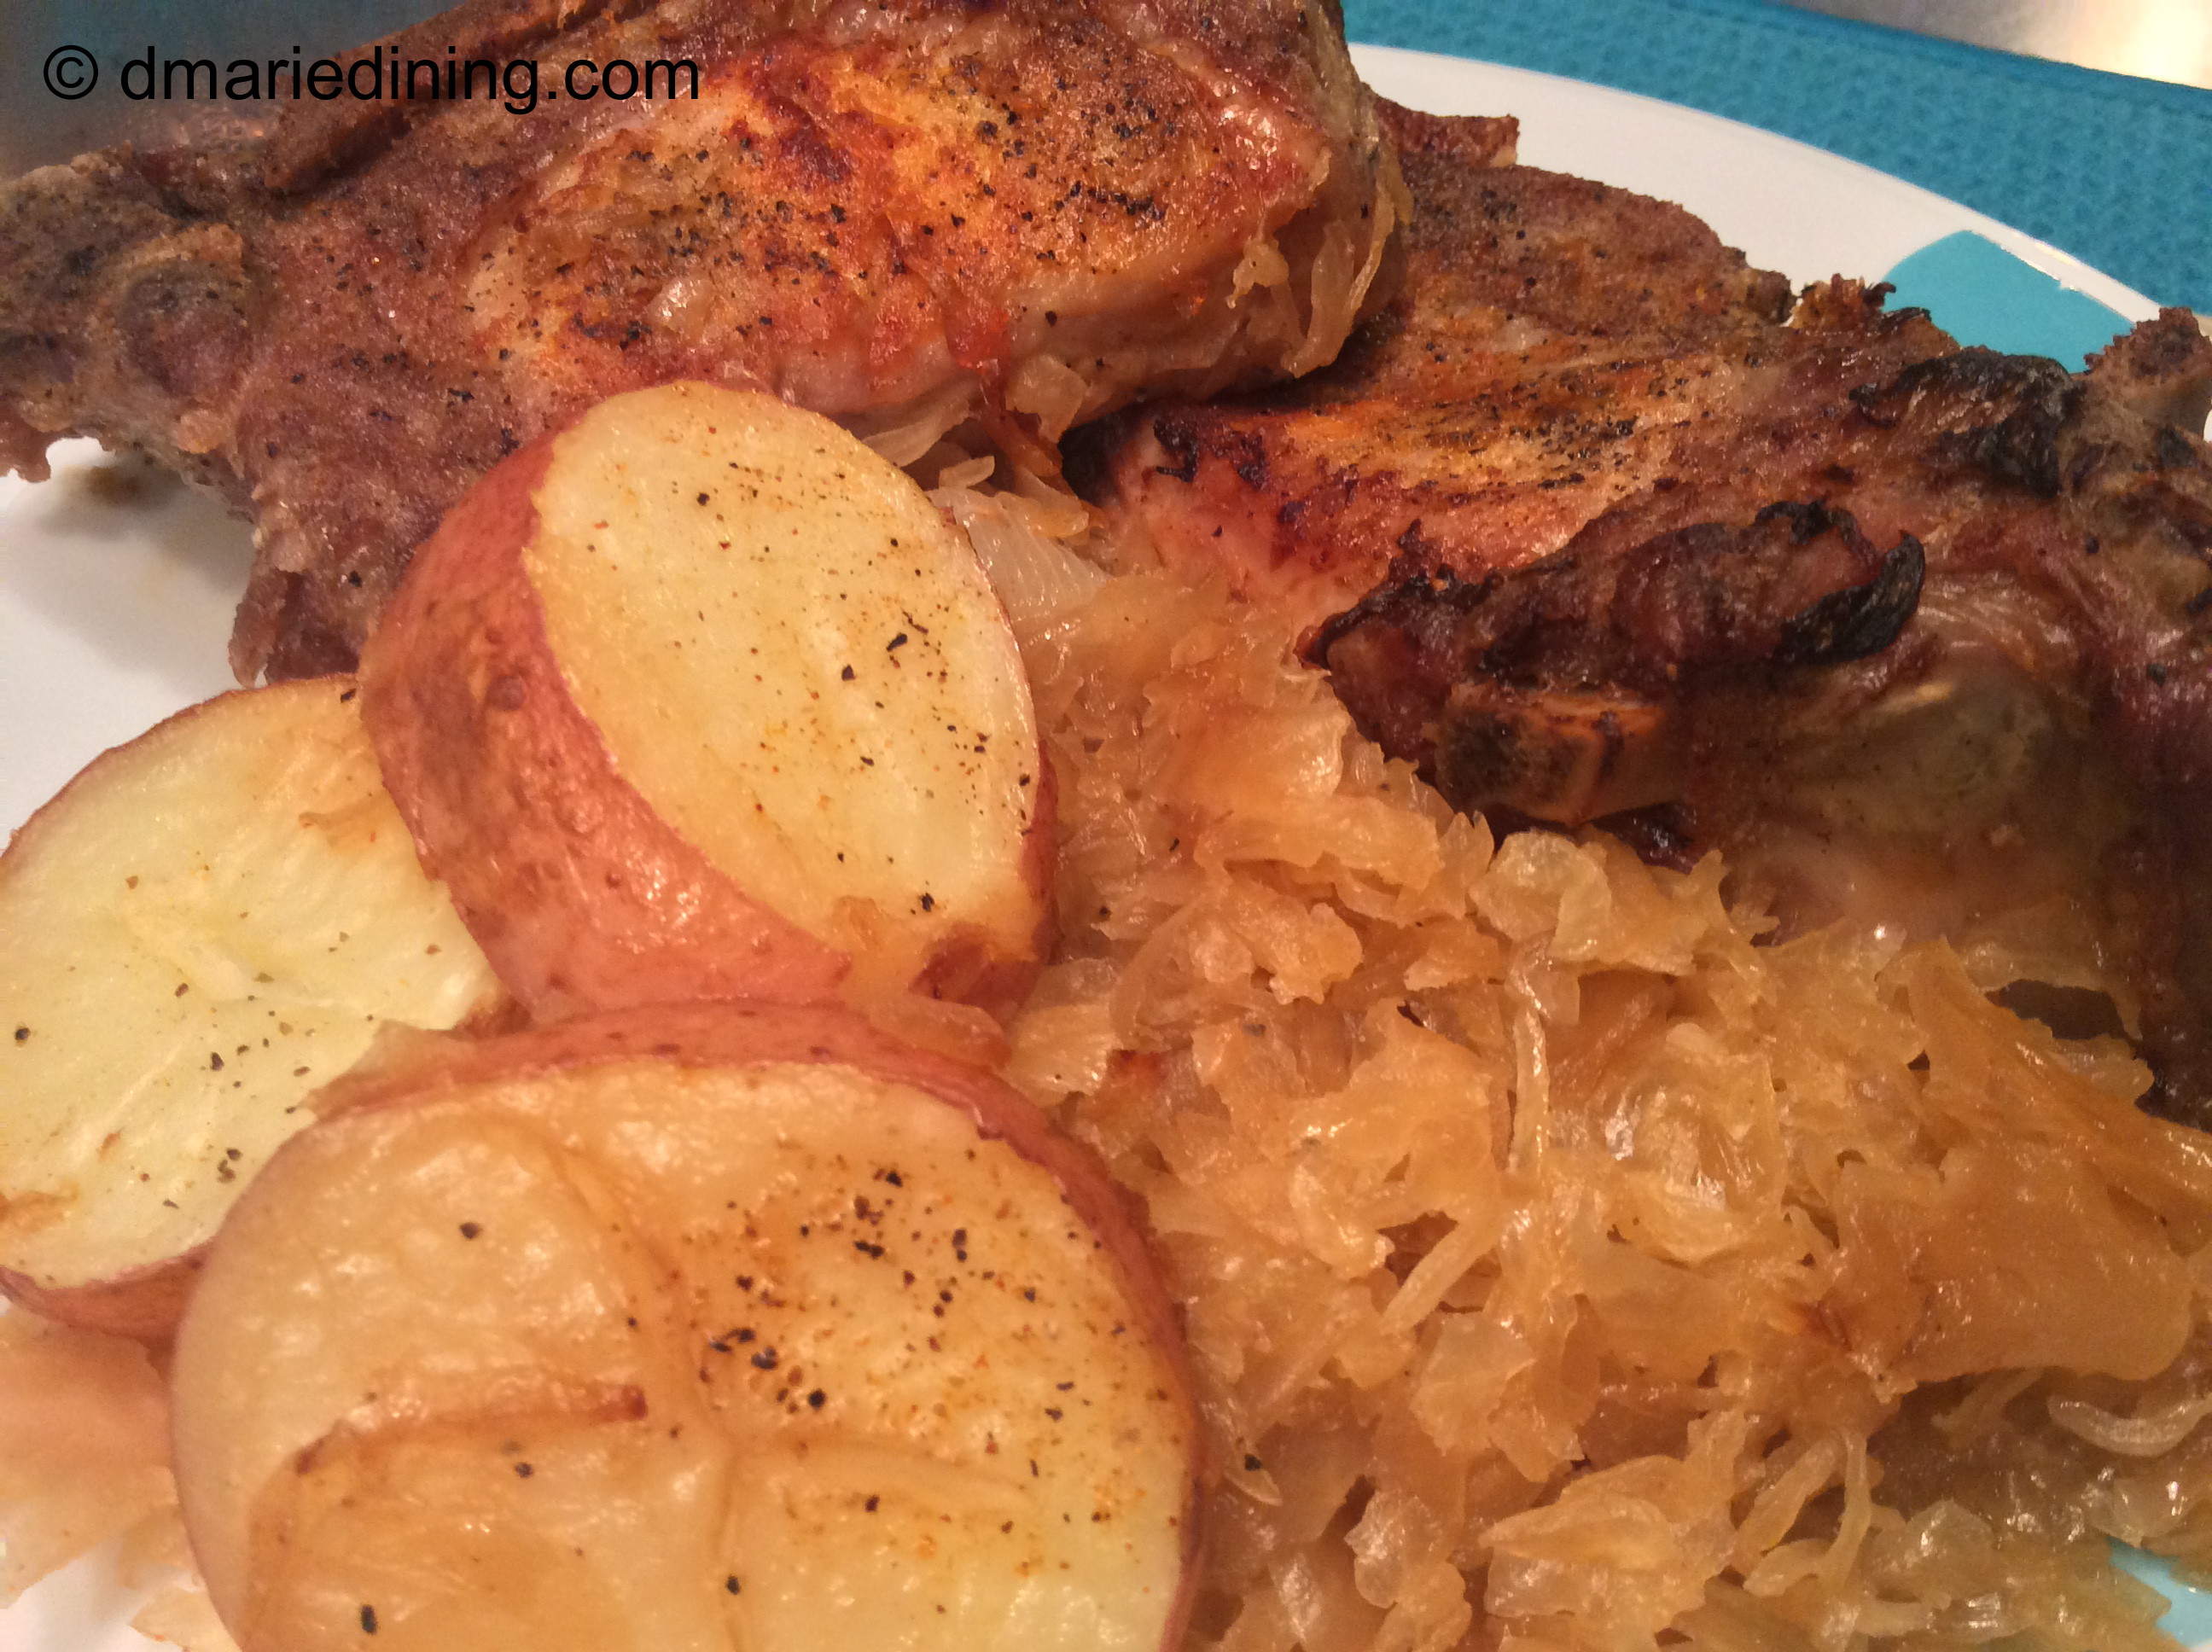
Place sauerkraut in the bottom of a baking dish. Add water then season with a little salt and black pepper. Crumble brown sugar over the sauerkraut and dot with butter. Layer potatoes on one side of the baking dish.

Season country style ribs with salt, pepper and onion powder. Sprinkle with paprika. Lay ribs over sauerkraut. Cover with foil and bake for 1 hour (baste ribs and potatoes after 30 minutes) then remove foil and continue baking for an additional 45 minutes to 1 hour.

Bon Appetit!

Follow my blog with Bloglovin

Meringue Clouds

Check out my dessert at rantingchef.com Diced! Day of Eating Contest.  Vote for my Meringue Clouds recipe.  Voting ends on 10/9/15.IMG_9458_1

I was sitting on our porch the other day surrounded by the beauty of nature watching clouds go by. The clouds were big, white, fluffy and moving ever so slowly against the bluest sky I had seen in a while. Watching the clouds I started thinking about cotton candy, food in general then dessert.

IMG_9469_1

Dessert. What kind of dessert could I make that reminded me of clouds? Meringue came to mind but the problem was that I wasn’t a lover of meringue. Whenever my mom made her delicious lemon meringue pie I would scrap off the meringue then eat the lemon filling and crust. The two textures of meringue, both crusty and squishy, just did not feel right in my mouth. After searching for a meringue alternative to crusty and squishy I ran across a recipe that called for baking the meringue and it looked light like a macaroon.

IMG_9562_1

To make meringue the centerpiece of my dessert, I created mounds of sweetness that melted in your mouth. Then I added fresh raspberries, blackberries and blueberries that were slowly simmered until a simple syrup was rendered and the fruit was fragrant. Talk about heaven! Eating my Meringue Clouds reminded me of sitting on the porch watching the clouds go by surrounded by the sweetness of nature.

IMG_9584_1

Meringue Clouds

Ingredients:
3 egg whites
1 cup sugar
1 tbsp water
½ tsp vanilla
½ tsp lemon juice
¼ tsp lemon zest
¼ tsp cream of tartar
1 pint raspberries
1 pint blackberries
1 pint blueberries
parchment paper

Preheat oven to 275 degrees.

Place eggs whites in a bowl and let sit for 30 minutes at room temperature. Beat egg whites with vanilla and cream of tartar on medium speed until soft peaks form. Gradually add ¾ cup sugar 1 tbsp at a time on high speed until stiff peaks are formed.

Drop a large spoonful of meringue on to parchment paper or place in a piping bag and pipe onto parchment paper to create mounds. Meringue will spread so do not make the mounds too big. Bake for 45 minutes then turn off the oven and DO NOT open the oven door for 1-2 hours.

While the meringue is baking, place berries, water, lemon juice, zest and ¼ cup of sugar into a medium sauce pan over medium heat. Cook until berries begin to breakdown and a simple sugar is rendered.

Place a Meringue Cloud in the center of a bowl then drizzle the berries and juice around the Meringue Cloud.

Follow my blog with Bloglovin

Banana Bread Bars

IMG_0372_1

The idea for Banana Bread Bars came to me when I was thinking of making more of my Fruit Nut Bars but I had two ripe bananas crying out for me to do something with them. I have only recently started using ripe bananas in various recipes. Before I started dmariedining.com I would just freeze overly ripe bananas for smoothies because I don’t like to eat mushy bananas. Fortunately for the bananas, I was in an aventerous mood and decided I could try making banana bread but in the shape of bars instead of a loaf.

IMG_0376_1

Making banana bread is not too different from making banana muffins but I found that the texture and flavor was slightly different. The Banana Bread Bars were firmer but still very moist. As always, my family and friends are my taste testers and truly honest judges of my cooking. If something does not quite meet their level of expectation or does not tickle their taste buds, they have no problem in letting me know without hurting my feelings. I also know I have not hit the mark if my son does not let me know how much he will miss my cooking when he goes to college or he does not brag to his friends that I can make dirt taste good. No, I have never tried to make dirt taste good but I figure that was a very high compliment coming from my youngest son.

IMG_0378_1

On the few occasions that we have unexpected company or I don’t feel like making a complicated dessert for a family gathering, I can make Banana Bread Bars in a little over an hour. That is my kind of cooking. The next time your bananas start turning brown don’t toss them or freeze them. Turn them into Banana Bread Bars. Pretty Quick and Pretty Easy.

IMG_0471_1

IMG_0457_1

Banana Bread Bars

Ingredients:
2 ripe bananas
2 large eggs
3 cups flour
1 cup unsalted butter
1 cup light brown sugar
¾ cup sugar
½ cup chopped walnuts
8 oz mascarpone cheese
1 tbsp vanilla extract
1 tsp baking soda
½ tsp salt
parchment paper

Preheat oven to 350 degrees.

Shift flour, baking soda and salt together into a small bowl and set aside.

Place bananas in a large bowl and mash. Mix in vanilla extract and eggs. Set aside.

Melt butter in a medium size sauce pan over medium high heat. Add sugars. Stir until sugars melt and are smooth. Remove from heat and let cool for 8 – 10 minutes.

Add cooled sugar mixture to bananas. Slowly whisk flour with bananas and sugar until totally blended. Fold in walnuts. Pour mixture onto a rimmed baking pan lined with parchment paper. Spread out evenly in the pan. Chill in the frig for 15 minutes then bake for 40 – 45 minutes. Stick a toothpick in the center of the banana bread to see if center is cooked. If it comes out clean the banana bread is done. Let cool then cut into squares and store in an airtight container.

Follow my blog with Bloglovin

Pork and White Bean Stew

IMG_1140_1

I spotted some nice country style ribs at the grocer while shopping this week. They looked so good and were on sale so I couldn’t pass them up. I was sure I could come up with a new recipe to include the country style ribs so they landed in my cart.

IMG_1144_1

Country style ribs are thick and meaty and are great in chili, stew or all by themselves. I am not sure if I should classify my Pork and White Bean Stew as a stew or a chili dish. I will leave that up to others. For now I will call it a stew. I just liked the idea of the pork with white beans and a few fresh veggies. Plus, one pot dishes are at the top of my list when it comes to cooking. Who wants to clean a lot of pots and pans when you can toss everything into one pot? Definitely, not me. In the case of my Pork and White Bean Stew I did use two pots. I used a pressure cooker to speed up the process of making the pork nice and tender. If you are not comfortable using a pressure cooker I would stick to cooking the pork a little longer to make sure it is tender. Just don’t over cook the meat or it will be dry and chewy.

IMG_1156_1

The flavors of the pork were amazing with the white beans. At the last minute, I decided to throw some fresh chopped tomatoes from our garden into the pot to give the dish a pop of color. The smell of the home grown tomatoes hit my nose before I could even take a bite of the stew. Wow, what a difference between home grown tomatoes and hot house tomatoes. Home grown beats out store bought tomatoes every time.

IMG_1175_1

Stew or chili? I am still not sure which one describes this dish the best. Whatever you decide to call it, I know you will like it.

IMG_1185_1

Pork and White Bean Stew

Ingredients:
4 – 6 thick country style ribs cubed
2 15oz cans cannellini beans (do not rinse/drain)
1 can green chiles
2 small tomatoes large dice
1 small onion diced
1 small green pepper diced
1 clove garlic minced
3 cups chicken broth
2 cups water
1tbsp cilantro
1 tbsp salt
1 tbsp ground black pepper
1 tsp cumin
1 tsp nutmeg
1 tsp parsley chopped
½ tsp cayenne (optional)
1 pkg whit chicken chili dry mix

Place pork in a large bowl and sprinkle with salt, pepper and cayenne. Toss until well coated. If comfortable with using a pressure cooker, place pork in pressure cooker with water and cook for 30 minutes to tenderize meat. Then place pork and remaining ingredients in a large pot along with 1 cup of juice from pressure cooker. Skim off grease. Cook for 1 hour. If not comfortable with using a pressure cooker, place all ingredients in a large pot and cook for 2 hours over medium high heat until meat is tender.

Follow my blog with Bloglovin

Diced! Day of Eating Contest (Shrimp Lo Mein)

Hi Everyone!

I need your vote for my Shrimp Lo Mein recipe which is entered in the Diced! Day of Eating contest at rantingchef.com.  Click on the link and vote for my recipe.  You can vote multiple times from different IP addresses.  I need your help to climb in the polls.  If you have a blog and are willing to let others know about the contest, I would appreciate it.

Voting is on the left side of the website towards the bottom of the page.  Tell your family and friends to vote too!  Thanks so much for our support.  🙂

Dee Marie

Shrimp Lo Mein

   IMG_0153_1The day I made Shrimp Spring Rolls I also made Shrimp Lo Mein. Most of the ingredients I used as the filling for the spring rolls was also used to create Shrimp Lo Mein. How great is that? Two meals and I only cooked one time.

IMG_0148_1

As I said in my Shrimp Spring Rolls post, my family loves Asian cuisine. We could eat it a couple times each week but I am sure that would get old as time goes on. We all need variety when it comes to food. At least I do. Anyway, Since I had quite a few extra ingredients I decided to make a quick Shrimp Lo Mein. The other thing my hubby and son love is pasta so Shrimp Lo Mein was definitely right up their alley. Thankfully, it did not take much to get them to agree to be my taste tester for this recipe.

IMG_0180_1

In case you didn’t know, there are all types of noodles used to make Lo Mein. I used Chinese noodles since that is what I used to make the Shrimp Spring Rolls. However, you can also used thin wonton noodles which are stringy and cooked in wonton noodle soup because they are light and delicate. Wide wonton noodles can also be used for Lo Mein. These noodles are often used in heartier soups like beef noodle soup. Of course you can just look for Lo Mein noodles which are thick and used in stir-fried noodle dishes made with a heavy sauce or gravy. In researching the variety of noodles used for my recipe I found out that Lo Mein noodles are probably the best choice when making a Lo Mein dish because they stand up better to reheating.

IMG_0225_1

Bottom-line. You can use whatever noodle you like to make Shrimp Lo Mein. In a pinch I think I would even use spaghetti noodles or linguine noodles if that was the only thing available. The most important thing to remember is add a little love to your recipe. It makes everything taste good.

IMG_0226_1

Shrimp Lo Mein

Ingredients:
1 lb large shrimp peeled and deveined
1 pkg lo mein noodles
1 pint snap peas
1 cup shredded carrots
1 tbsp sriracha sauce
2 tbsp olive oil
4 tbsp oyster sauce
½ tsp black pepper
½ tsp salt
¼ tsp cayenne pepper (optional)
juice from ½ lemon

Prepare lo mein noodles according to package. Drain and set aside.

Heat olive oil in a medium size non-stick frying pan over medium high heat. Add shrimp, sriracha sauce and lemon juice. Season with a little salt and pepper. Stir shrimp until they turn pink. Remove shrimp from pan and set aside in a small bowl. Add carrots, snap peas and a little more salt and pepper (add cayenne pepper if you really like heat) to the frying pan. Stir and let cook for 1 minute. Add oyster sauce and mix with veggies until they are well coated. Reduce to low heat and cook for another 2 minutes. Toss with lo mein noodles. Enjoy!

Follow my blog with Bloglovin

Black Bean and Corn Gazpacho

IMG_0404_1

I am one of those people that enjoys soup year round. Similar to my Auntie M who drinks hot tea 365 days a year no matter what the temperature is outside. Of course on the hottest of days in the summer when I have a craving for soup, I prefer a gazpacho style soup.

IMG_0478_1

Gazpacho is a soup made with raw veggies and is usually served chilled but can be warmed. Most gazpacho soups have a tomato base with multiple layers of flavor and textures. The ingredients and thickness of the gazpacho often depends on the region in which it is made. While researching the history of gazpacho I learned that in Spain some of the original recipes included bread, vinegar, water,oil and garlic. Other recipes added fruits and nuts to the recipes.

IMG_0484_1

I decided to create a very simple version of gazpacho that would be delicious whether served chilled or slightly warmed. Black Bean and Corn Gazpacho fits that description as both black beans and corn are good when served hot or cold. The best thing about this soup is that it is relatively light and is very flavorful with fresh corn. So, the next time you have a craving for a nice healthy soup in the middle of a hot summer day think about making some Black Bean and Corn Gazpacho. Hot or cold you can’t go wrong with this soup.

IMG_0492_1

Black Bean and Corn Gazpacho

 Ingredients:
3 15.5 oz cans black beans rinsed
1 small onion diced
4 cups chicken broth
1 ½ cups fresh corn kernels
½ cup fresh salsa or diced tomatoes
¼ cup half and half
2 tbsp sour cream
1 tsp cilantro
1 tsp black pepper
1 tsp salt
1 tsp parsley
½ tsp red pepper flakes (optional)

Place beans, onions, broth and seasonings in a large pot over medium high heat. Cook for 20 minutes until beans and onions are tender. Remove from heat and puree beans using a hand blender or in a regular blender. Place pot back on the heat and reduce to a simmer. Stir in sour cream and half and half. Simmer for another 5 minutes then stir in corn and salsa. Continue simmering for 10 minutes. Remove from heat and let cool.

Follow my blog with Bloglovin

Chickpea and Cucumber Mint Salad

IMG_0881_1

I recently went on a cucumber buying spree because my local grocer had so many beautiful cucumbers on sale. In the summer months the store features produce from local area farmers. I try to support farmers as much as I can because when you get produce direct from a farm you know it was grown with tender loving care. Plus, the fruit and veggies are usually huge!

IMG_0876_1

Anyway, my grocer had some really nice cucumbers and after eating a bunch of them all week I needed to find one more way of serving them besides with lettuce. I decided to keep it simple and incorporated a few items from my little garden like small cherry tomatoes and mint. In the end, I made a Chickpea and Cucumber Mint Salad.

IMG_0898_1

The cucumbers were crisp. The tomatoes were sweet. And the chick peas were light but filling. To top it all off, the mint made the dish taste refreshing. If you like cucumbers and want a light refreshing salad, try making this Chickpea and Cucumber Mint Salad. I doubt you will be disappointed.

IMG_0915_1

Chickpea and Cucumber Mint Salad

Ingredients:
1 15oz can of chickpeas drained and rinsed
1 large cucumber peeled in into stripes and cubed
12 small cherry tomatoes
4 – 5 mint leaves chopped
4 tbsp Gazebo Room Greek Salad Dressing and Marinade
1 tsp salt
1 tsp black pepper
juice from ½ lemon
pinch of sugar

Combine all ingredients in a bowl and stir until well mixed. Chill for at least 30 minutes to let the flavors blend together.


Follow my blog with Bloglovin

Smoked Salmon and Cucumber


IMG_7798_1I am always looking for new appetizers and snacks for parties or just to have on the weekends. I try to incorporate veggies as much as possible to keep the appetizers light. One appetizer I really like to make is a smoked salmon spread. I use light cream cheese and reduced fat sour cream to lessen the calories but maintain flavor.

IMG_7829_1

The other day I had an English cucumber leftover from another recipe that I did not want to waste so I decided to make a quick appetizer by filling the cucumber with my smoked salmon spread. I just tweaked the recipe a little by adding the scooped out center of the cucumber to the spread to add another layer of texture. My hubby is big on textures when it comes to food which has made me more aware of including different textures when I cook. I think it helps to enhance most dishes when you can have layers of flavor and layers of textures. What better way to create a party in your mouth and keep the experience of eating interesting than by tickling your taste buds with variety of textures and flavor!

IMG_7849_1

To me, smoked salmon and cucumbers is a fancier version of celery filled with pimento cheese or peanut butter. A great appetizer or snack that is easy to make and wonderful to eat.

IMG_7853_1

Smoked Salmon and Cucumber

Ingredients:
1 pkg smoked salmon diced
1 English cucumber (strip skin to decorate with stripes)
½ tsp old bay seasoning
½ tsp dill
½ tsp lemon zest
½ tsp seasoned salt
½ tsp cracked black pepper
½ cup softened cream cheese
¼ cup sour cream
juice of 1lemon
paprika

Scoop out the center of cucumber and reserve.  In a medium bowl cream together the reserved cucumber center, cream cheese and sour cream. Add lemon juice, zest, dill and seasonings to cream cheese mixture. Blend together until well mixed. Gently incorporate the salmon into the mixture.

Cut the cucumber in half lengthwise.  Cut into bite-size pieces. Spread salmon mixture into the center of each cucumber bite.  Arrange on a tray and then refrigerate until ready to serve. Sprinkle with smoked paprika prior to serving.

Follow my blog with Bloglovin

Fruit and Nuts Cookie Bars

IMG_0817_1

I have been searching for cookie recipes that were easy to make and included mascarpone cheese. I found a couple of recipes but changed my mind and decided to come up with a cookie bar that included nuts and dried fruit. I could try to say the nuts and fruit made the cookies healthier than a regular cookie but who would I be kidding!

IMG_0835_1

I usually use pecans in my dessert recipes but I decided I wanted to use some thing different so I chose walnuts. Walnuts of course go great in any cookie. To compliment the nuts I used dried chopped plums instead of cranberries just because they looked interesting and they were on sale.

IMG_0844_1

Since I have been working on improving my baking skills I was pretty confident I could pull off making a tasty cookie bar. The issue would be whether or not my son would like them because they had both nuts and fruit. He is more of a chocolate chip cookie or oatmeal raisin kind of person. Nuts and dried plum? I was not too sure about that. I was pleasantly surprised that he really liked the cookie bars and didn’t even ask what was in them. One step closer to being a real baker!

IMG_0301_1

Fruit and Nuts Cookie Bar

Ingredients:
3 cups flour
1 cup unsalted butter softened
1 cup light brown sugar
½ cup chopped walnuts
½ cup dried cranberries or dried chopped plums
¼ cup golden raisins (optional)
¾ cup sugar
1 tbsp vanilla extract
1 tsp baking soda
½ tsp salt
parchment paper

Preheat oven to 350 degrees.

Melt butter over medium high heat then stir in brown sugar. Cook for 5 minutes stirring occasionally. Remove from heat and stir in sugar. Let mixture cool for 5 minutes.

In a large bowl combine four baking soda and salt. In another bowl mix eggs, vanilla and cooled sugar. Slowly add flour to butter mixture and stir until well mixed. Stir in nuts and dried fruit.

Line a small rimmed baking sheet with parchment paper. Pour cookie mix onto parchment paper and spread it out. Bake for 30 – 35 minutes. Let cool then cut into 2 inch squares.

Enjoy!

Follow my blog with Bloglovin