Category Archives: Main Course

Andouille Sausage with Tomato Gravy

IMG_0094_1

Tonight I fixed andouille sausage with tomato gravy over pasta. I used chicken andouille sausage and made a rue with beer then added fire roasted tomatoes. I am not sure why or how I decided to make a tomato gravy. The idea just came to me on my long drive home from work. I was racking my brain to come up with something quick for dinner because I no longer felt like making the seafood salad I had planned. I knew I had andouille sausage at home and thought they would be good in a gravy so tomato gravy was born.

IMG_0103_1

Tomato gravy is really just a rue made with beer and fire roasted tomatoes. I don’t make gravy too often because it can be very heavy and of course fattening if made the way my grand-mom use to make it. Her gravy was delicious and good for twirling your biscuits in but now that I am older I cannot have a lot of biscuits and gravy. My hips will not allow it.

IMG_0113_1

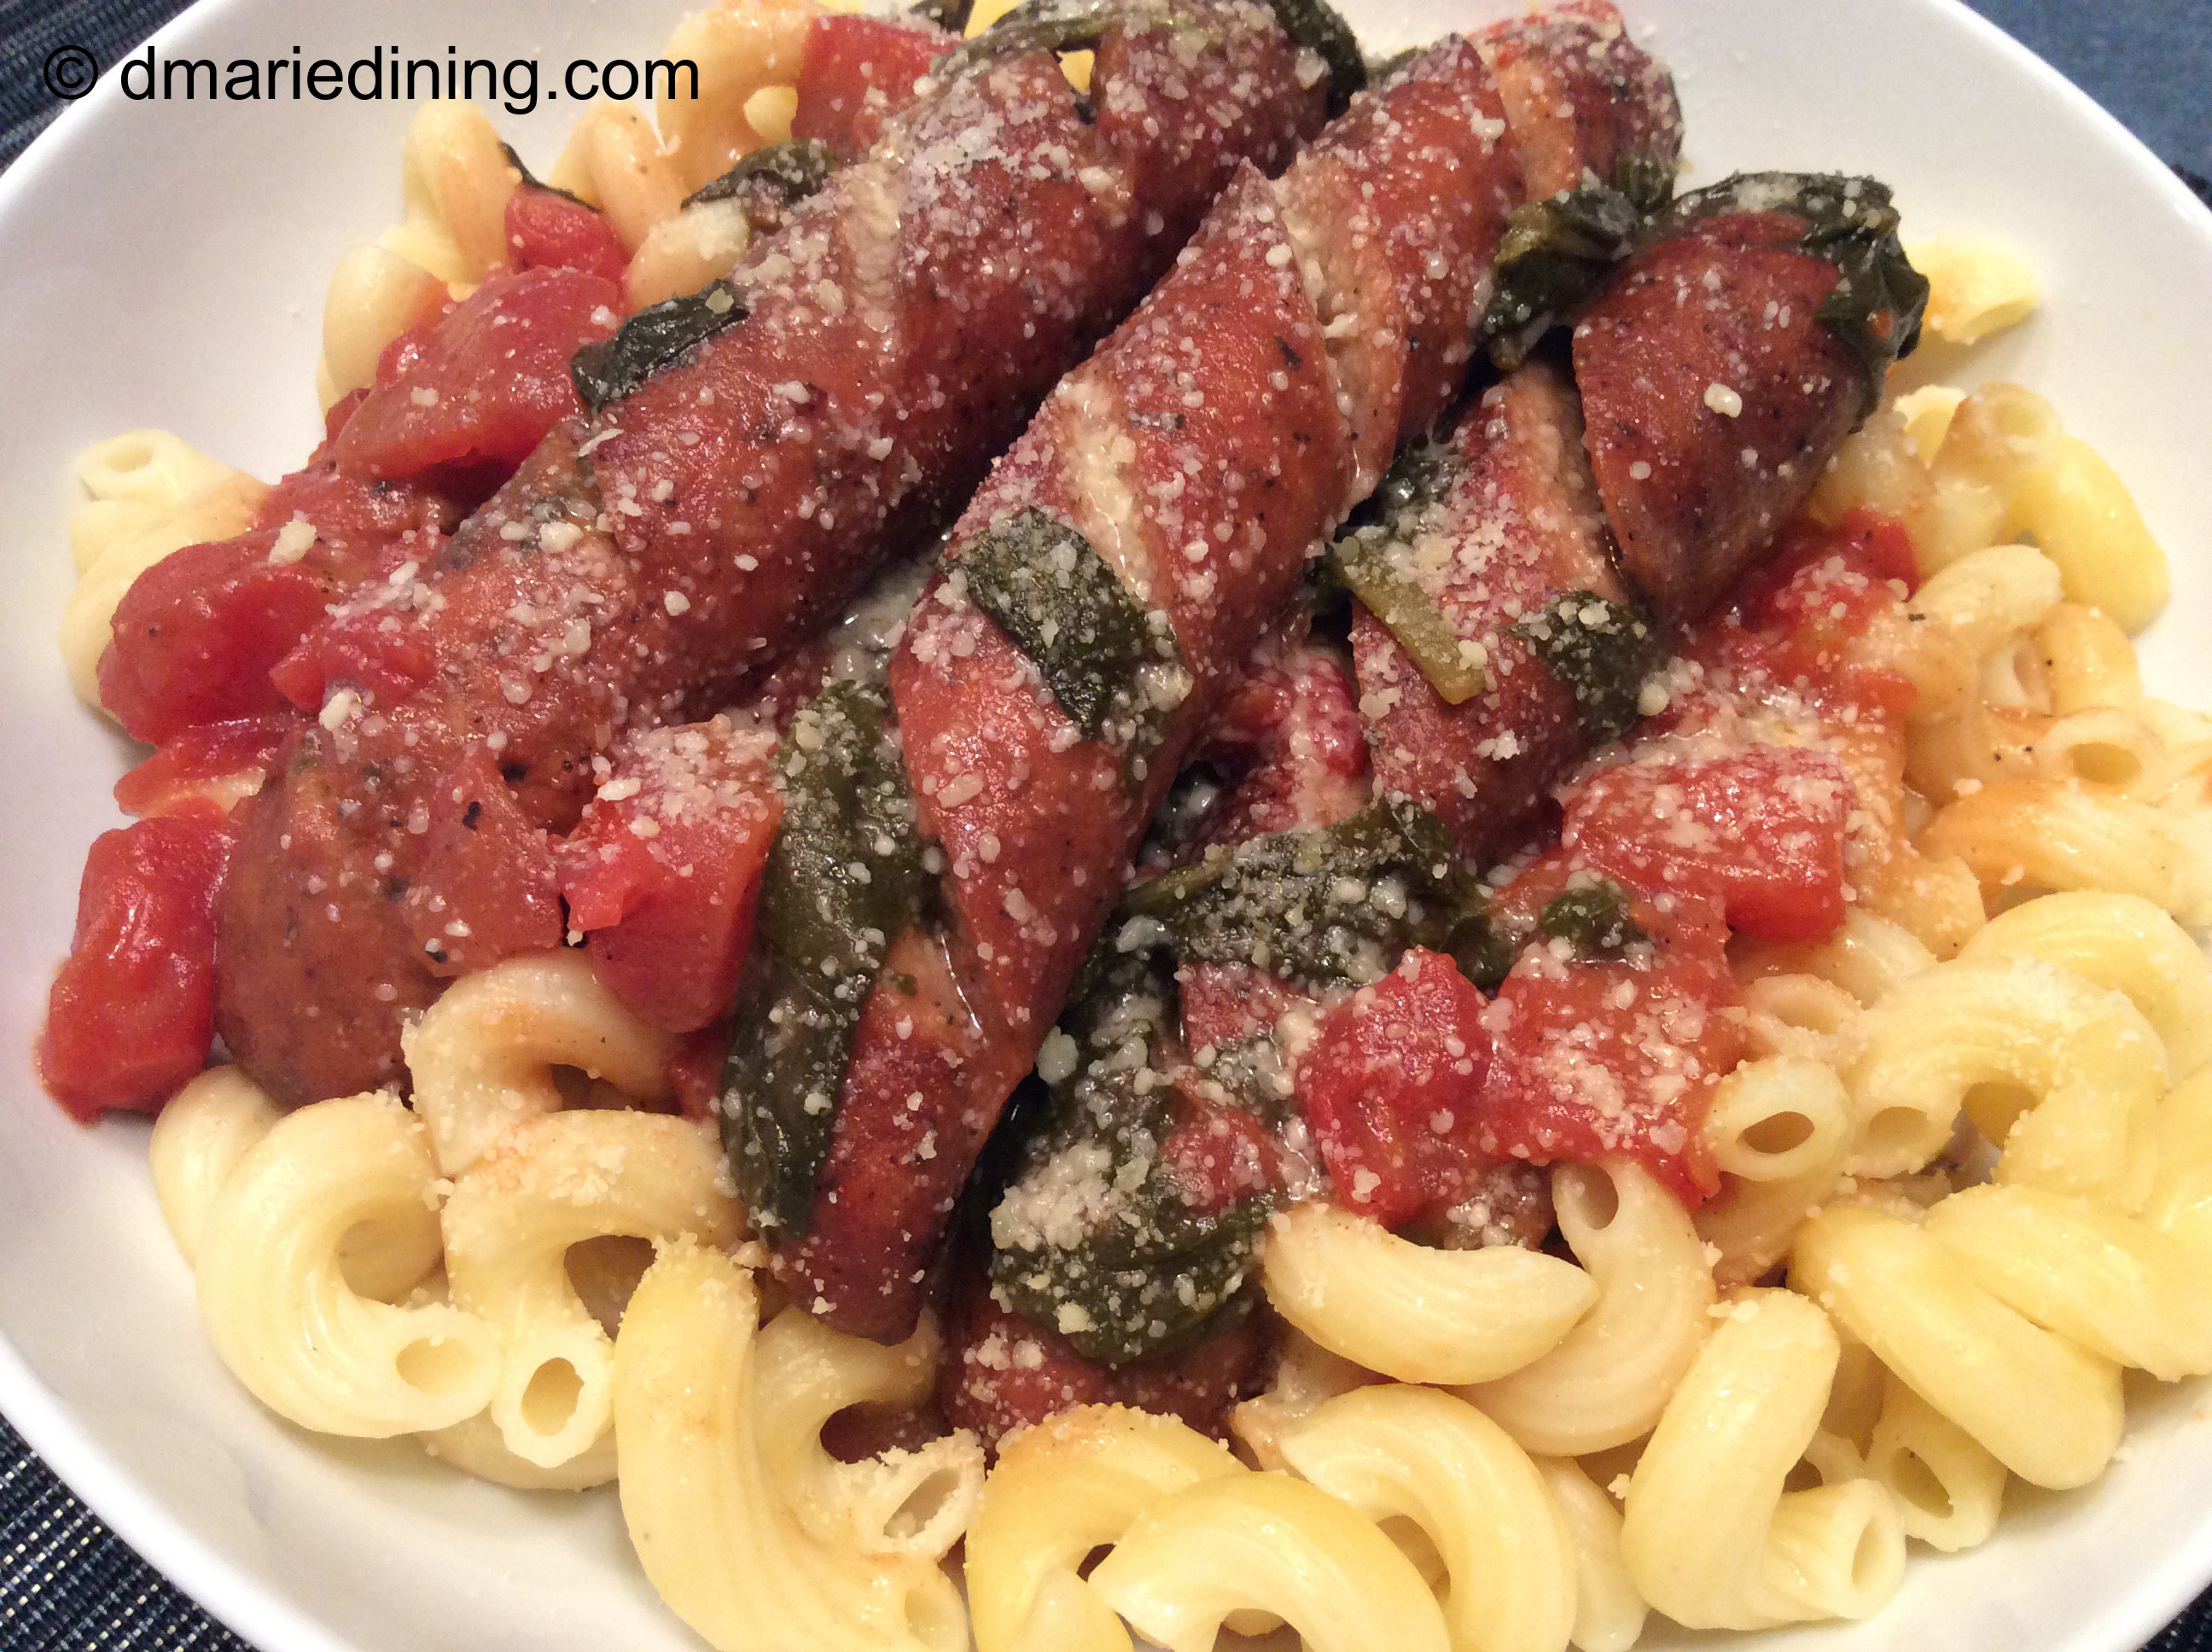
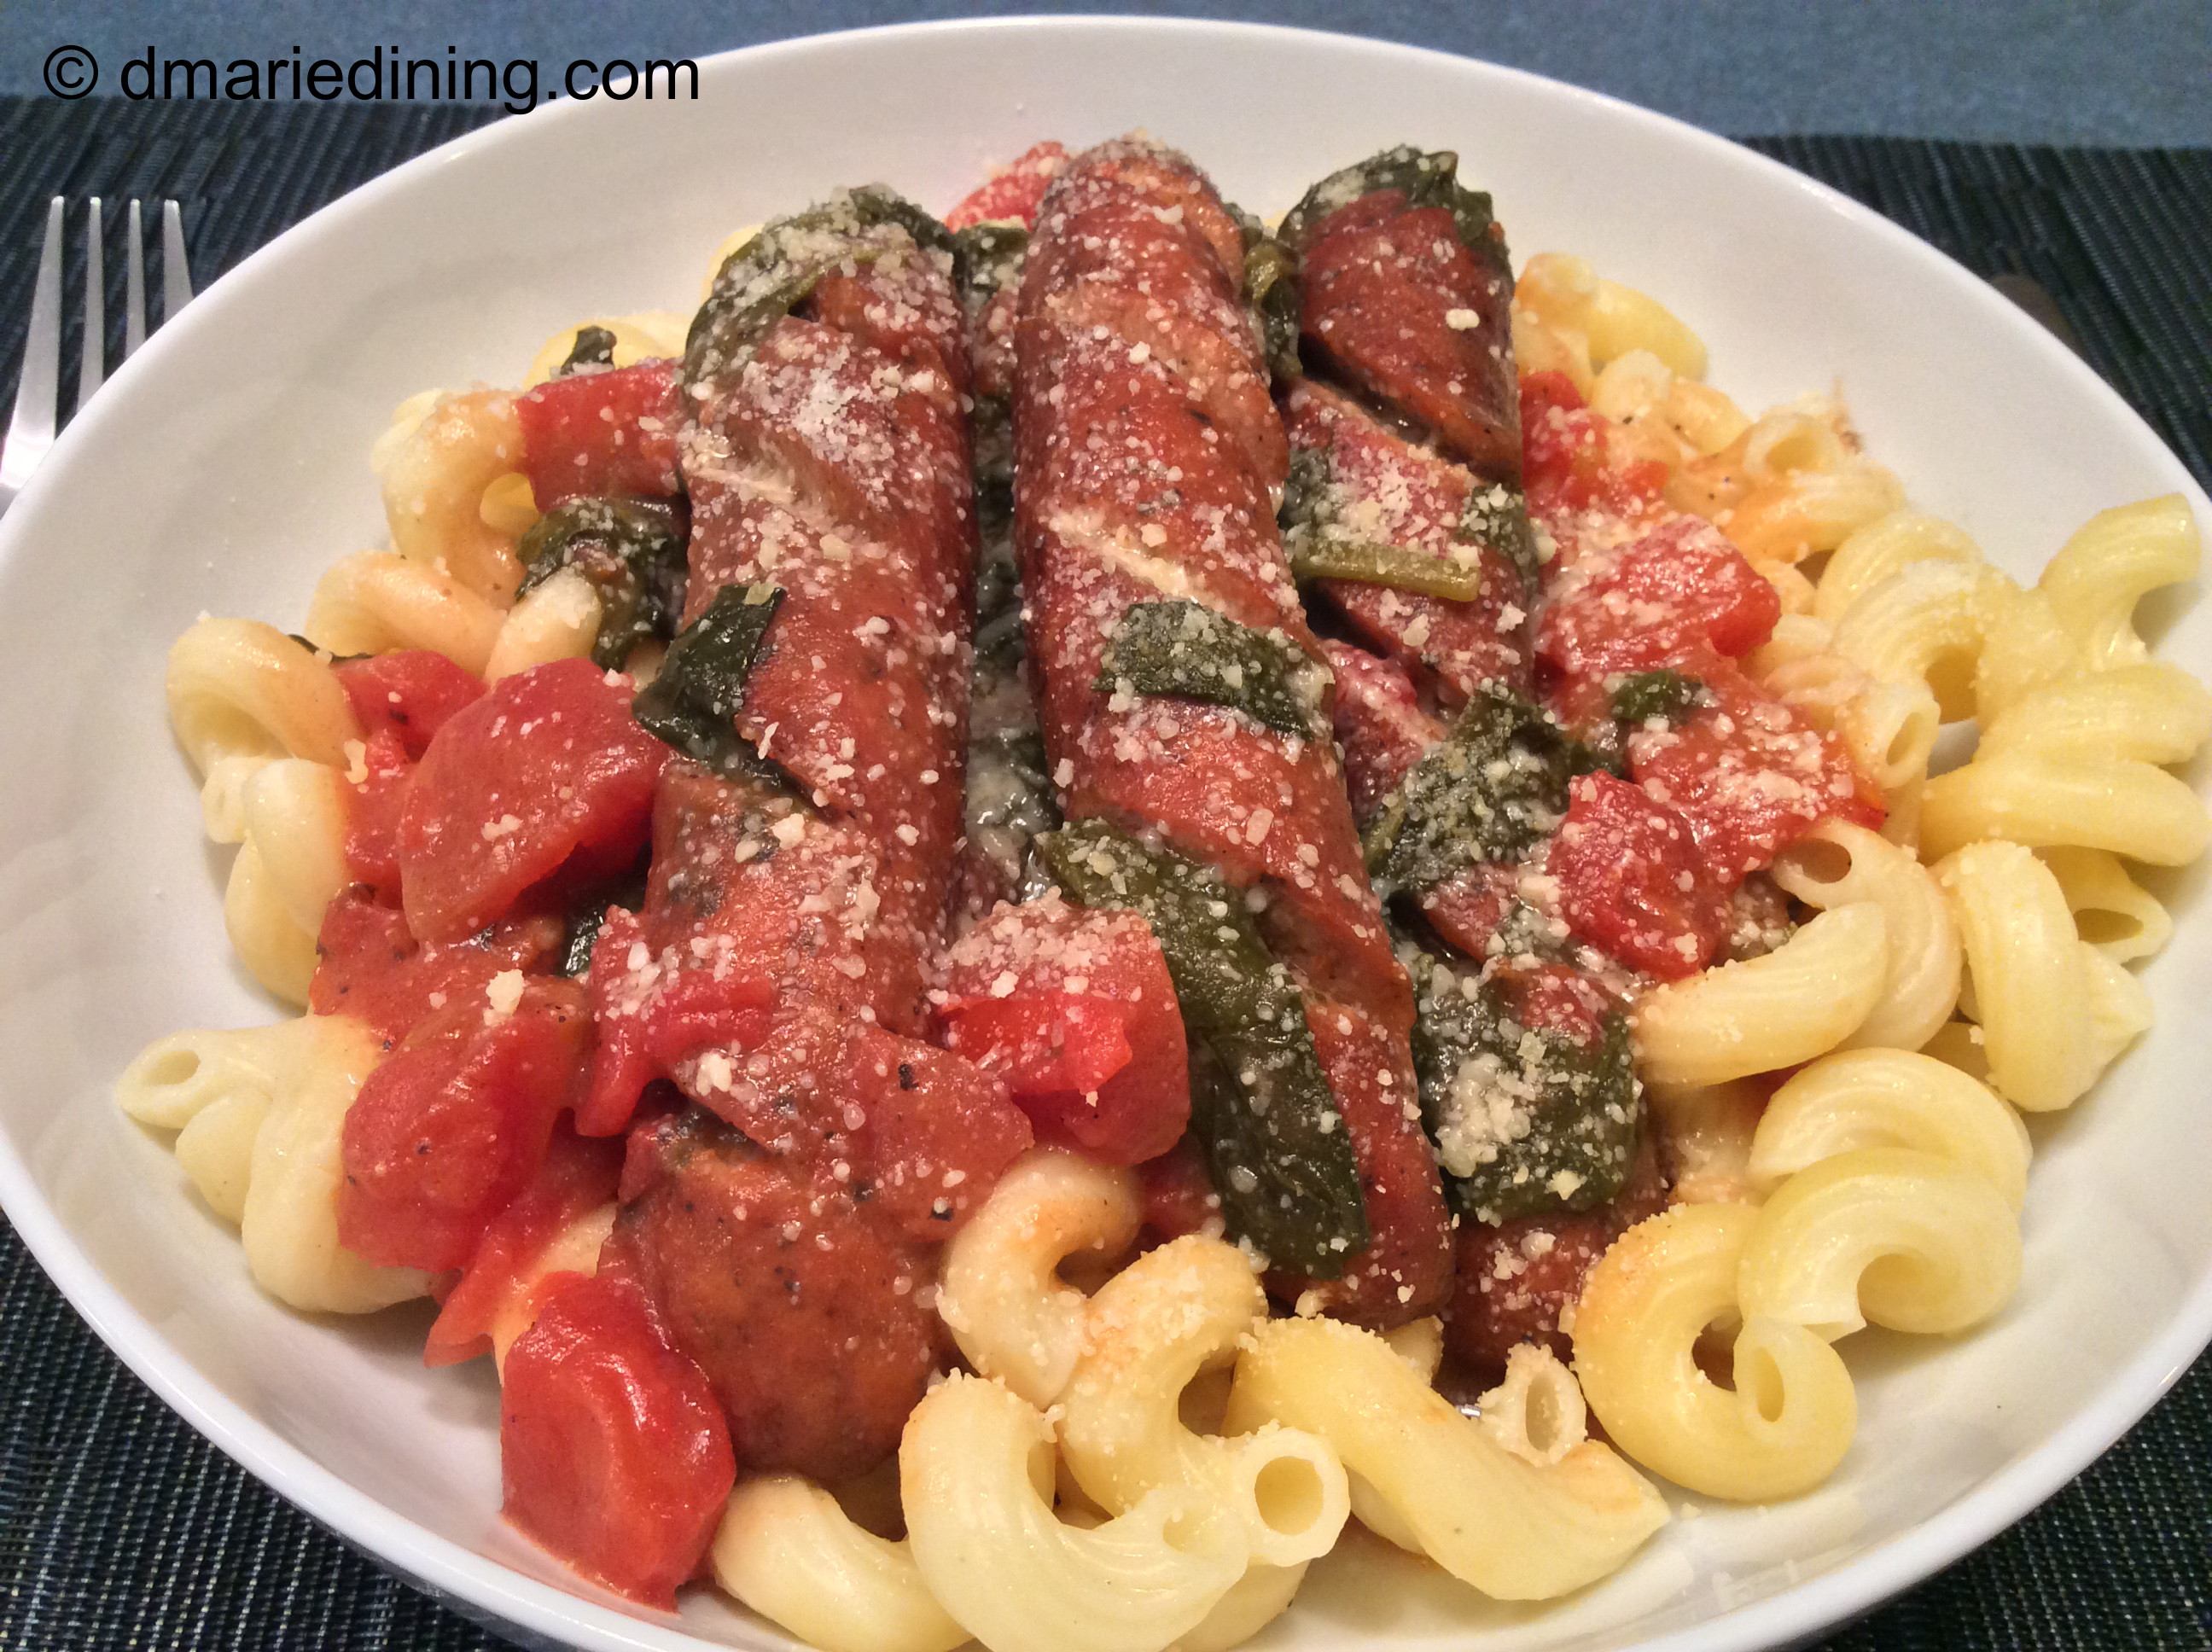
Anyway, the andouille sausage and tomato gravy was good. One of those turn up the bowl to your lips so you can get every drop kind of good. You know what I mean. Everyone (I hope) has experienced at least once in their lifetime a dish that made you want to lick the bowl but you settled for secretly lifting the bowl to your lips and sucking up the juices. If you have not had that experience I feel sorry for you. Maybe this will be one of those dishes for you.

IMG_0117_1

The slight heat from the sausage and the smokiness of the fire roasted tomatoes was a wonderful combination. The beer added another level of flavor because of the lemon grass, coriander and orange spices in the beer. I am not a real beer drinker but I do like to cook with it so I look for different flavors of beer that might elevate a dish. Beer can add a subtle punch to any recipe instead of overpowering the dish like other types of alcohol.

IMG_0126_1

I am sure I will be making andouille sausage with tomato gravy again and again judging by the two bowls my hubby had tonight. Quick and easy is still my motto.

IMG_0125_1

Andouille Sausage with Tomato Gravy

Ingredients:
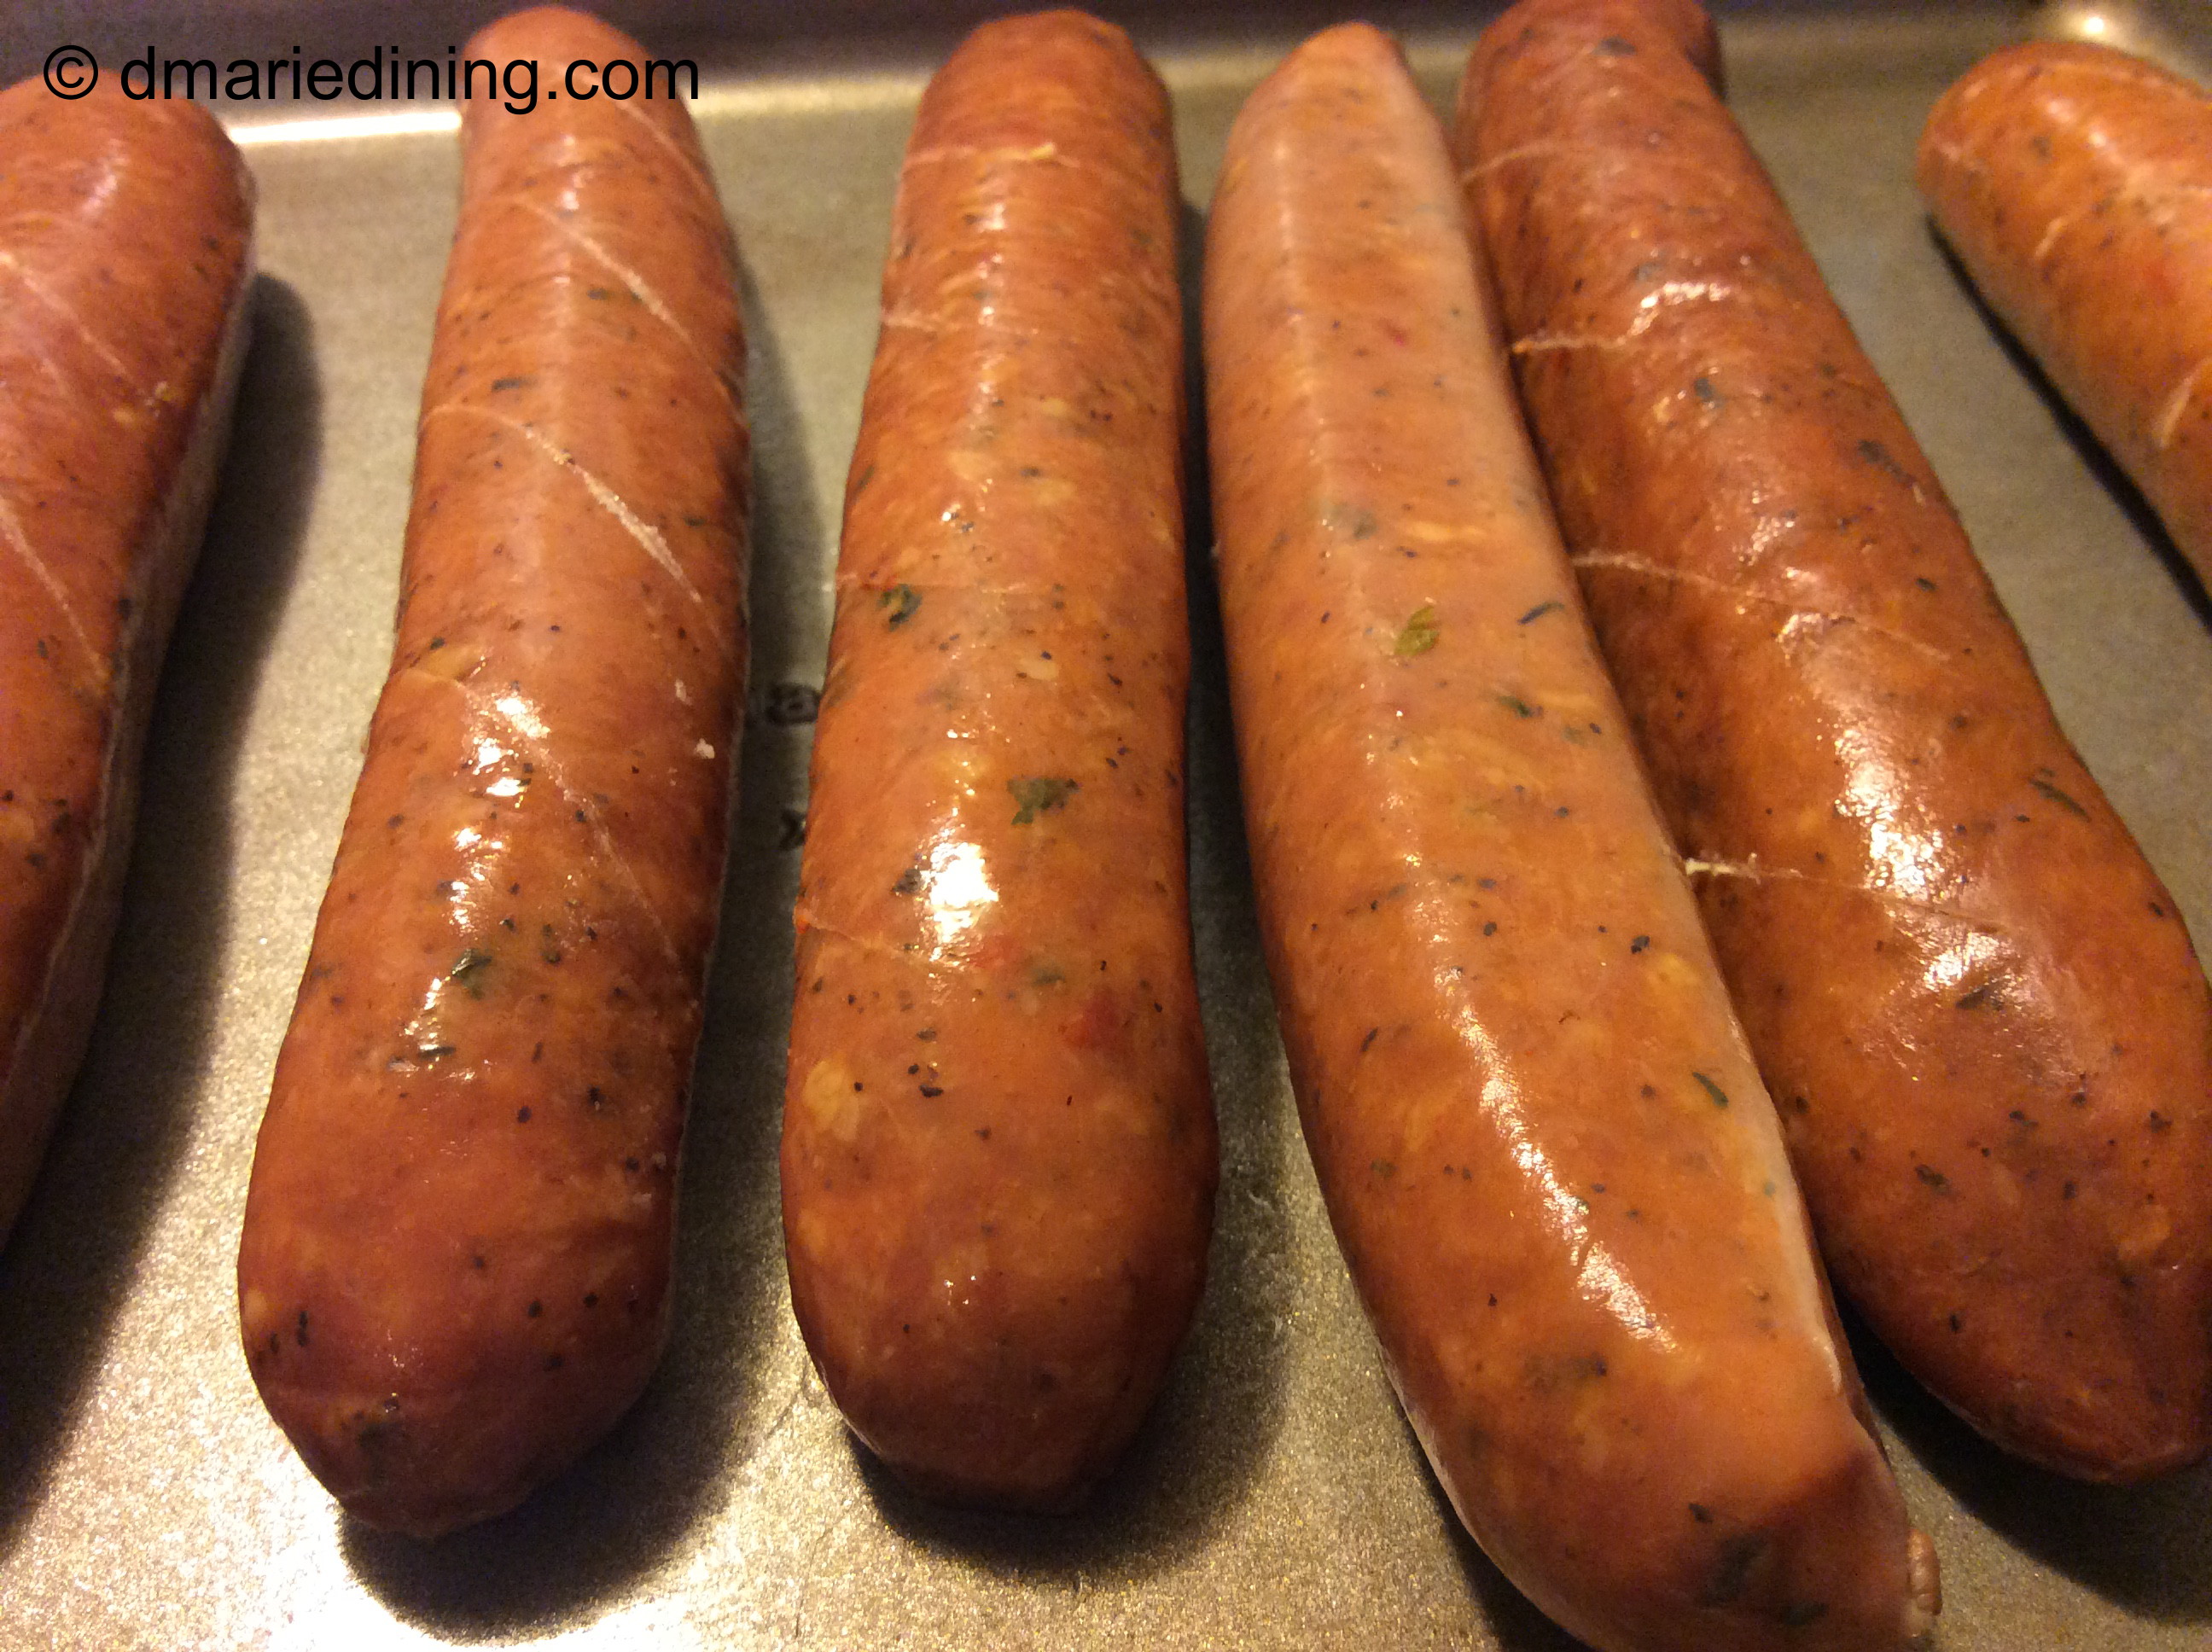
8 chicken andouille sausage links
2 15 oz cans fire roasted tomatoes
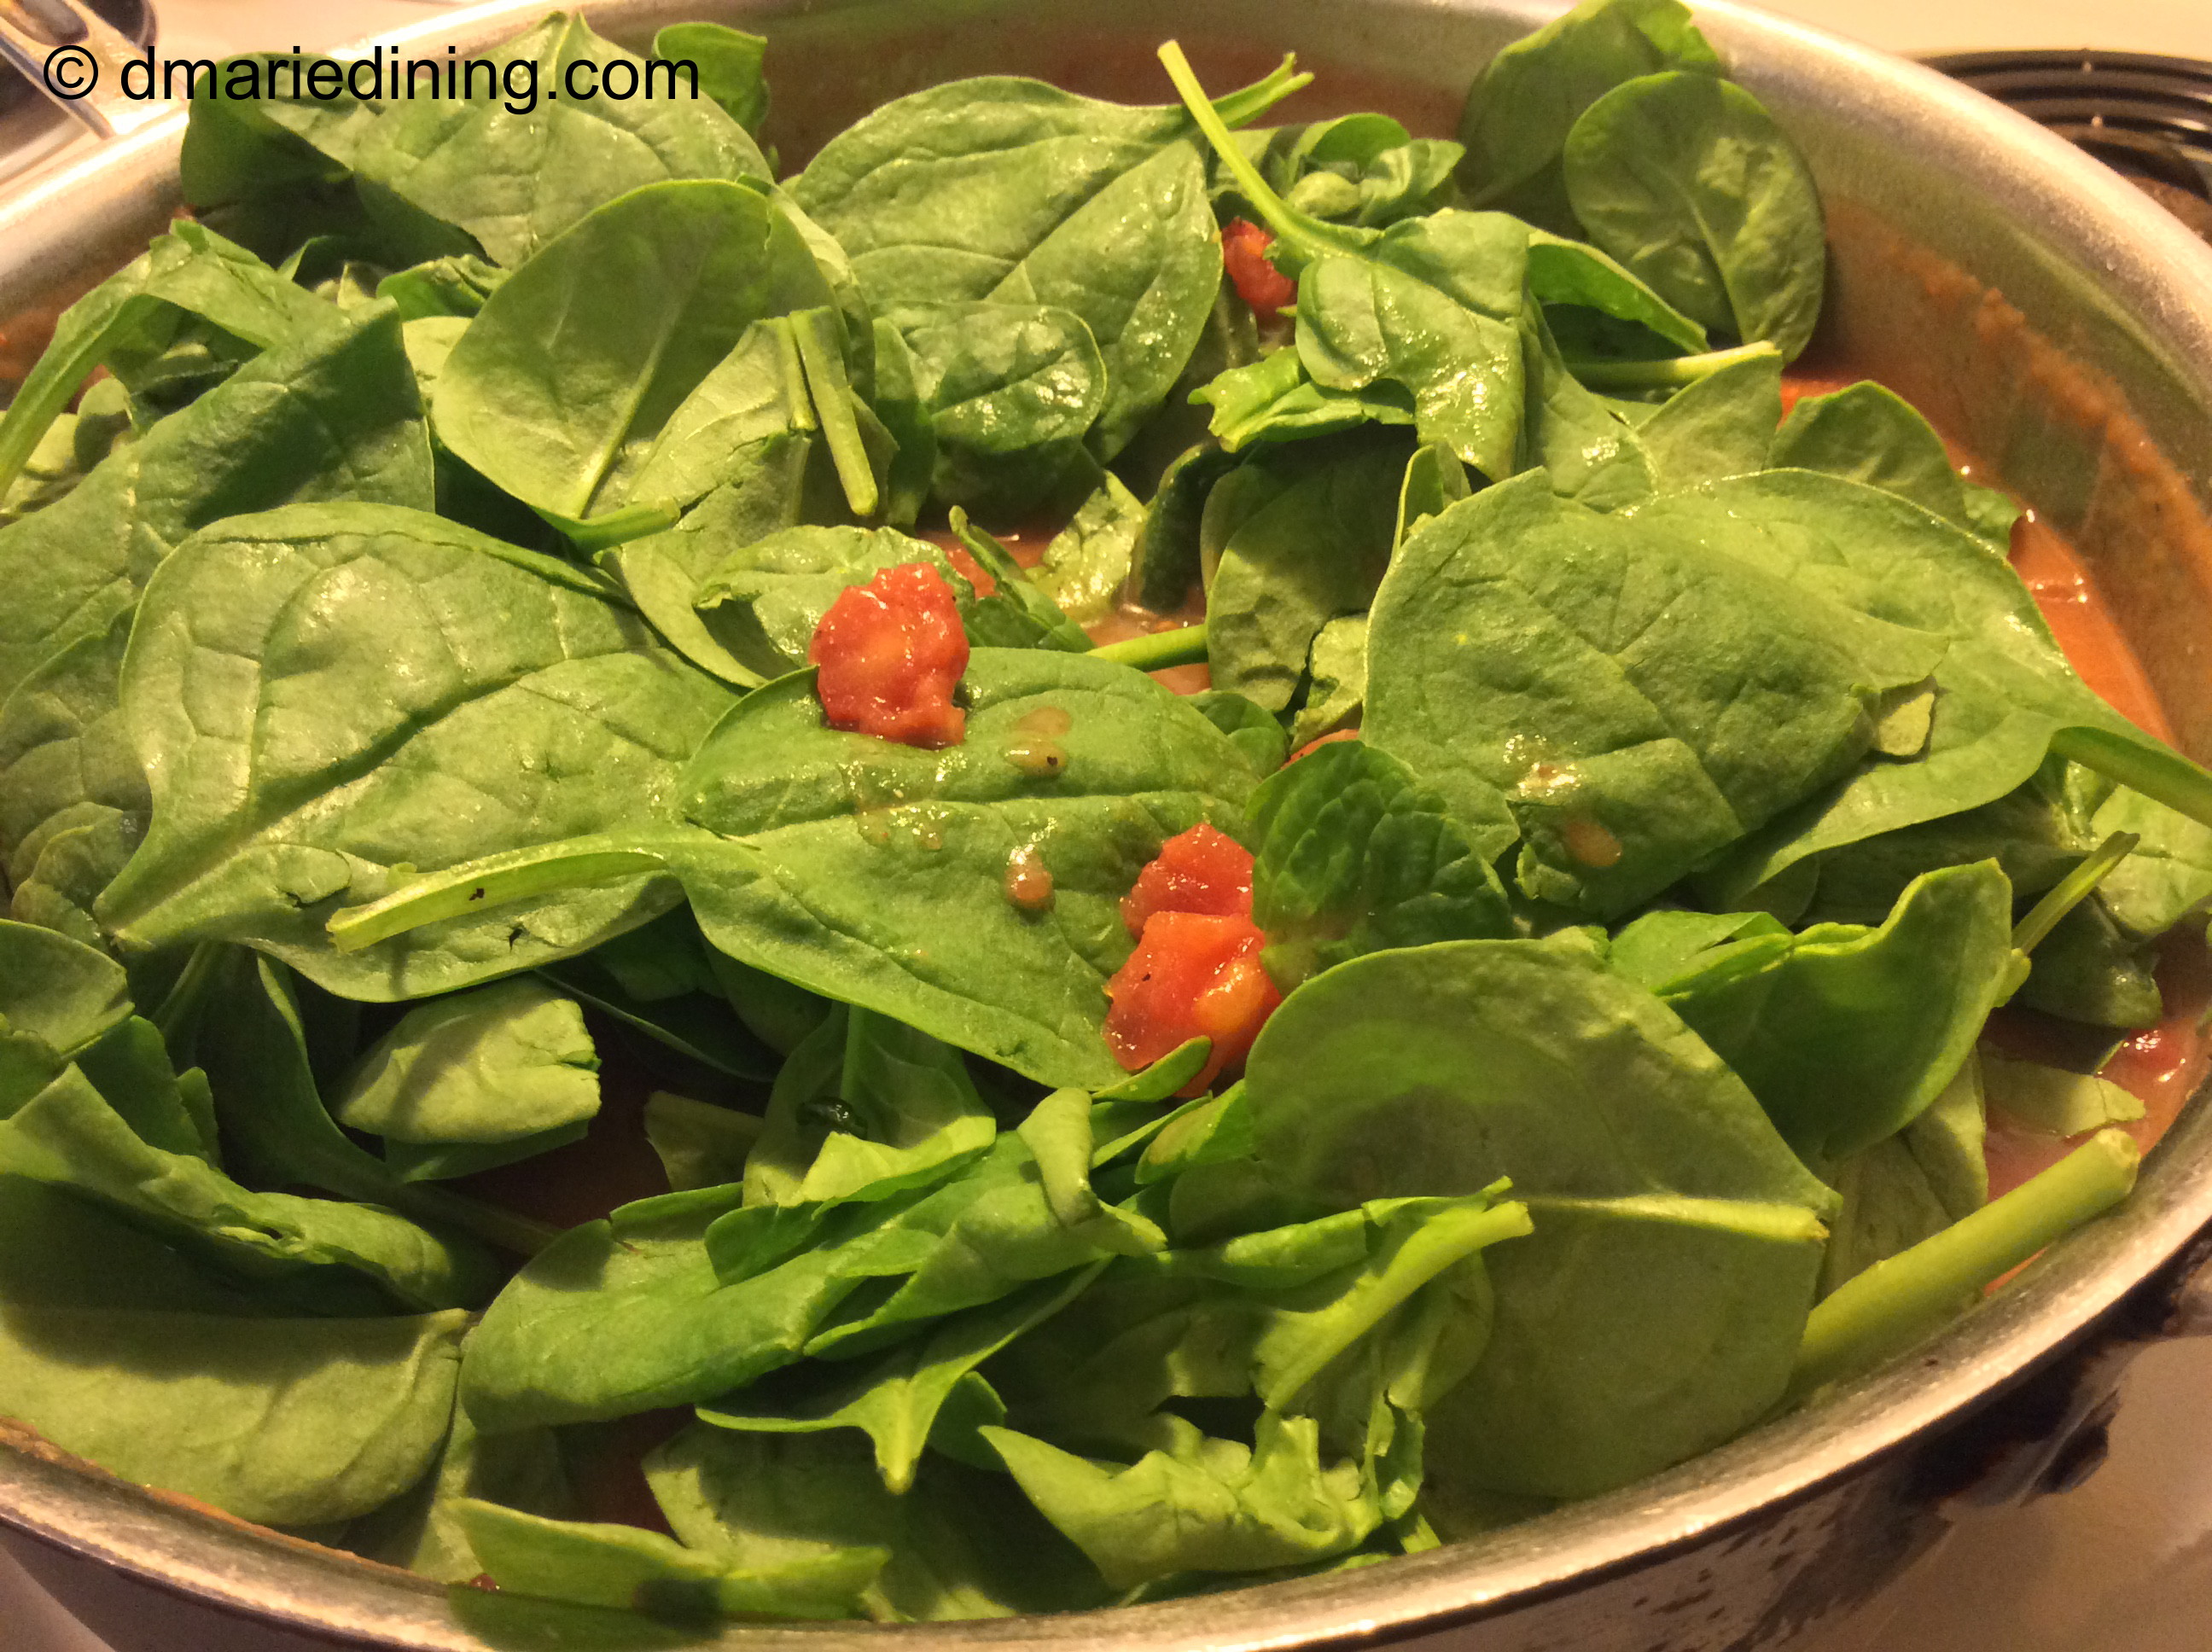
1 bag baby leaf spinach (optional)
1 bottle good beer / ale
¼ cup vegetable oil
½ cup water
3 tbsp flour
1 tsp salt
1 tsp black pepper
1 tsp Adobo
1 tsp worcestershire
1 tsp onion powder
½ tsp gumbo file (optional)
½ tsp cilantro
¼ tsp nutmeg
¼ tsp cayenne

Preheat oven to 425 degrees.

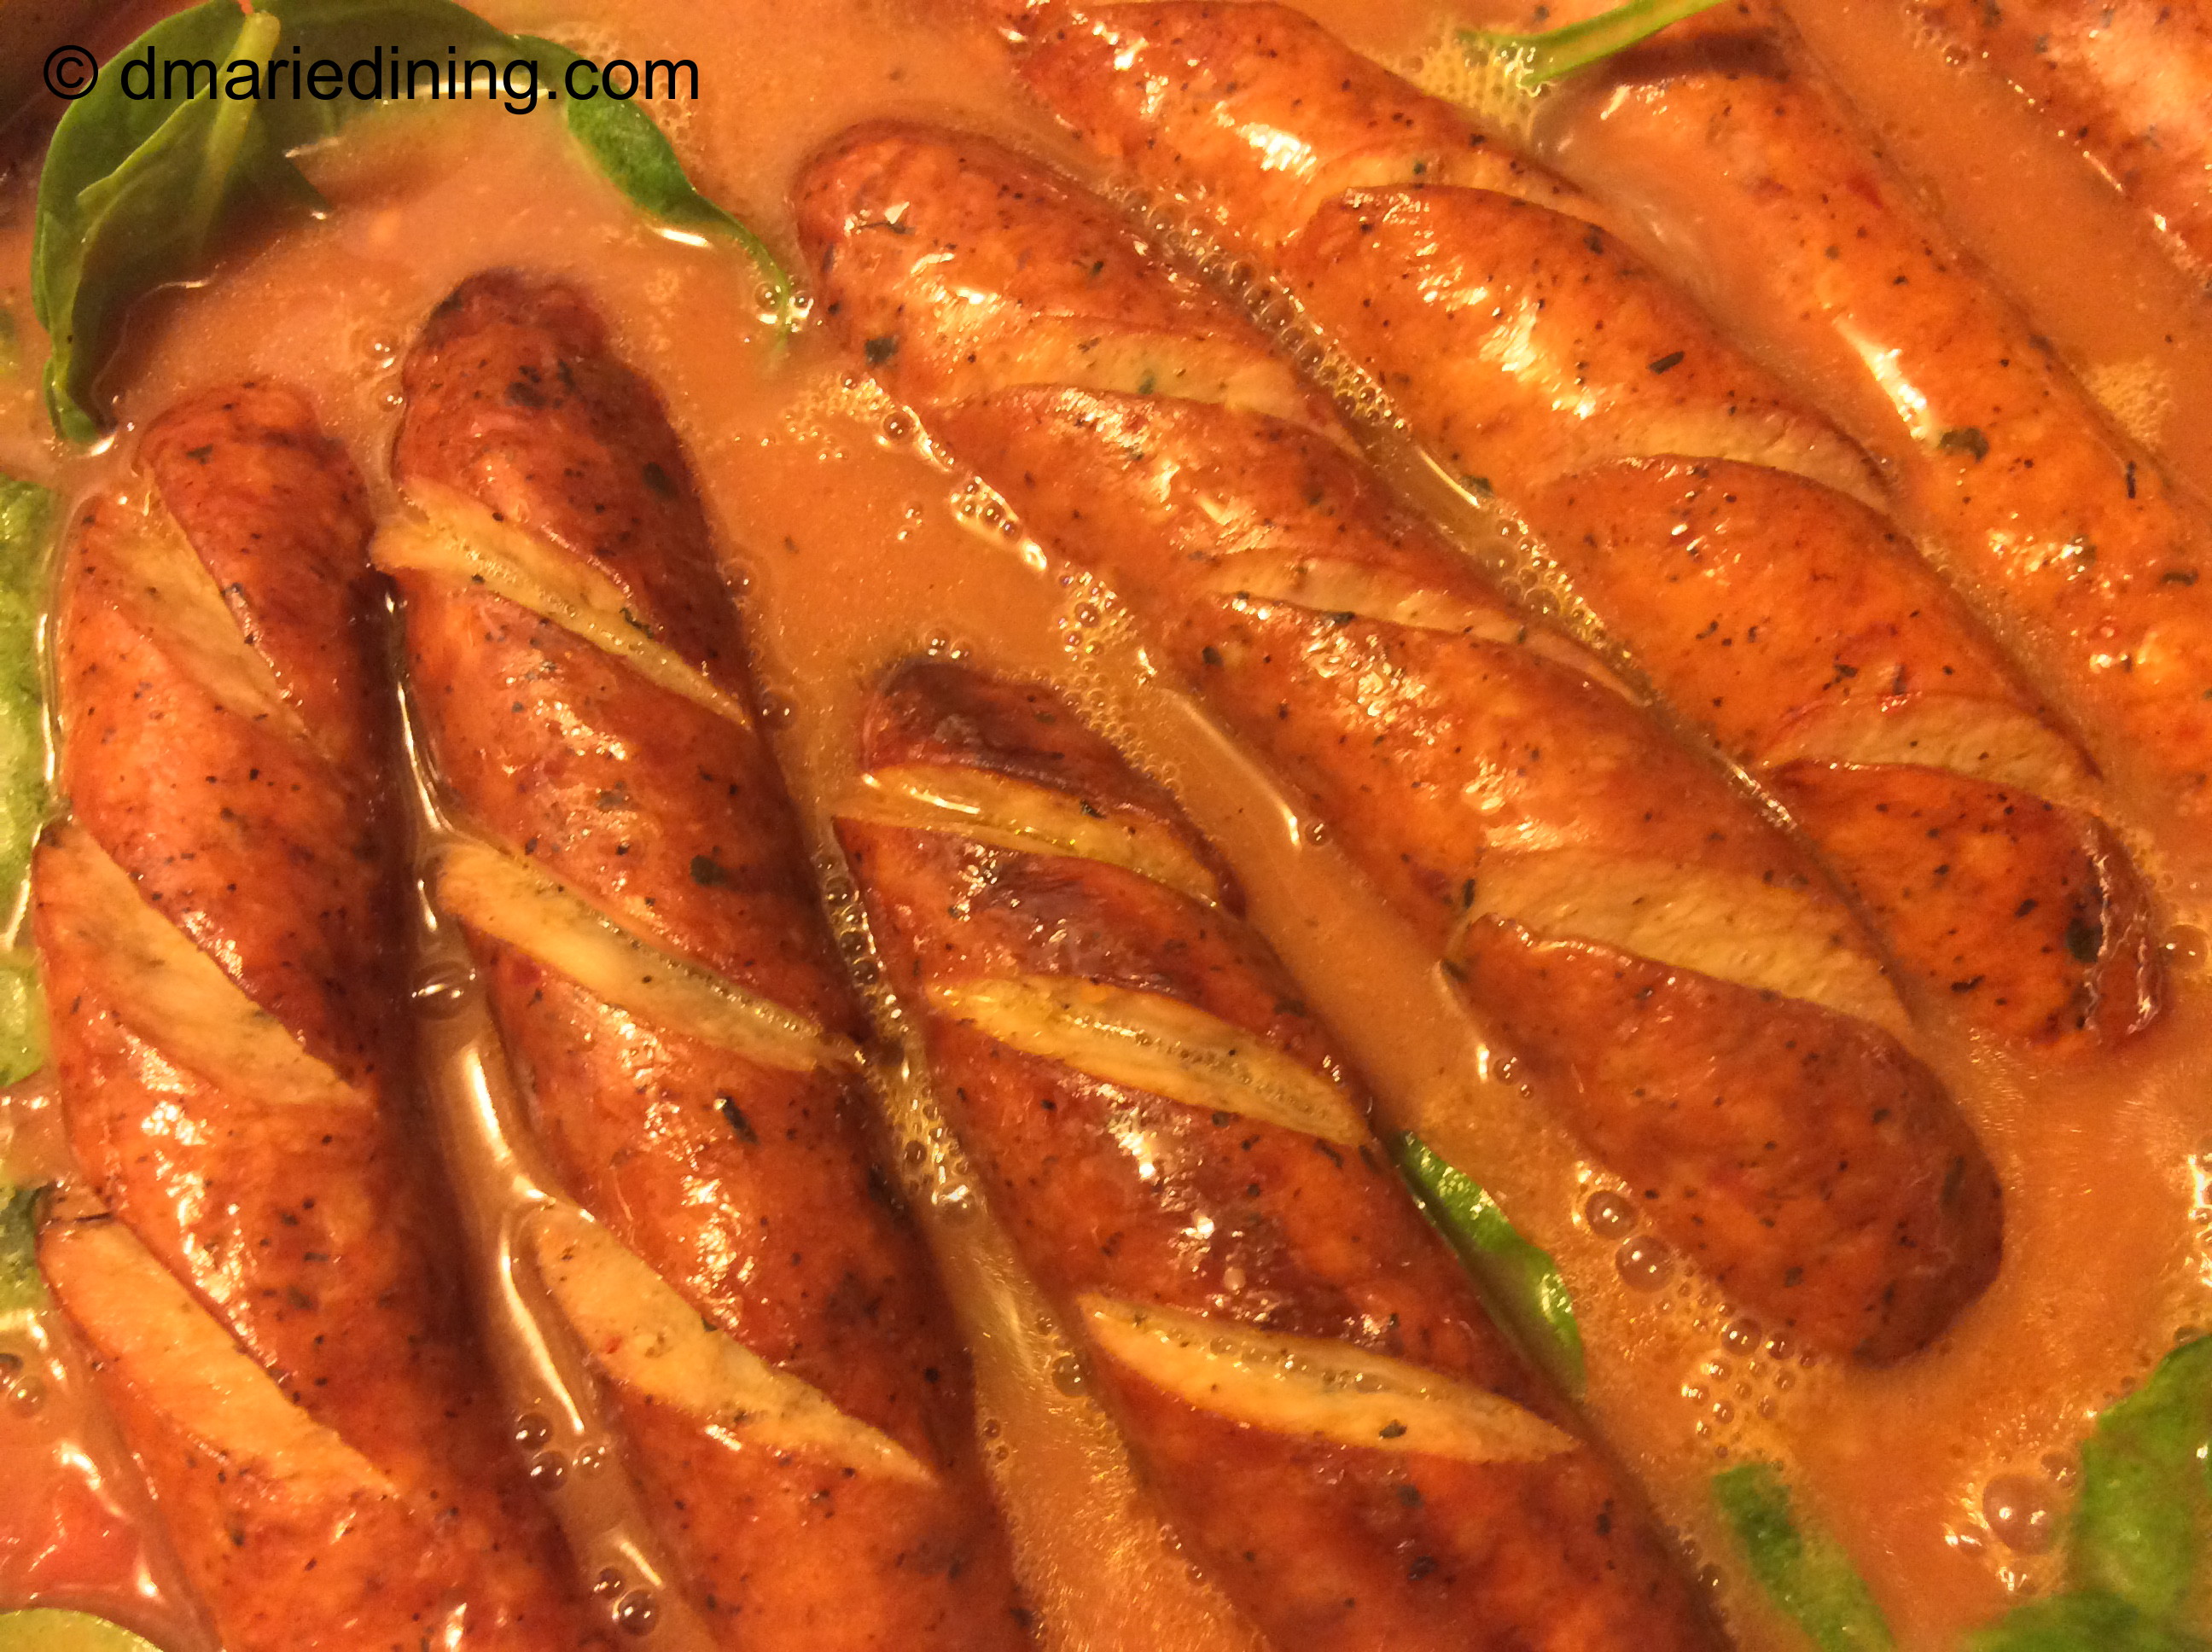
Cut a few slits in each andouille sausage link and place them on a rimmed baking sheet and cook for 15 minutes until browned. Remove from oven and set aside.

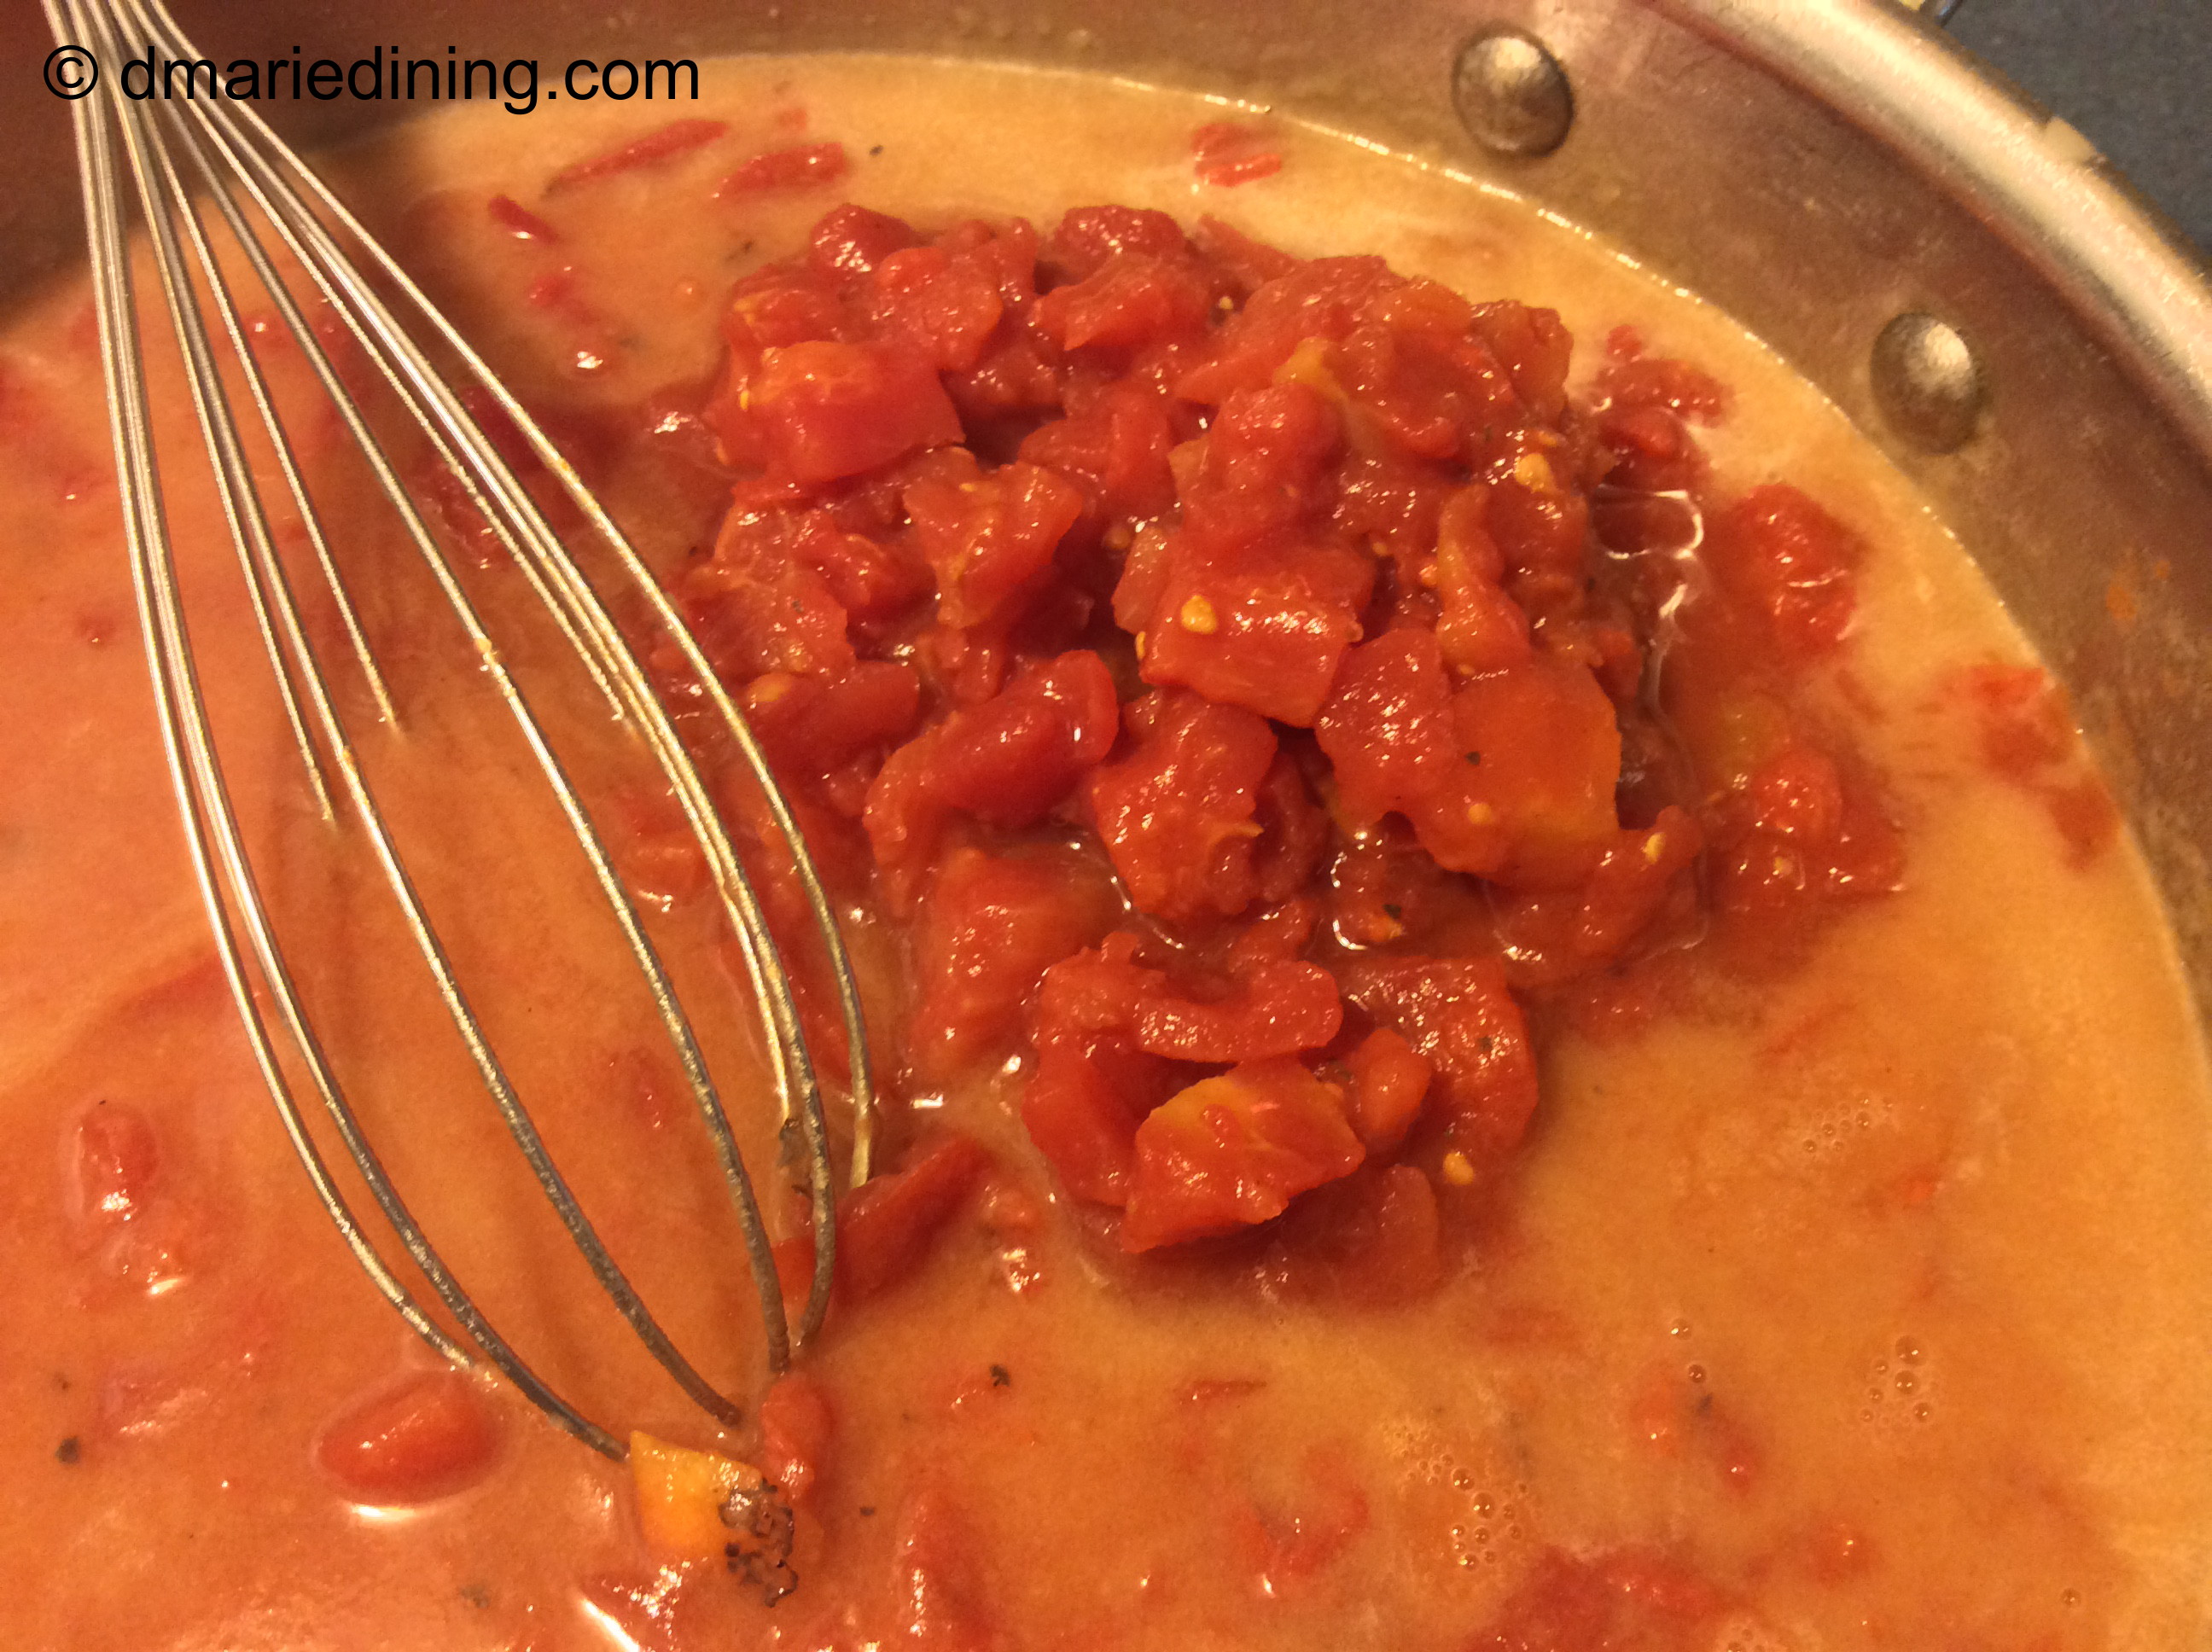
In a large frying pan add vegetable oil and flour over medium high heat. Whisk together until smooth and continue whisking until mixture turns a light cocoa brown. Be careful not to burn the rue so whisk constantly. Slowly pour in beer while continuing to whisk the rue. Add water, tomatoes and seasonings. Reduce heat to a simmer then add spinach. Stir to coat spinach with gravy then add sausage. Cook for an additional 15 minutes. Serve over curly pasta, mash potatoes or rice.

Follow my blog with Bloglovin

Chopped Salad

IMG_9670_1

Salads! A quick and light meal during warm weather. A refreshing side dish with heavier meals during cooler weather and good for you all year round. I am in salad mode which means I am into preparing some type of salad for my family almost every night for dinner. Fortunately, my family loves salads as long as I give them variety.

IMG_9669_1

It really isn’t hard to come up with new combinations of of ingredients when I create salads. However, I do have to make sure the combination of ingredients work as a salad. A few times I have had some wild salad ideas but I decided against posting them because although I like sauerkraut it just didn’t seem to work well with tomatoes, cheese and carrots.

IMG_9680_1

One of the best things about chopped salads is that chopping up everything that goes into the salad keeps it simple. The only thing I worry about is making sure there is a great combination of flavors and textures. Like the crunch of salty bacon and the smooth creamy taste of boiled eggs and avocado. Plus, lots of sweet tomatoes and just the right bite from carrots and red onions.

IMG_9699_1

There are so many options of veggies to use when making a chopped salad. If you like certain veggies and they compliment each other, go for it. Chop them up. Put them in a bowl and dress it up with a nice salad dressing. You cannot go wrong.

IMG_9703_1

Chopped Salad

 Ingredients:
2 heads of romaine chopped
2 salmon fillets blackened and flaked
6 slices crisp bacon chopped
3 boiled eggs chopped
1 avocado diced
1 cup cherry tomatoes cut in half
½ cup green or red peppers diced
½ cup shredded carrots chopped
½ cup shaved parmesan cheese
¼ cup oil based dressing
½ tsp black pepper
½ tsp seasoned salt
½ tsp red onion small diced

Combine all ingredients in a large bowl and toss gently.

Optional:
grilled chicken chopped
grilled turkey chopped
grilled shrimp

Follow my blog with Bloglovin

Grilled Chicken Salad

IMG_9840_1

Grilled Chicken Salad is another family favorite when the weather is warm and no one wants to eat a real heavy meal. Chicken of course is good any time of the year but chicken salad is one of those dishes I tend to make when I need a quick meal and I am too tired to turn on the oven or stove. I like to make Grilled Chicken Salad when my hubby is in the mood to do a lot of grilling. Grilling is his territory not mine so I take advantage whenever hubby is ready to fire it up.

IMG_9879_1

That being said the last time I made Grilled Chicken Salad for the family I didn’t wait for hubby to grill the chicken for me. Instead, I went to Trader Joe’s and purchased packaged grilled chicken which is actually very tasty with a great grilled flavor. Home grilled is wonderful but if you are short on time check out the grilled chicken at Trader Joe’s.

IMG_9889_1

Most chicken salad is just chicken and a few veggies. I kick it up another level by adding fruit. Grannie Smith apples, fennel, green grapes and golden raisins provide both a sweet and slightly sour taste to the salad. The combination of sweet and sour along with different levels of texture from the chicken, walnuts and tomatoes made this one of my signature dishes.

IMG_9893_1

To really put a smile on my family’s face I served the chicken salad on a bed of lettuce then sliced up a little brie and served it with crackers. De-li-ci-ous!

Grilled Chicken Salad

Ingredients:
2 pkgs grilled chicken cubed (approximately 2 cups)
2 boiled eggs
½ cup sliced apples
½ cup sliced fennel
½ cup chopped walnuts
½ cup cherry tomatoes sliced in half
½ cup green grapes sliced in half
¼ cup golden raisins
½ tsp salt
½ tsp cracked black pepper
½ tsp onion powder
¼ tsp dill
¼ tsp celery seed
¼ tsp cilantro
¼ tsp parsley
¼ tsp red pepper flakes
3 tbsp mayonnaise
2 tbsp ranch dressing
1 tbsp sour cream
juice from ½ a lemon

Remove yolks from boiled eggs and then chop the egg whites. Place all ingredients in a large bowl and gently mix until chicken, veggies and fruit are well coated with dressing. Chill for 30 minutes to 1 hour then serve on a bed of lettuce or with crackers.

Follow my blog with Bloglovin

Fried Spare Ribs

IMG_8569_1

Last Christmas my brother “O” insisted on making Fried Spare Ribs as an appetizer. I will admit I was skeptical for two reasons. One, because he wanted to make ribs as an appetizer prior to a big Christmas dinner. Two, because he wanted to fry the ribs. I had never heard of fried spare ribs and could not imagine what they would look like or how they would taste.

IMG_8581_1

Usually, when I fix ribs it takes hours in the oven or on the grill. I figured that frying ribs would make them tough. Well, I was wrong. I was surprised at how tender the ribs were and even more surprised at how everyone gathered in the kitchen waiting for the ribs  drooling. As fast as as the ribs came out of the pot they were gobbled up.

IMG_8583_1

Compliments to my brother “O” for giving me a new idea for ribs even if he did not share his exact recipe. Of course, since I am a decent cook it didn’t take much for me to figure out how to make my own delicious Fried Spare Ribs. I can say with confidence that once you try fried ribs you may not look at BBQ ribs the same way any more.

IMG_8573_1

Fried Spare Ribs

Ingredients:
2 pkgs baby back ribs or 1 slab of ribs cut up
4 cups vegetable oil
1 ½ cups flour
1 tbsp seasoned salt
1 tbsp black pepper
1 tbsp Adobo seasoning
1 tbsp salt
1 tbsp onion powder
1 tbsp smoked paprika

Heat oil in a large dutch oven over medium high heat until lightly smoky.

Combine flour, Adobo seasoning, onion powder, seasoned salt and paprika in a large plastic zip lock bag then shake to mix ingredients.

Season ribs with salt and black pepper. Drop 5 – 6 ribs into the plastic bag then shake to coat ribs. Shake off excess flour and gently drop ribs into hot oil. Cook for 10– 15 minutes turning ribs mid-way through cooking process. Drain on paper towels and serve immediately.

Follow my blog with Bloglovin

London Broil Salad with Crispy Fried Onions

IMG_9800_1

Steak, potatoes and salad is a hearty meal that real meat eaters love. I must admit I am a meat eater but I am not big on eating red meat. My friend Girly Girl is a true meat eater especially when it comes to beef. She loves a good steak and savors every bite. I cannot remember a time when she didn’t order some style of beef whenever we would go out to dinner. Recently, Girly Girl and I were talking about recipes and I told her I was working on a variety of salads since the weather was getting warmer and I preferred preparing lighter meals in the summer. She immediately asked if I had a steak salad. At the time I did not but Girly Girl got me to thinking about creating one.

IMG_9772_1

The elements of a good steak dinner are a tender steak (of course), sauteed onions, a baked potato and salad. Creating a salad that incorporated all of those ingredients didn’t quite work for me. So, I decided to make a basic salad that included thinly sliced pieces of London Broil instead of a hearty steak just to keep it light. Some of you might be thinking who has time to fix London Broil just to put it on a salad? I certainly don’t. It was easier to go to the deli at my local grocer. They always have delicious London Broil that is tender, cooked to perfection and full of flavor. After layering the salad with the London Broil, I topped it off with crispy fried onions.

IMG_9831_1

There were only two things missing when I finished pulling the salad together. Dressing and potatoes. To elevate the salad I drizzled a little blue cheese over the crispy fried onions then I added a small buttered baked potato on the side to make the meal complete.

IMG_9815_1

I think Girly Girl is gonna like this one.

IMG_9810_1

London Broil Salad with Crispy Fried Onions

Ingredients:
½ lb London Broil
1 – 2 heads romaine lettuce sliced
1 large onion sliced thin
1 cup panko bread crumbs
4 cups vegetable oil
½ cup cherry tomatoes sliced in half
½ cup green pepper sliced thin
½ cup flour
¼ cup milk
2 eggs
1 tsp salt
1 tsp black pepper
1 tsp Adobo seasoning (optional)
blue cheese dressing

Place sliced onion rings in a Ziploc bag. Season with salt, pepper and Adobo seasoning. Add flour and shake to coat the onion rings. In a bowl beat eggs and milk together. In a second bowl place panko bread crumbs.

Heat vegetable oil in a large pot until lightly smoking. In batches dip floured onion ring slices in egg mixture then panko bread crumbs. Shake off excess crumbs. Add to oil and cook until golden brown flipping onion rings to evenly brown. Drain on paper towels.

Layer romaine lettuce, green peppers, tomatoes and London Broil on a dinner plate. Sprinkle with onion rings then drizzle with blue cheese dressing.

Feeds 3 – 4 people.

Follow my blog with Bloglovin

Grilled Corned Beef and Pastrami Sandwiches

IMG_8726_1

I had just come back home from a 3 day business meeting when I decided I should cook dinner for my hubby and youngest son since I knew they had been eating take out while I was gone. However, I was mentally tired and did not feel like making something too complex for dinner. On my way to the grocery store I kept trying to think of a simple meal that would satisfy their tummies, be easy for me and make them remember how much they missed my cooking.

IMG_8714_1

Rolling through the grocery store doors it hit me. Sandwiches would be easy to make but they couldn’t be just any ol’ sandwiches. Grilled Corned Beef and Pastrami sounded like a good combination. I had never made them for the family but I recently discovered my hubby likes Reuben sandwiches. Who knew after all these years. I didn’t have any sauerkraut and I didn’t have the time or the energy to fix some for the sandwiches. So, I decided to use corned beef and pastrami along with pepper jack cheese, provolone cheese, Kumato tomatoes and thousand island dressing. I used Kumato tomatoes on the sandwiches only because I like the color and taste of the tomatoes. Of course any type of tomato will work.

IMG_8731_1

As I said earlier I was mentally tired so making fancy side dishes to go with the sandwiches was out of the question. To at least make the sandwiches seem really special I added a sliced deli pickle and potato chips with aged cheddar and cracked black pepper.

IMG_8755_1

Don’t let anyone tell you that sandwiches are boring when it comes to dinner. Actually, they can be pretty exciting if you remember flavor and texture are the key to any meal. The different flavors of the meats along with the contrast of flavors of the cheese mixed with the tang of the thousand island dressing put a little pizazz into my Grilled Corned Beef and Pastrami Sandwiches. Both of my men loved the sandwiches and let me know they missed me and definitely missed my cooking.

IMG_8746_1

Grilled Corned Beef and Pastrami Sandwiches

Ingredients:
6 slices sourdough bread
½ lb sliced corned beef
½ lb sliced pastrami
¼ lb pepper jack cheese sliced
¼ lb provolone cheese sliced
1 small tomato sliced thin
2 tbsp thousand island dressing
6 tsp softened butter

Spread a little thousand island dressing on one slice of bread. Top with 2 slices pepper jack cheese then slices of corned beef and pastrami. Add slices of tomato then top with two slices of provolone cheese. Place second slice of bread on top of cheese. Spread butter on one side of the bread.

Heat 2 tbsp of butter on a griddle over medium high heat. Place sandwich butter side down on heated griddle. Spread butter on other side of the bread. Flip sandwich once browned on one side. Brown second side of bread. Serve with pickles and chips.

Follow my blog with Bloglovin

Salad (Italian Sub Style)

IMG_9505_1

I was eating a small Italian sub the other day and started thinking about my promise to cut back on eating bread. As we all know, eating too many carbs is not good for you. I was feeling guilty since I had already eaten a bagel for breakfast and I was trying to limit my bread intake to once per day if at all.

IMG_9499_1

While eating my sandwich I was thinking of ways I could ditch the roll and just eat what was inside the roll. Then I thought why not turn my sandwich into a salad. Viola! I could still have the ingredients of an Italian sub but no bread. I decided to create a Salad (Italian Sub Style) with lots of romaine lettuce and a sprinkling of meats, cheeses, tomatoes and Italian seasonings. This salad can be either a nice small portioned start to a meal or a meal unto itself. Either way I think you will enjoy it.

IMG_9525_1

IMG_9543_1

Salad (Italian Sub Style)
Ingredients:
1 bunch romaine lettuce chopped
½ cup pepperoni sliced into strips
½ cup capicola sliced into strips
½ cup salami sliced into strips
½ cup cherry tomatoes cut in half
½ cup provolone cheese sliced into strips
¼ cup sweet peppers (optional)
½ tbsp parsley chopped
½ tbsp red onion chopped small (optional)
¼ cup black olives sliced
¼ cup olive oil

Seasonings:
2 tbsp Italian salad dressing
½ tbsp lemon zest
½ tbsp oregano
½ tsp onion powder
½ tbsp dill
½ tsp black pepper
½ tsp red pepper flakes
¼ tsp salt
1 tsp lemon juice

Whisk together oil, lemon juice, lemon zest, salad dressing, salt, black pepper, oregano and dill. Set aside.

Combine romaine, tomatoes, red onion, black olives, sweet peppers, meats and cheeses in a large bowl. Whisk olive oil dressing then drizzle over salad. Toss gently. Enjoy!

Follow my blog with Bloglovin

Boneless Leg of Lamb

IMG_8421_1

Boneless Leg of Lamb is one of those “special” meals I make when I find lamb on sale and I have a little extra time to prepare dinner. I like to cook the lamb low and slow which means on relatively low heat and slow in the oven to ensure the lamb gets nice and tender.

IMG_8487_1

The last time I made boneless leg of lamb was for Easter. I wanted something other than the traditional ham we usually have each year and everyone seemed on board for a change of menu. That was my first hurdle. The second hurdle turned out to be browning the lamb. I idea was for me to brown the lamb in my dutch oven then saute the veggies in the same pot to infuse the flavor of the lamb into the veggies. Well, when I placed the lamb in the dutch oven the hot oil sloshed up onto my wrist and burned me. No worries. After I finished screaming and running cool water over the burn I finished browning the lamb and kept on cooking.

IMG_8476_1

Needless to say I was determined that my boneless leg of lamb would be a success since I had suffered for the “art” of cooking. I was not disappointed and neither was the family. Everyone enjoyed the meal and the celebration of renewed life as dictated by the day. I even added to our old family tradition by preparing lamb instead of ham. Next year I think we will have both!

IMG_8484_1

Boneless Leg of Lamb

Ingredients:
1 boneless leg of lamb
1 large onion sliced
1 pint mushrooms whole or sliced
1 bottle good beer
1 cup water
¼ cup vegetable oil
1 tbsp salt
1 tbsp black pepper
1 tbsp garlic powder
1 tsp ground ginger
1 tsp thyme
smoked paprika

Preheat oven to 350 degrees.

Heat oil in a dutch oven over medium high heat until slightly smoky.

Season lamb with all seasonings then gently place in hot oil. Brown leg of lamb on both sides. Remove from dutch oven and set aside. Add onions and mushrooms to dutch oven and sprinkle with a little salt and pepper. Stir veggies and let them brown a little. Add beer and water to deglaze the pot. Return leg of lamb to the pot and place in the oven. Baste the lamb every 15 minutes for the first hour then every 30 minutes the next hour. Remove lamb the oven and dutch oven. Let rest for 10 minutes. Slice or shred lamb and enjoy.

Optional:
Make a light gravy with the broth from the lamb or use a jar of beef bistro jus.

Follow my blog with Bloglovin

Chili Nachos

IMG_8377_1

Get ready to get messy and grab a fork! I just made chili nachos and they were wonderful. I first made Tex-Mex chili using ground turkey instead of beef but feel free to use any meat you prefer to make chili. I liked the idea of a Tex-Mex chili because the flavors are bolder (in my opinion) than regular chili. Because I planned to use the chili as a topping for nachos I did not add all of the veggies I sometimes use in my chili. I kept this one simple by using only onions instead of adding various peppers and shredded carrots.

IMG_8381_1

Long ago I made all kinds of nacho dishes for the family usually when I was fixed for time to get dinner on the table. I would search the refrigerator for leftovers I could use as a topping for nachos that would not make my hubby and kids look at me like I had two heads.

IMG_8391_1

The idea of combining chili and nachos came to mind while watching a food show about restaurants and their specialties. There was one restaurant that served chili nachos but piled so much stuff on the nachos that you forgot there were nachos some where in the giant mound of food sitting on the table. I liked the concept but not all of the stuff!

IMG_8403_1

Chili Nachos are made to be messy as I said in the beginning. So, if nobody is looking, you can eat them with your fingers. Just let the juices and cheese drip down your fingers. If you aren’t into flavorful fingers, grab a fork and scoop up the chili and nachos without missing a drop. I personally like eating chili and nachos using both my fingers and a fork to make sure I don’t miss anything on my plate … or fingers!

IMG_8399_1

Chili Nachos

Ingredients:

Chili:
2 lbs ground turkey
1 15 oz can black beans (undrained)
1 15 oz can small white beans (undrained)
1 15 oz can small kidney beans (undrained)
1 15 oz can fire roasted tomatoes
1 small can tomato paste
1 pkg Tex Mex chili seasoning
½ onion diced
½ cup water
1 tbsp worcestershire sauce
½ tbsp salt
½ tbsp black pepper
½ tbsp Adobo seasoning
½ tbsp cilantro
½ tsp nutmeg
10 dashes hot sauce

Nachos/ Toppings:
1 bag Tostitos Nacho Chips
2 plum tomatoes seeded and sliced into strips
1 small pkg Velveeta cheese cubed1 small jar salsa (hot or mild)
1 small jar sliced jalapeno peppers
1 avocado sliced
½ cup shredded cheddar or Monterey Jack cheese
¼ cup sliced olives

Preheat oven to 300 degrees.

Season turkey with salt, pepper and worcestershire sauce over medium high heat and drain. Add beans, remaining seasonings, hot sauce, fired roasted tomatoes and water to a large pot. Let simmer over medium heat for 10 minutes. Add browned turkey to the pot and stir. Simmer and additional 15 minutes.

Add cubed Velveeta cheese and ½ cup of salsa to a microwave safe bowl. Place in microwave for 2 minutes then stir to mix salsa and cheese. Microwave for an additional 1 ½ minutes until bubbly.

Layer an aluminum pie tin or an oven safe plate with nacho chips. Using a slotted spoon scoop chili over nachos then layer with Velveeta mixture. Add a little more chili, jalapeno peppers, fresh tomatoes, olives and shredded cheese. Place in oven until cheese melts. Top with sliced avocados.


Follow my blog with Bloglovin

Eggplant, Tomatoes and Onions with Pea Shoots on Flatbread

IMG_8776_1

Working with flatbreads is one of my new adventures. I came up with a few recipes that I am trying out on my lovely taste testers. The first one I pulled together was eggplant, tomatoes and onions with pea shoots. I know. Who ever heard of pea shoots. I had never heard of them until I was perusing the fresh vegetables at Trader Joe’s. I am always interested in trying out new veggies and figuring out how I can use them in a recipe. I originally thought I would use spinach or even watercress but the pea shoots caught my eye and I had a second thought. Why not use them on the flatbread!

IMG_8782_1

Because roasting veggies makes them soft I wanted to have another level of texture on the flatbreads. The pea shoots added just the right amount of crunch to go with the roasted eggplant, tomatoes and onions. Plus, the pea shoots have a nice flavor too. They have the subtle “sweet taste of spring peas” just like it says on the package. I will definitely be adding pea shoots to some other recipe in the future.

IMG_8798_1

Getting back to flatbreads, I find it is really just a fancy way of saying pizza. Although when I was researching information about flatbreads, there really is a difference between the two. Flatbreads are thin and made from unleavened dough and pizzas can be be thin or thick and are made with yeast so it rises. What is confusing is that I have seen on restaurant menus the description of flatbread pizzas which means they are just thin flat pizzas with yeast somewhere in the mix.

IMG_8808_1

I am keeping it simple and calling this a flatbread dish based on what it said on the package I purchased. No matter what you call it the taste will be delicious. If your creation works out the way mine did you may have to make two because the family will keep coming back for more.

IMG_8818_1

IMG_8824_1

Eggplant, Tomatoes and Onions with Pea Shoots on Flatbread

Ingredients:
1 14oz flatbread (Trader Joe’s Rustic Ciabatta Flatbread)
1 medium eggplant sliced (skin on)
1 medium onion sliced thin
2 Kumata tomatoes sliced
2 Roma tomatoes sliced
1 1/2 cups shredded mozzarella cheese
1 cup organic pea shoots
1 tbsp lemon juice
2 tbsp balsamic vinegar
4 tbsp olive oil
1 tsp salt
1 tsp black pepper
½ tsp red pepper flakes
½ tsp basil
½ tsp oregano
cooking spray

Preheat oven to 400 degrees.

Toss together pea shoots, a pinch of salt, balsamic vinegar and lemon juice in a bowl and set aside.

Spray a rimmed baking sheet with cooking spray. Layer eggplant, tomatoes and onions on a the baking sheet. Drizzle olive oil over veggies then sprinkle with salt and black pepper. Roast until veggies are soft and browned for approximately 25 – 30 minutes. Toss the veggies mid-way through cooking to make sure all of the veggies brown.

Place flatbread on a cookie sheet and brush with olive oil then sprinkle with ½ cup of mozzarella. Spread eggplant, tomato and onions over the flatbread then sprinkle with red pepper flakes. Top with remaining cheese then sprinkle oregano and basil over cheese. Bake for 12 – 15 minutes until cheese melts and turns slightly brown. Let cool for a few minutes then cut with a pizza slicer. Top with pea shoots and enjoy.

Follow my blog with Bloglovin